Online Gym Registration Form simplifies fitness enrollment, offering a user-friendly digital experience through the RegistrationMagic plugin on WordPress. Transforming your gym registration process into a seamless digital experience is a strategic move. This guide explores the creation of an online gym registration form using the RegistrationMagic plugin in WordPress. With the powerful features of RegistrationMagic, designing a user-friendly and efficient registration form tailored to your gym’s needs becomes a hassle-free endeavor. Say goodbye to paperwork and welcome the convenience of digital registration for your fitness enthusiasts.
How to Create an Online Gym Registration Form?
Before going ahead make sure to ‘Install’ and ‘Activate’ RegistrationMagic plugin on your website using this link.
RegistrationMagic stands out as the ultimate tool for crafting user-friendly gym membership registration forms. Offering seamless form creation, it excels not only in design but also in form management and analytics. This versatile plugin empowers you to customize forms limitlessly, from event registrations to admission forms, delivering unparalleled flexibility and ease of use.
Try RegistrationMagic for Free.
Online Gym Registration Form: A Sample
Given the simplicity and customization ease of most online gym registration forms, we’ve prepared a gym membership form sample to guide you. We aim to offer insight into the fields you might consider when creating your unique form.
The fields used in this form are:
- First name and Last name
- Mobile Number
- Address
- Occupation
- Age
- Gender
- Photo Upload
- Signature Upload
- Text areas to enter descriptive details
A basic sample of a single-page gym registration form –

Discover a straightforward online gym registration form encompassing essential fields for efficient gym management. In this guide, we’ll lead you through creating a multipage form, offering a more elaborate and systematic approach to collecting information.
Steps to create a multipage gym registration form
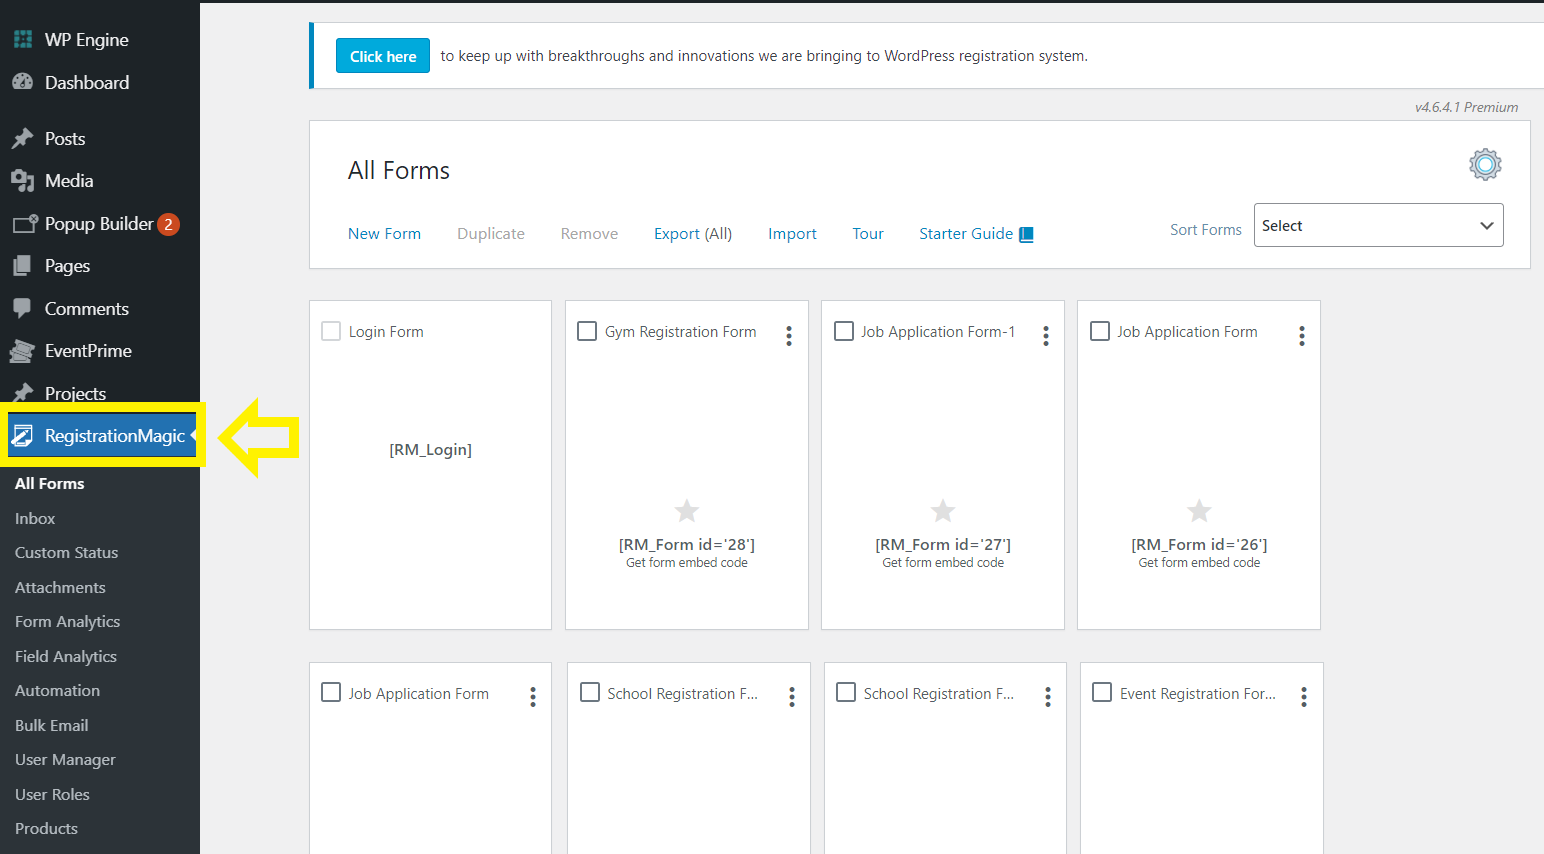
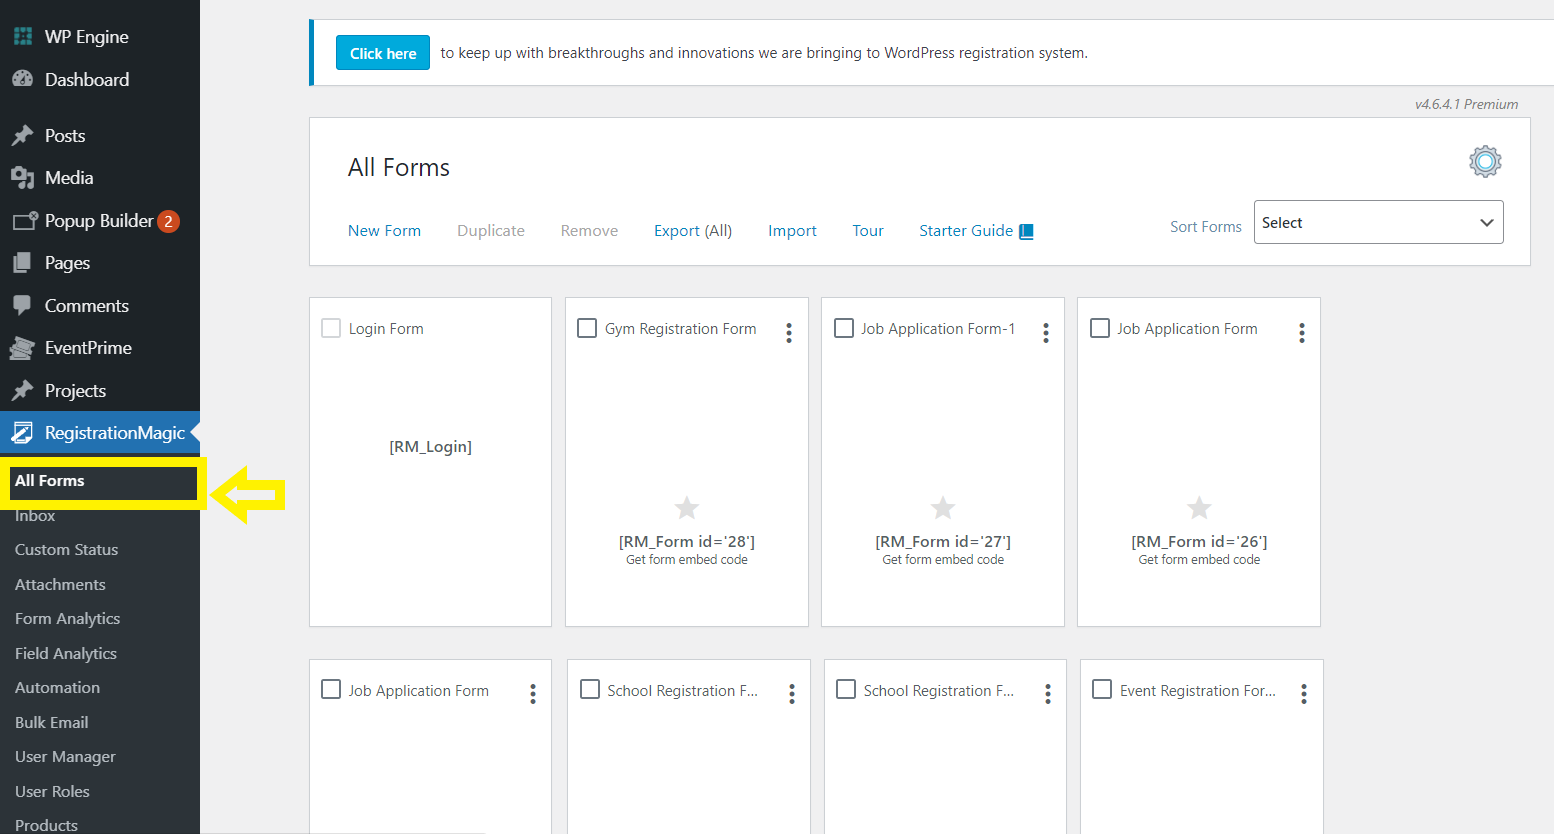
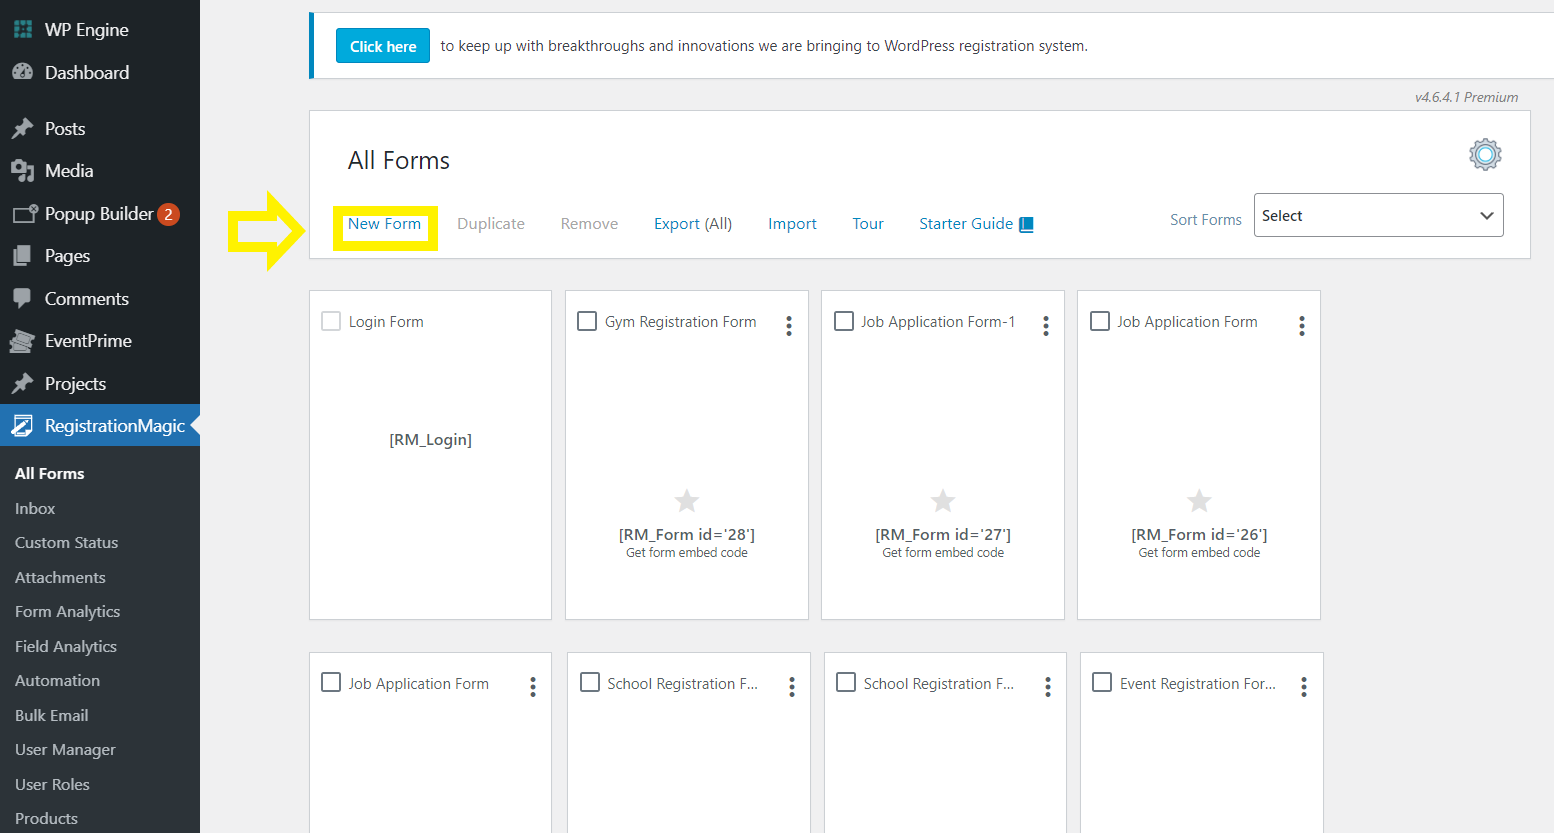
Step 1: Adding a new form using RegistrationMagic.
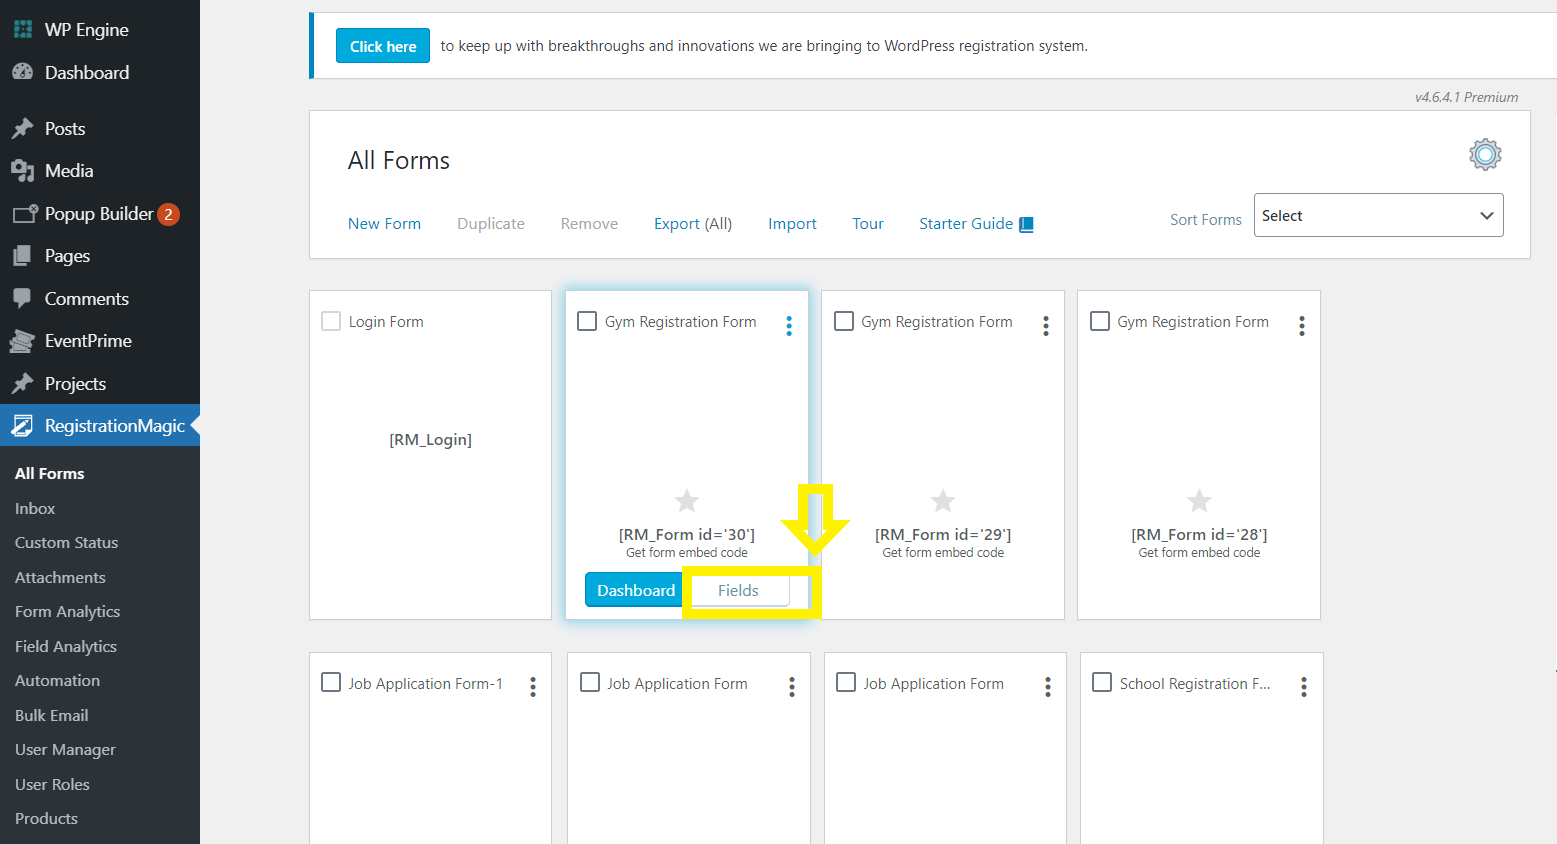
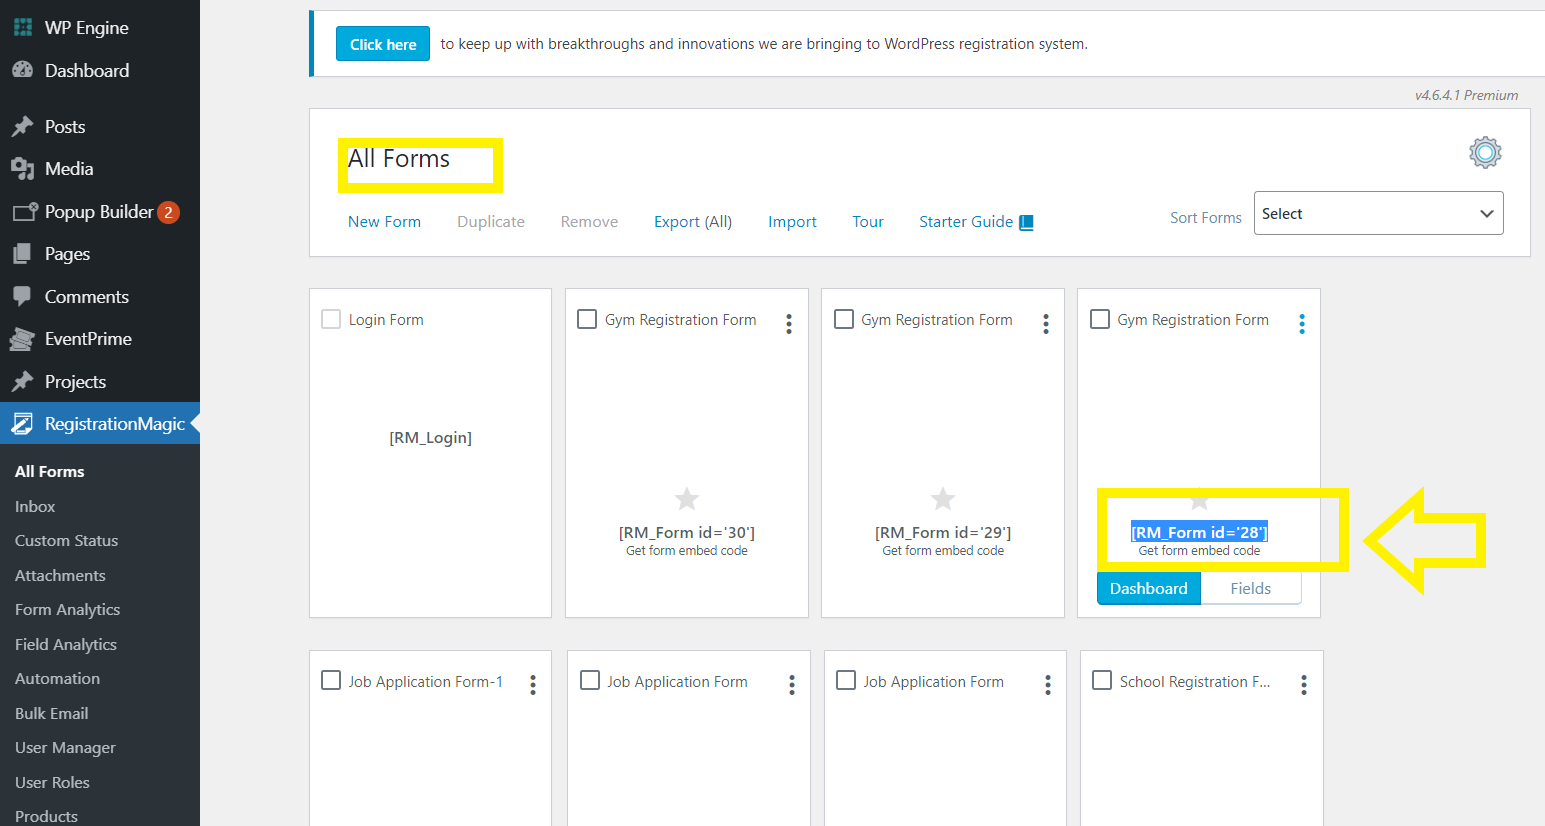
- First, click on the RegistrationMagic plugin and click on “All Forms“.
- Next, click on “New Form” to create a new online gym registration form.
Step 2: Adding a new name for the form.
- In the window that says “Create New Form“, add a title for your form.
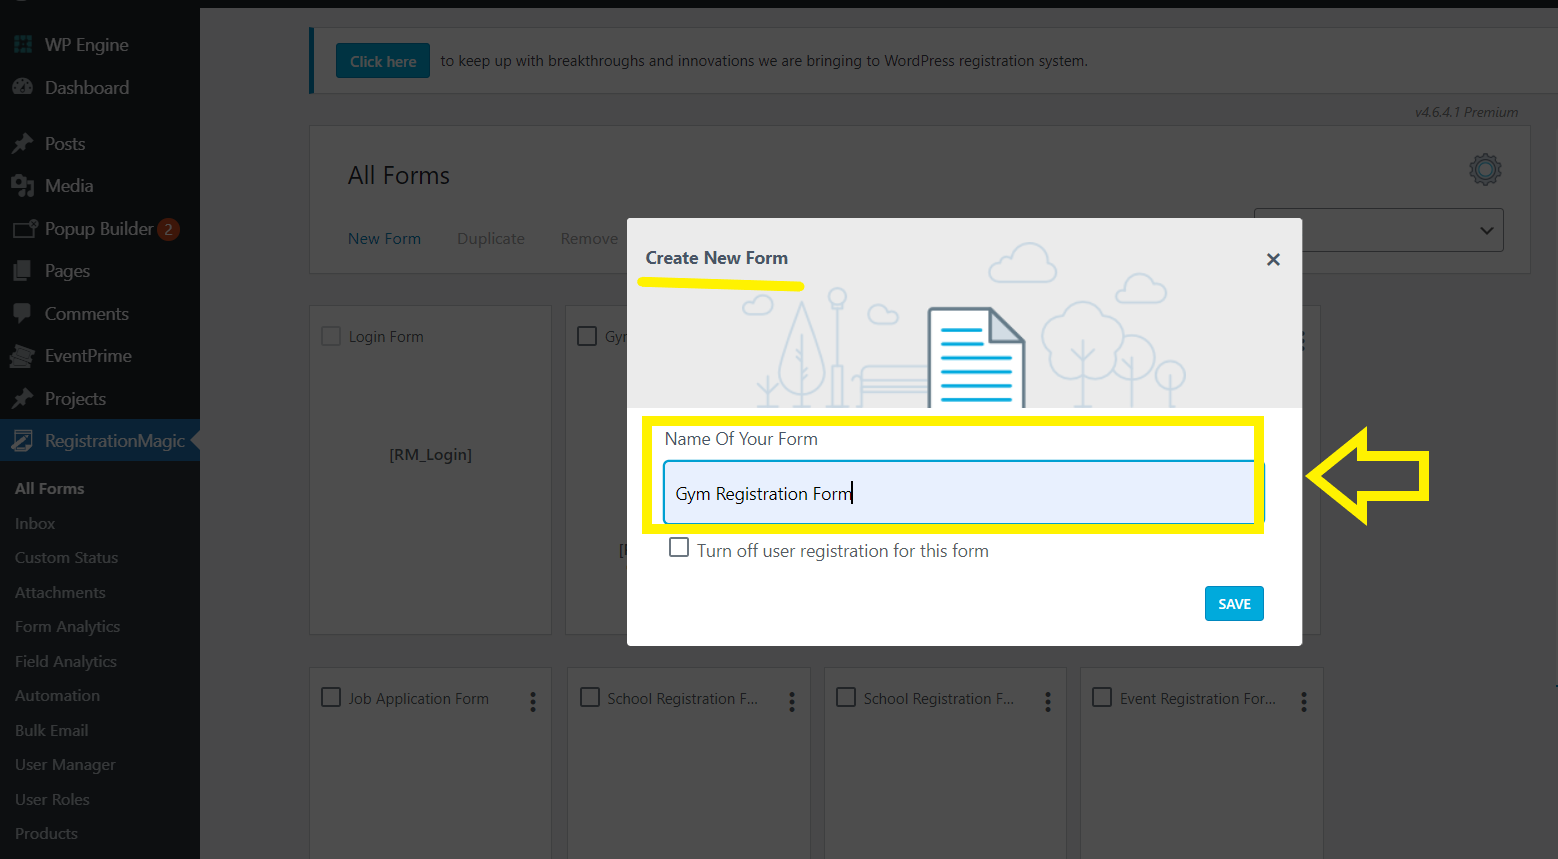
- Since we are creating a layout for people seeking gym memberships, name the form “Gym Registration Form“.
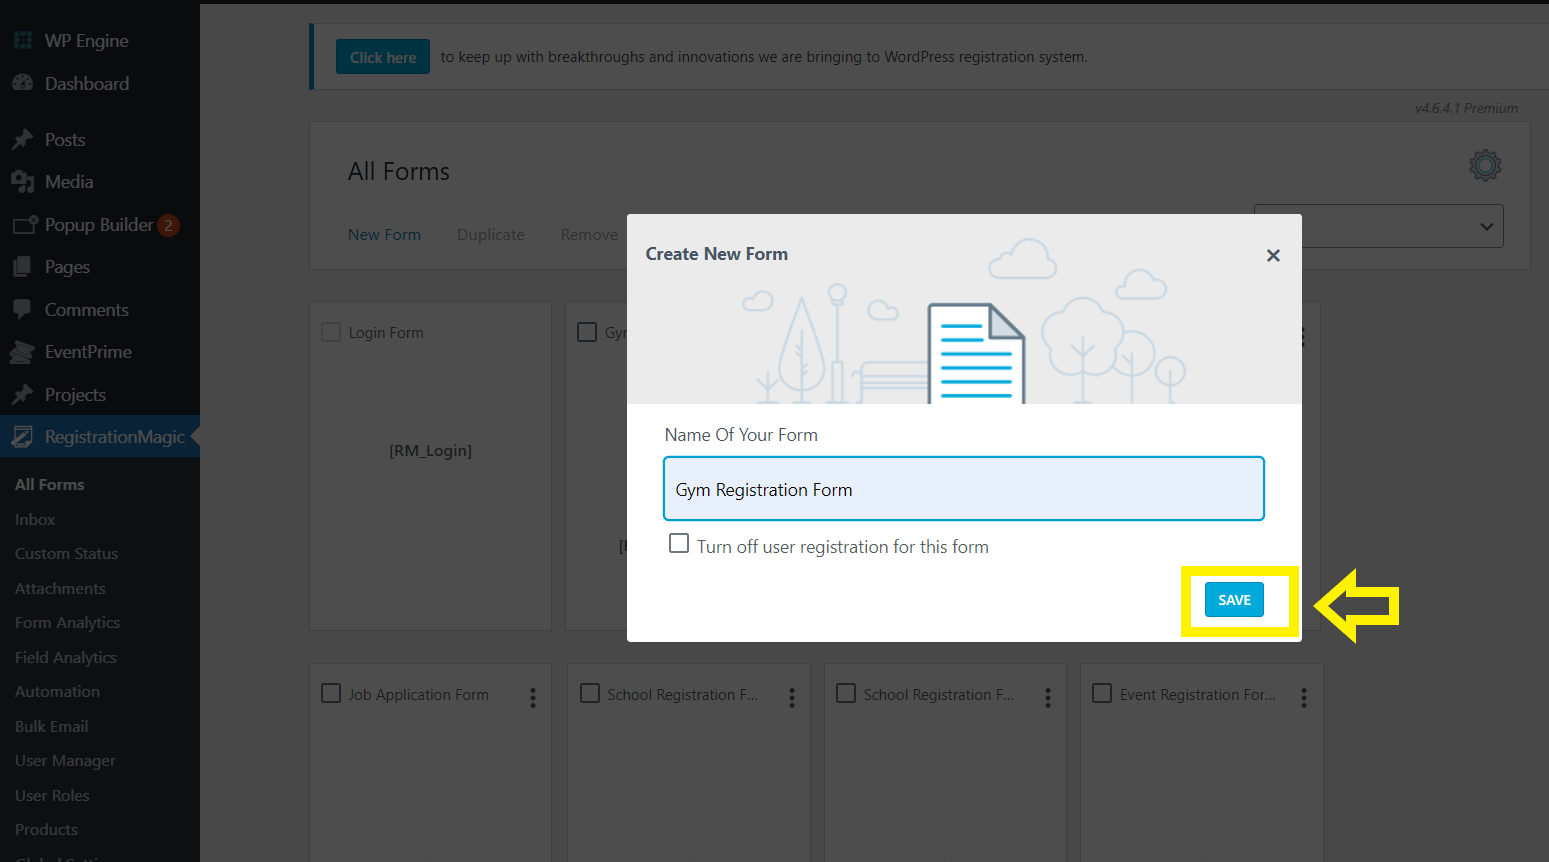
- The next step is to save the name to create the form.
- The next step is to add fields to the form. First, we’ll navigate through the steps of adding multiple pages and adjusting their labels. Why is this important? It provides clarity; labeling and organizing pages will help you strategically place specific fields across various pages.
Step 3: How to add pages to the form and label them
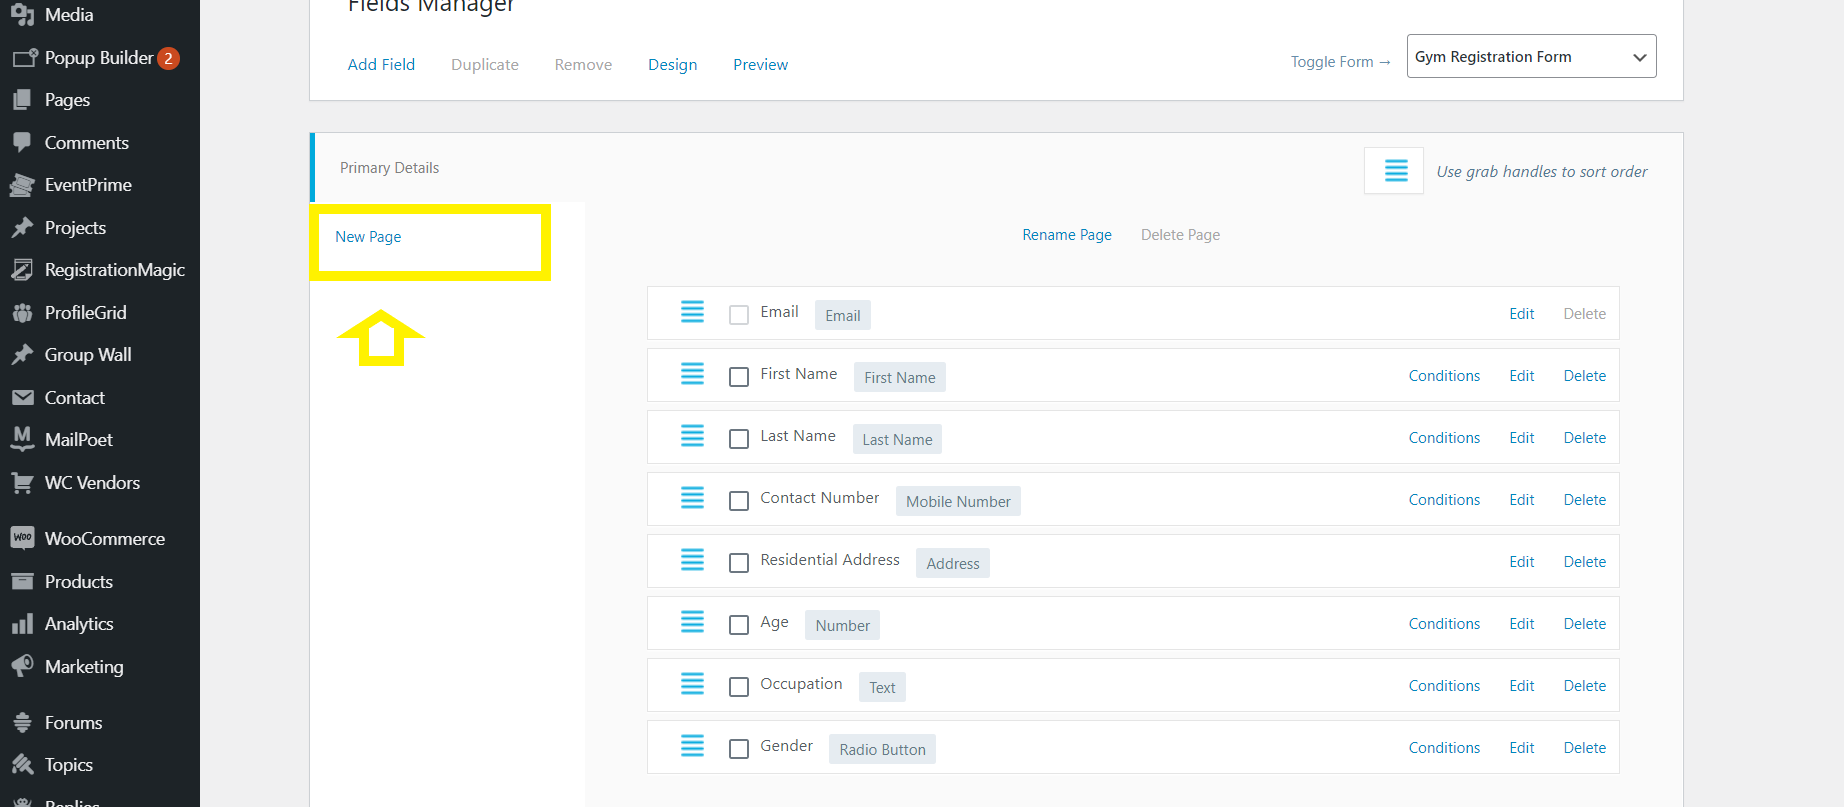
- Click on “Fields” on the form and a new window with a few default fields will open.

- Similarly, on the left-hand panel of the fields window, click on the “New Page” option.
- This will add a new page to your online gym registration form.
- Now, repeat the same process of adding pages to the form till you make a detailed and well-structured form.
Step 4: Add the fields to your gym registration form.
Since your form has multiple pages, that are now categorized, you can add fields to them.
-
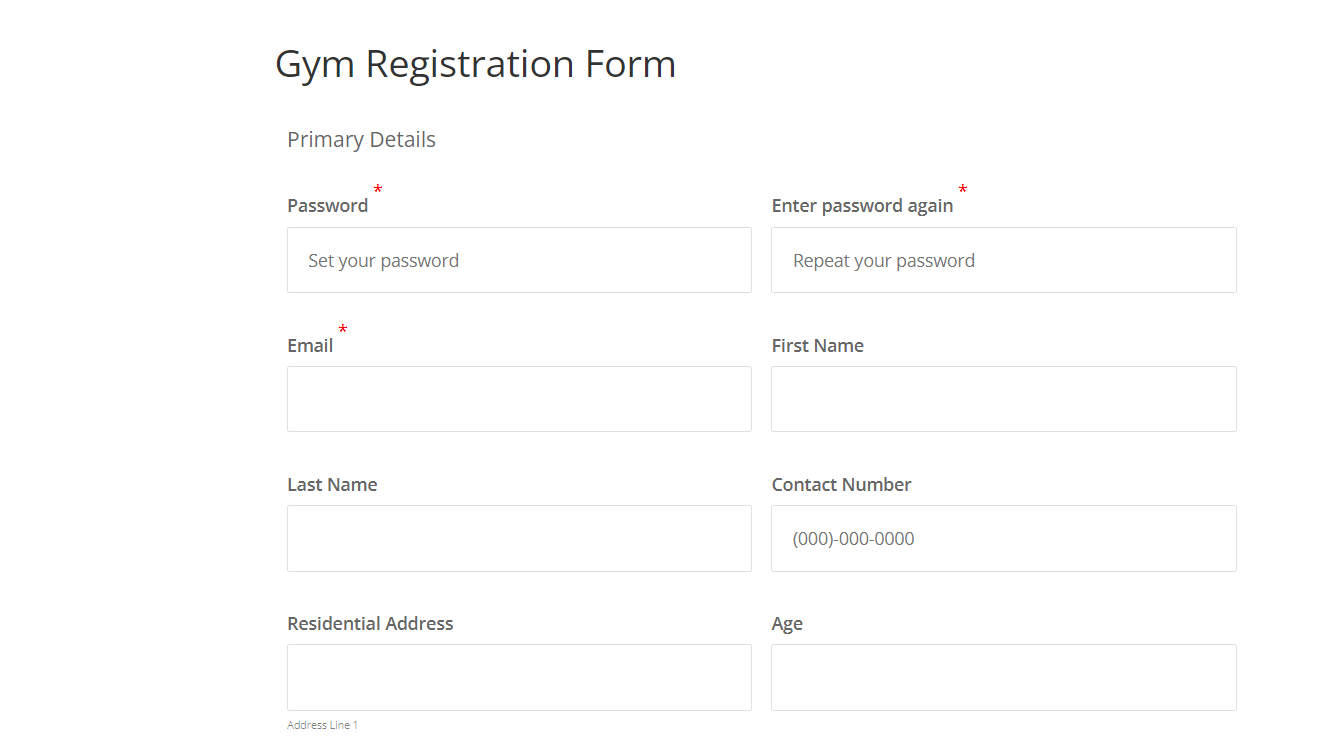
Page 1: Primary Details
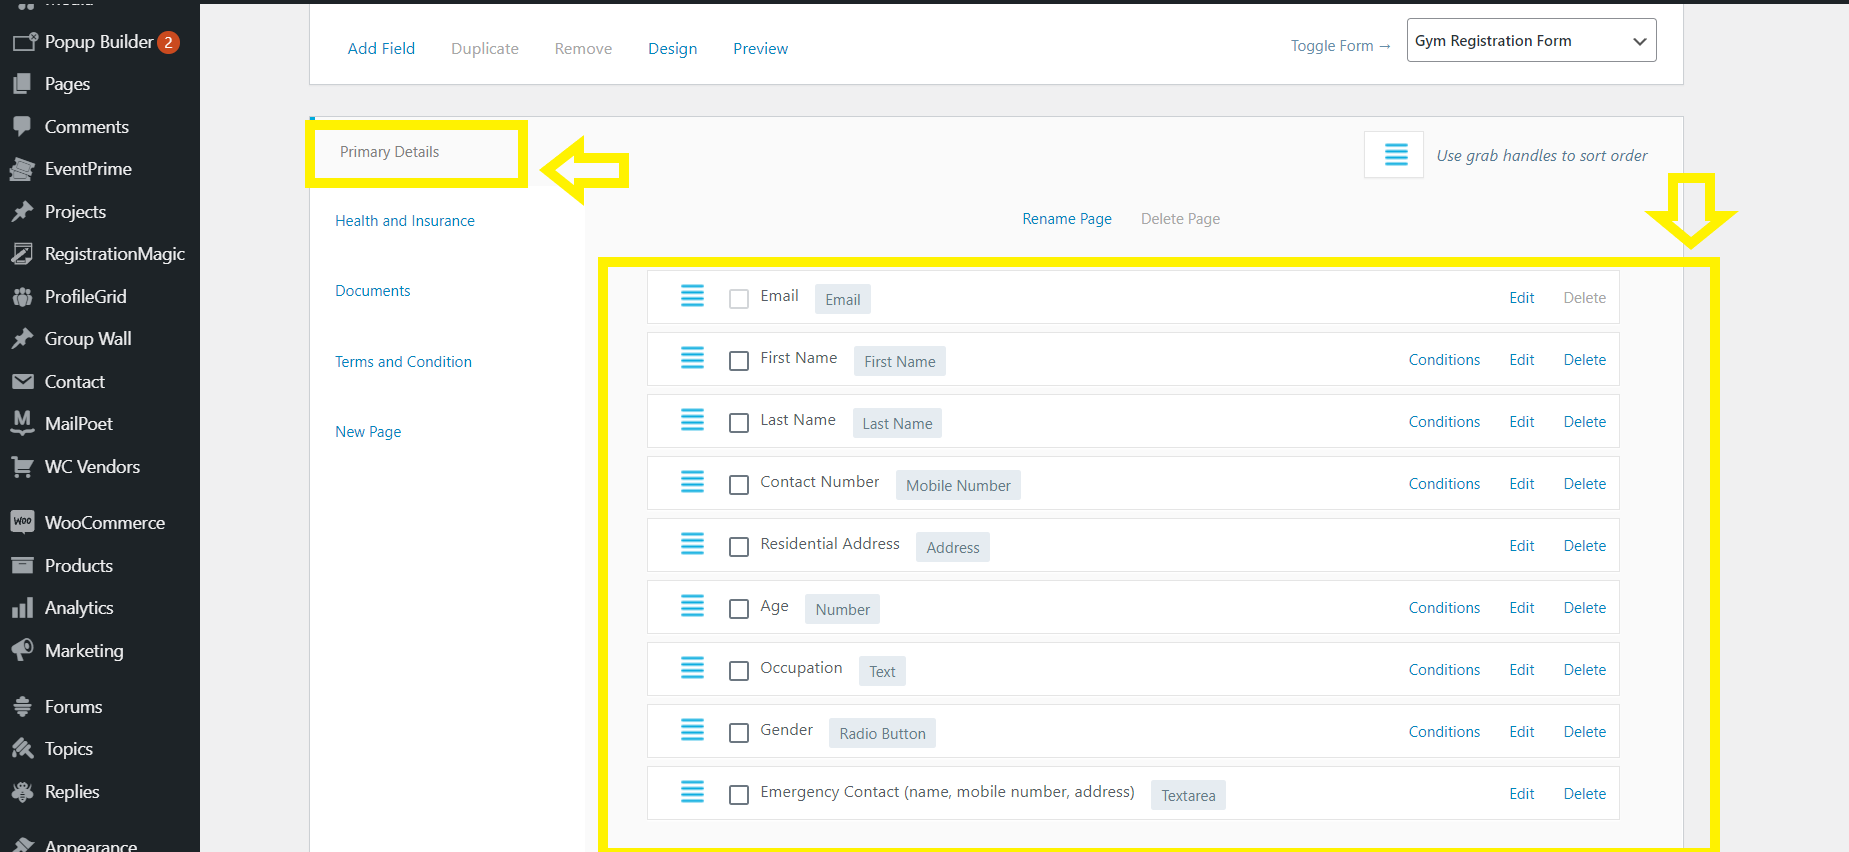
First name
The first name field, as the name suggests, is used to enter the first name of anyone filling this form.
Last name
Similarly, the last name field is used to fill in the last name of anyone who is filling out the form.
Radio button
The radio button is a field that allows a user to select only one option at a time. On this page, we have used a radio button to denote the “Gender” field.
In this. the client filling out the form has to select their gender.
Number field
The number field here is used to add age.
Email is a field that you do not have to add to the form. There are a few fields that are already present in the layout by default. However, the option of keeping or removing the field lies entirely with you.
This field is used to document the official email ID of a client. Ideally, the email ID provided is used for further communication with the client or to send notifications.
If the user is already registered on your website, then the email ID will be automatically detected by this field. In such a case, the applicant doesn’t have to re-enter the email and can move on further with other fields.
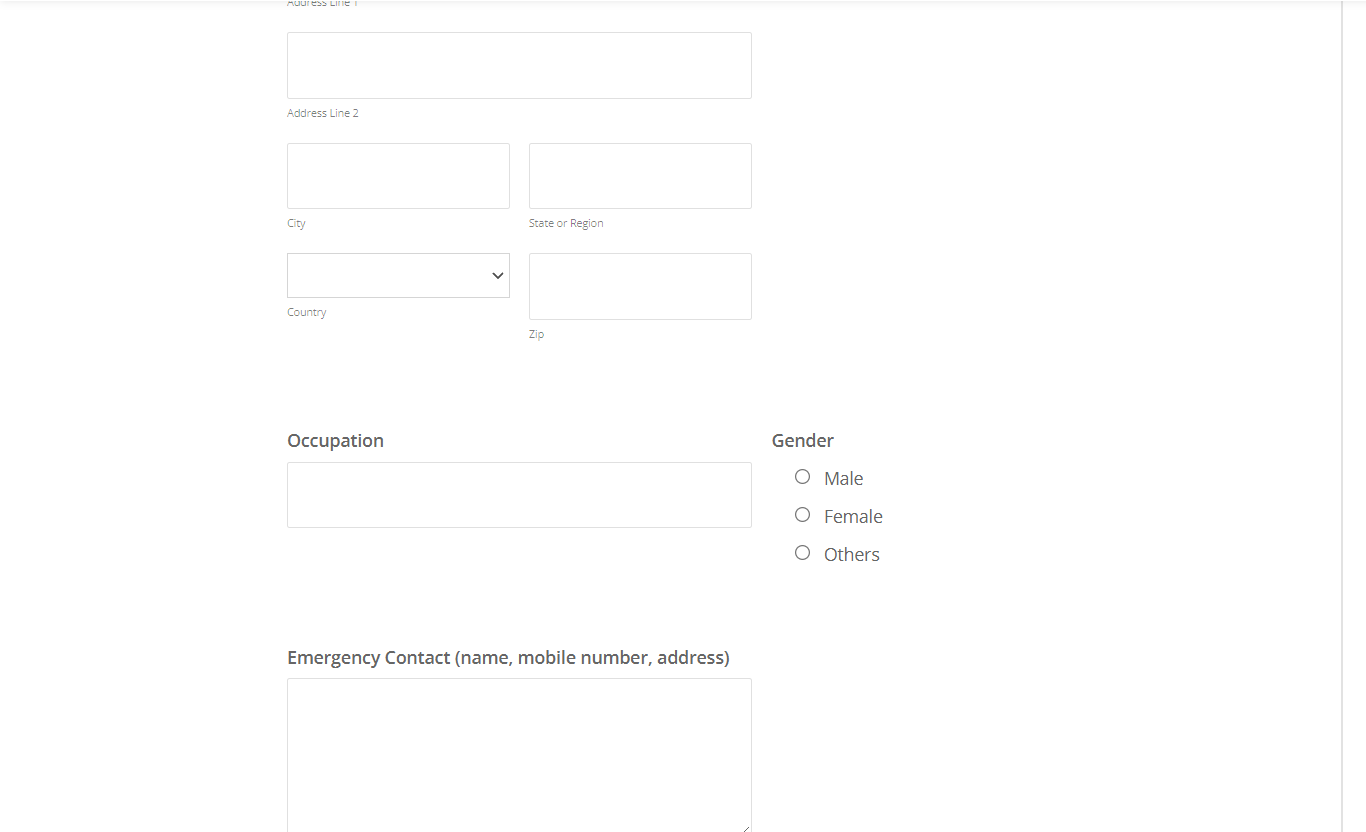
Address
The address field is quite an elaborate field that contains all the information about a client’s current address. From required address lines to filling in county and zip codes, this field stores all the necessary fields.
The “Regular” format of this field allows the user to fill in their address details manually.
Moreover, the plugin is integrated with Google Maps and hence if you choose auto-detection of location by Google Maps, the address field will automatically detect the location of the client with its pinpointer.
There are a few things you will need to know more about this field
- The eye symbol denotes the visibility of the field, If the eye is crossed, the field will not be visible on the user end.
- The checkbox next to “Required” under the field box determines whether you want a compulsory field or not. If the box is checked, a red “*” sign will be visible on the label of the field. Without filling in this information, the client cannot switch to another page on the form.
Mobile number
Mobile number is a field where a client provides their contact detail. This field can be synced with the country field present in the address field.
Syncing the contact with the country field will determine the country code automatically so that the process becomes easier at the user’s end.
Text
The text area helps the client add a piece of small text information as required for the form. The text area field is used to enter Occupation on this form page.
Text area
The text area helps the client to fill in as much text as required of all sorts for completing the form and to add extra information.
-
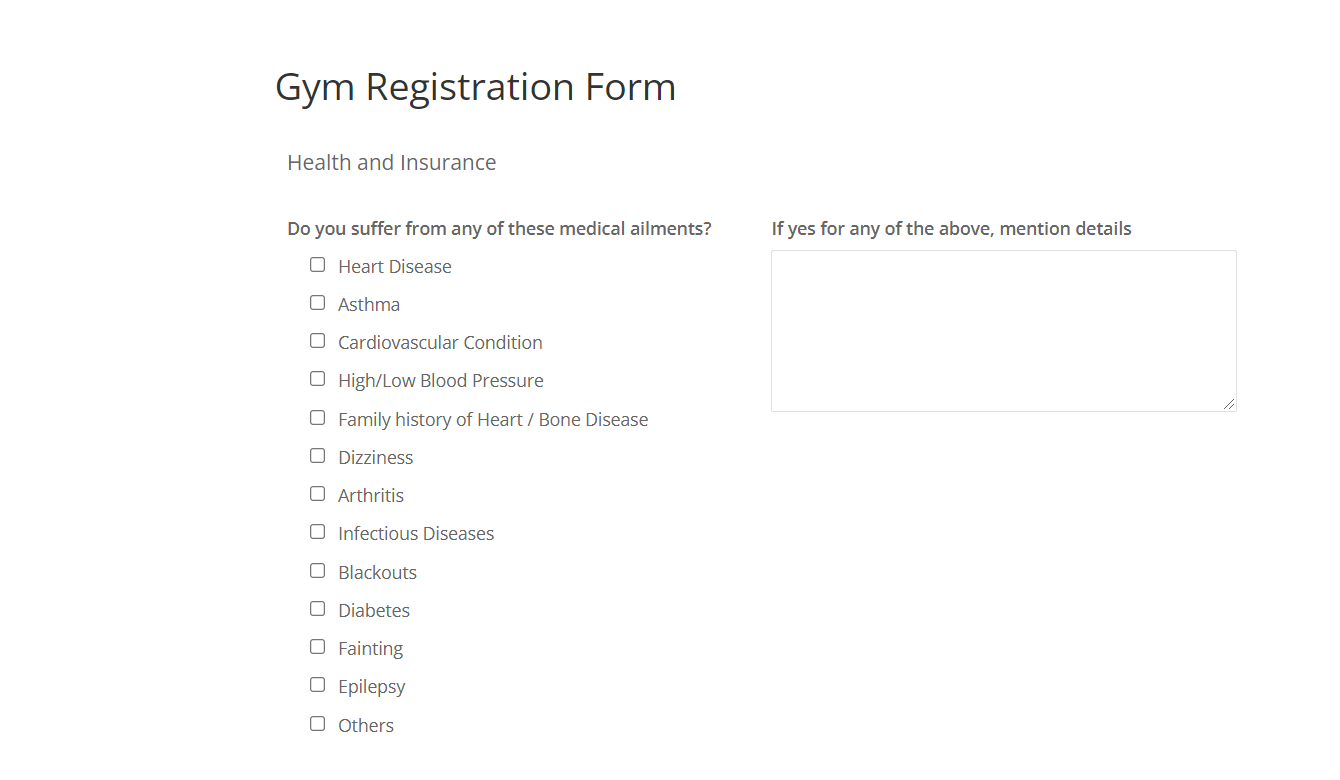
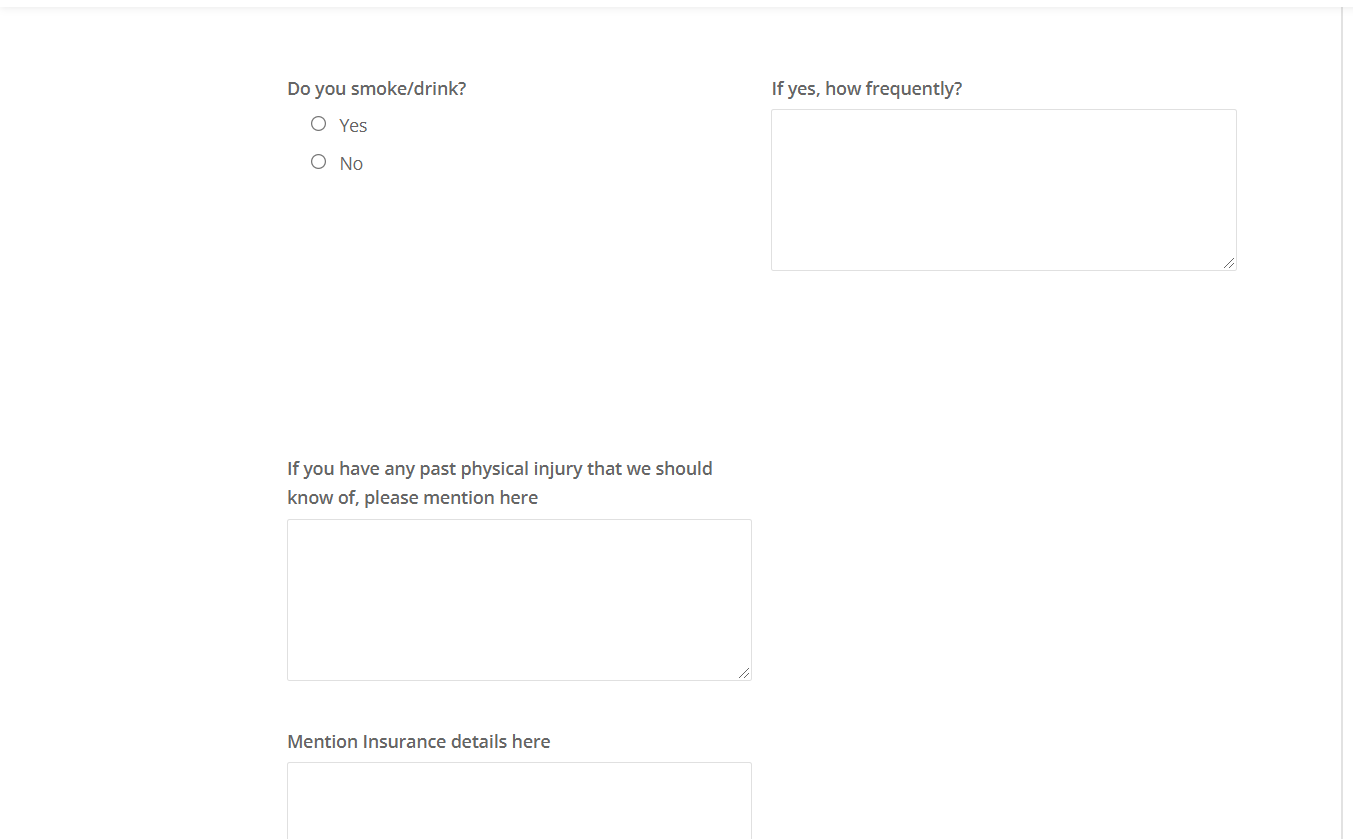
Page 2: Health and Insurance
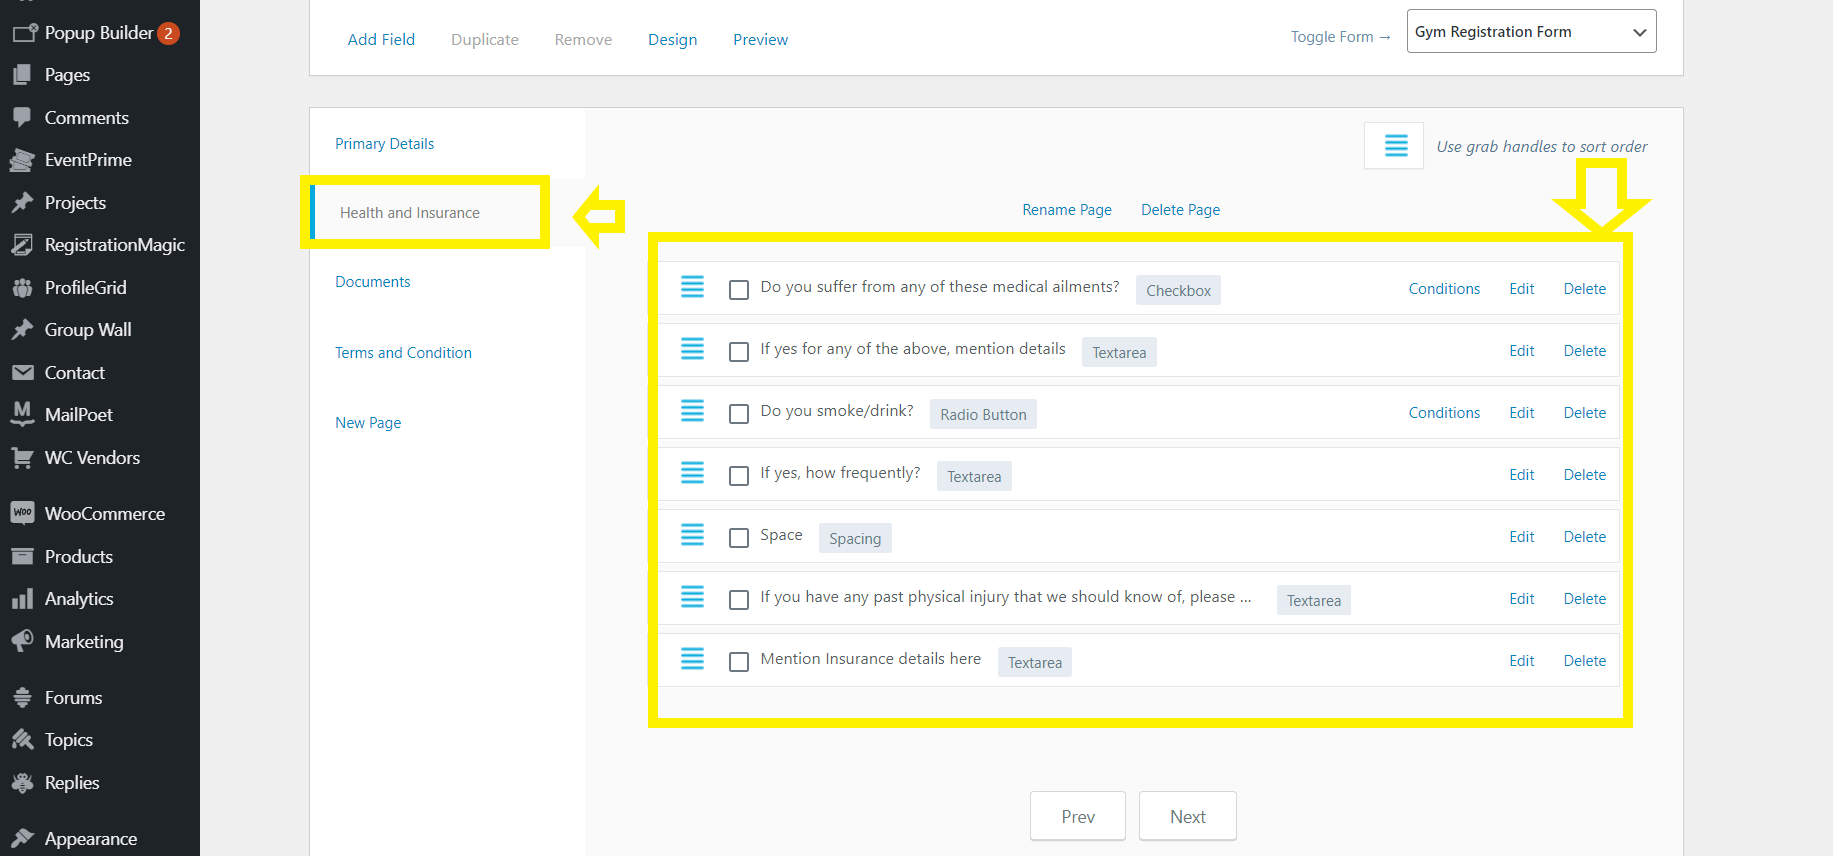
The fields used on this page of the form are all about the health condition and insurance of the client. The fields added to this page are Checkbox, Radio Button, Text Area, and Spacing.
Checkboxes
Checkboxes are used to mark as many options out of the ones available as one requires. Here we have used checkboxes to mark one or multiple physical conditions that the client might have.
Spacing
Spacing is an additional display field that can be added to forms between multiple text area boxes to avoid congestion of text.
-
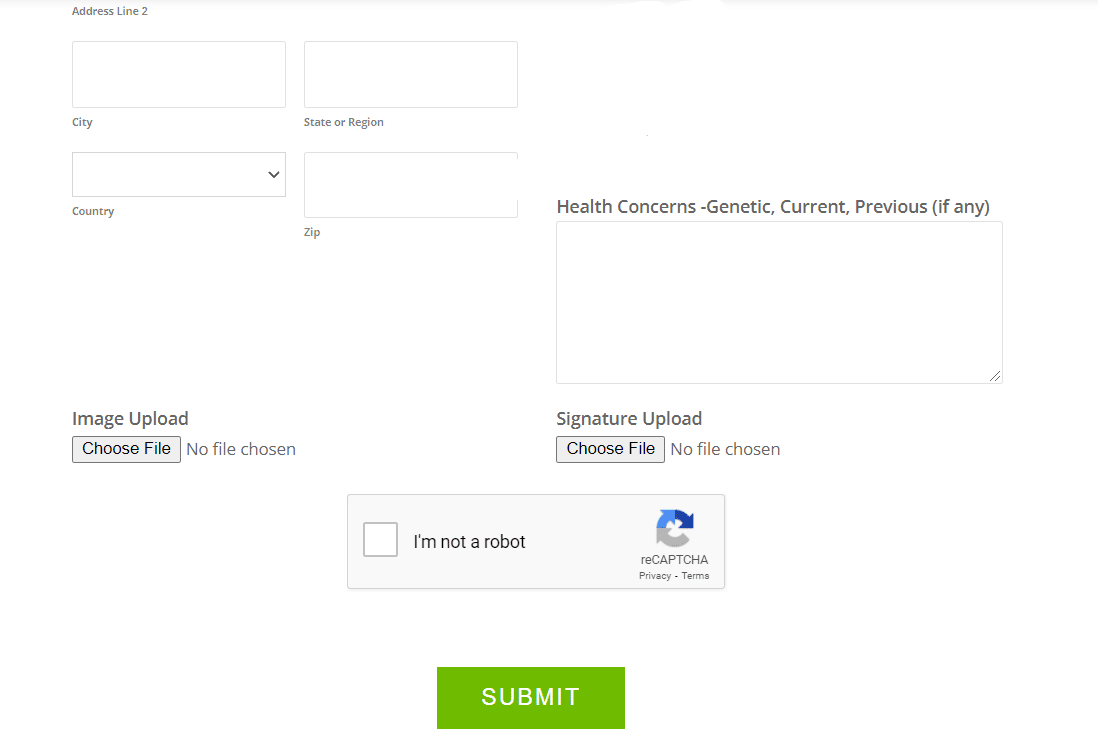
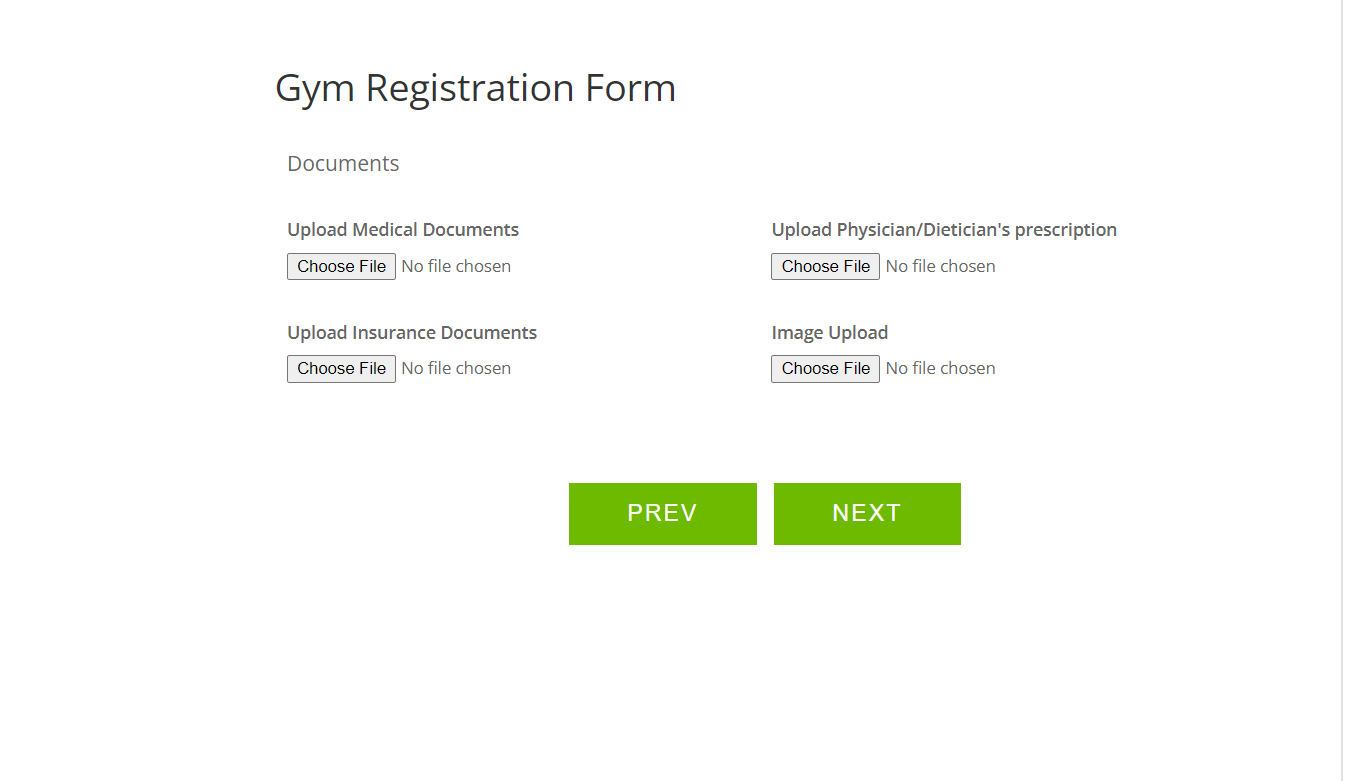
Page 3: Documents
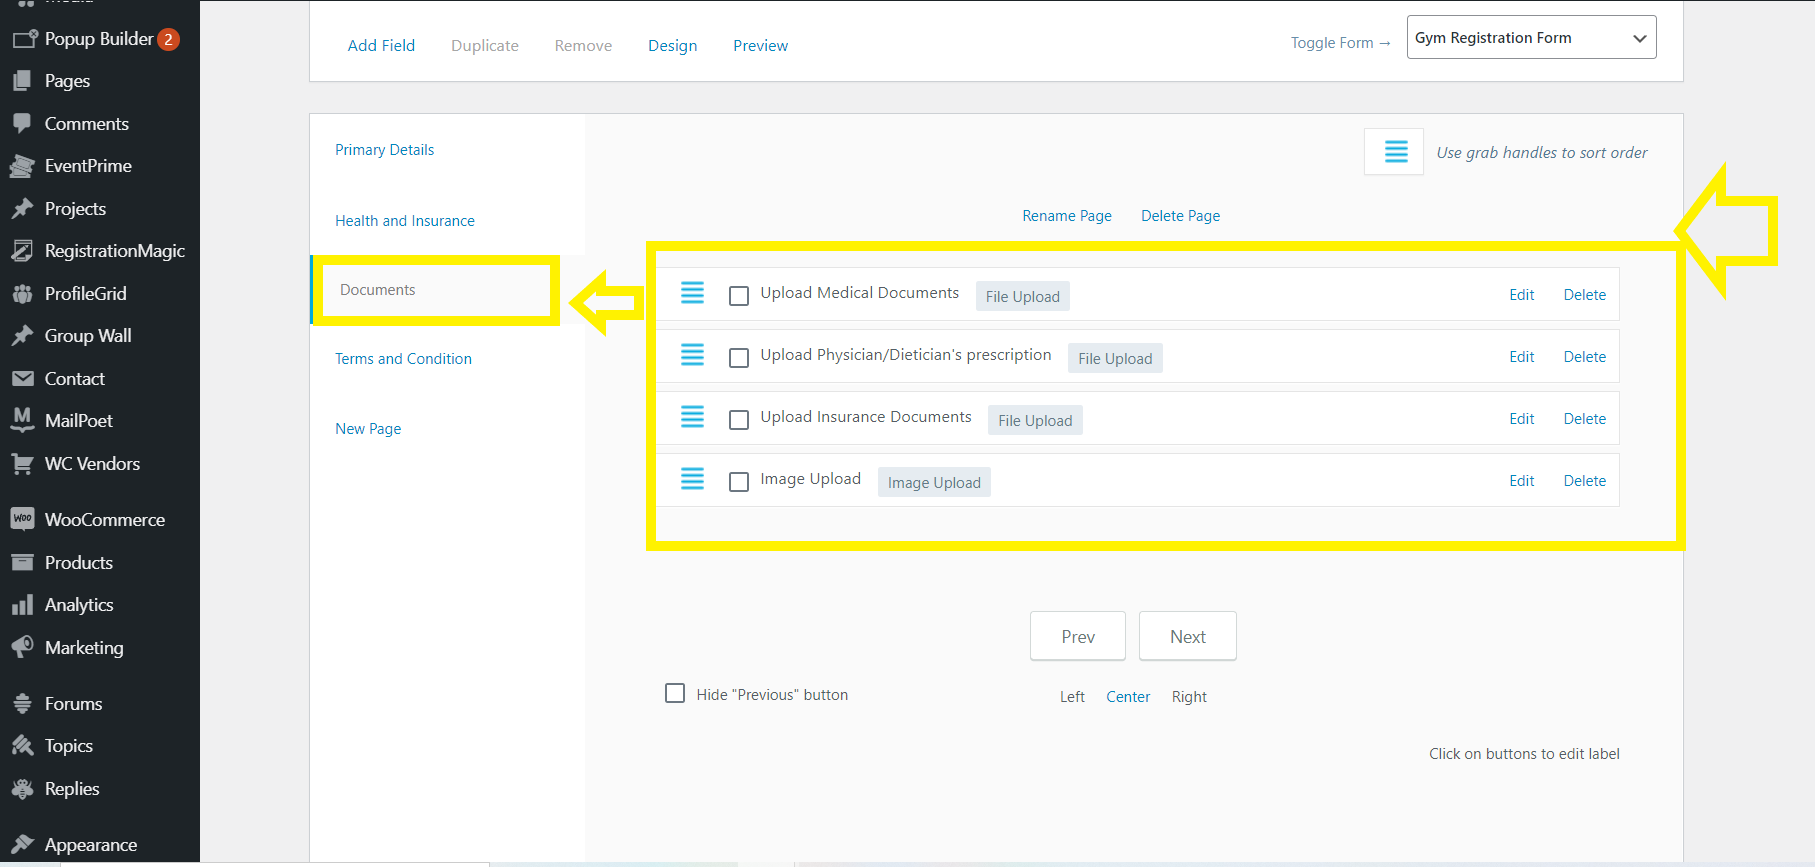
Document uploading plays a very important role in collecting information which is made super easy through an online gym registration form. The fields used on this page are:
File Upload
File upload is used for docs or PDFs. Here we have used it to get the client’s insurance, medical, and other documents on the same lines. An online gym registration form makes this process convenient and hassle-free
Image Upload
As the name suggests, this field is used to upload client images in JPEG or PNG file formats. This also provides some additional file-type options for convenient photo upload. You can convert your picture to the required dimension and add it to the online gym registration form easily.
-
Page 4: Terms & Conditions and Signature
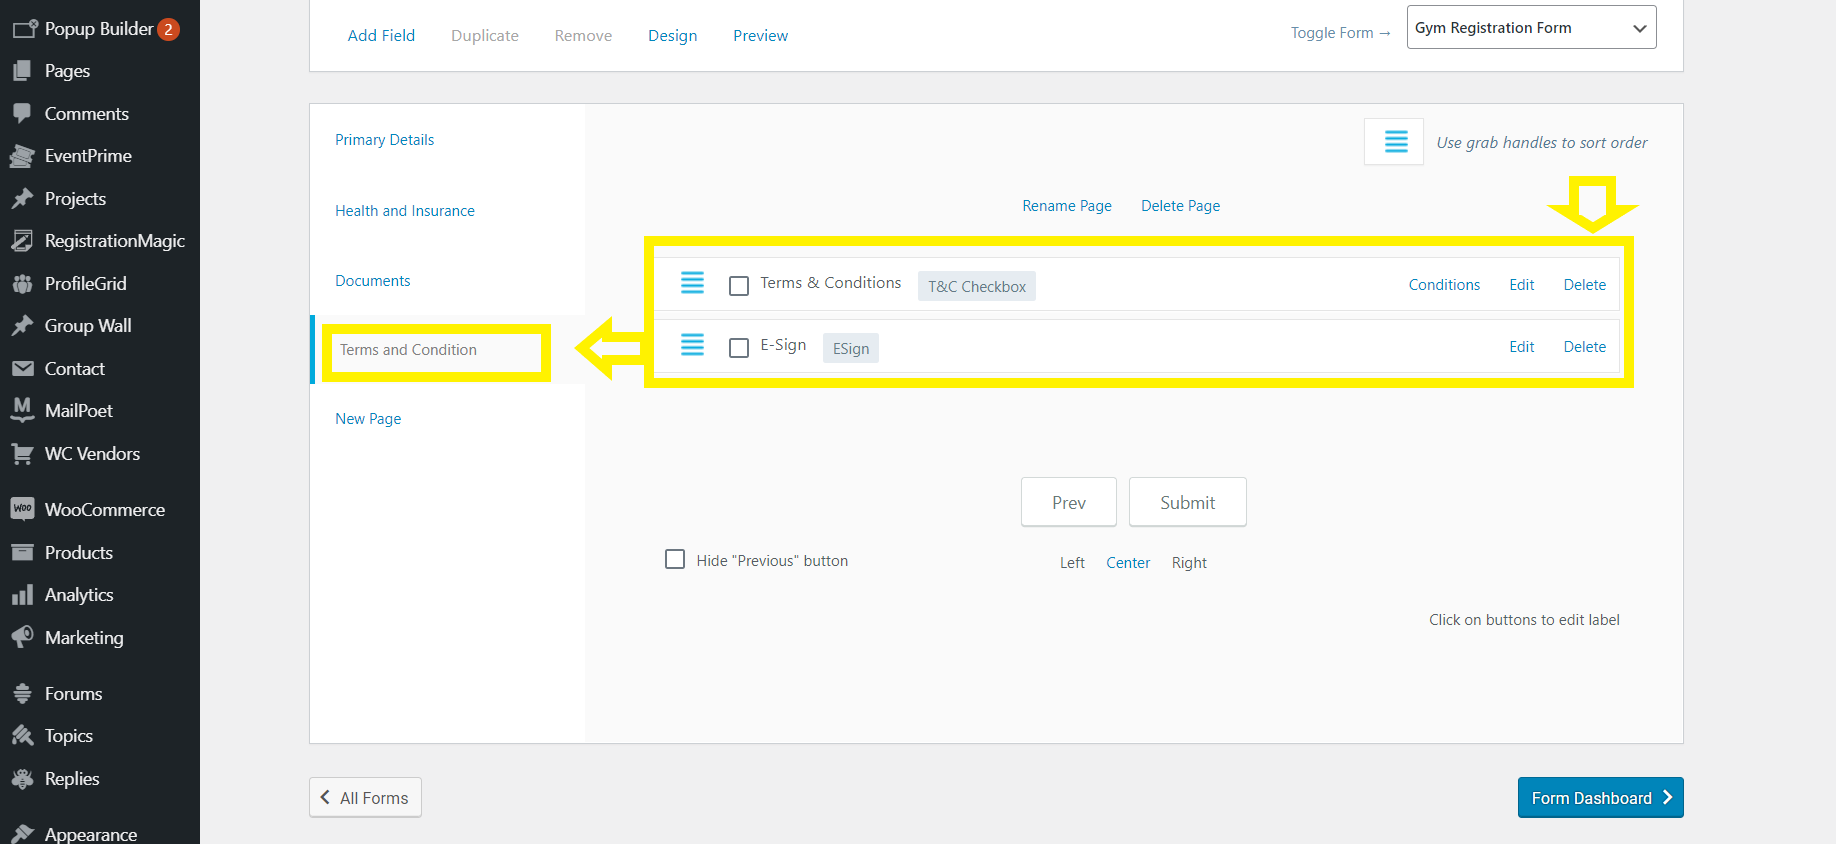
T&C Checkbox
The auto-build option provided in the field section of forms for Terms and Conditions provides an easy implementation option for this very important field.
E-Sign
The E-Sign option which is already available in the fields section allows the client to upload their signature or sign the form on the mobile device itself.
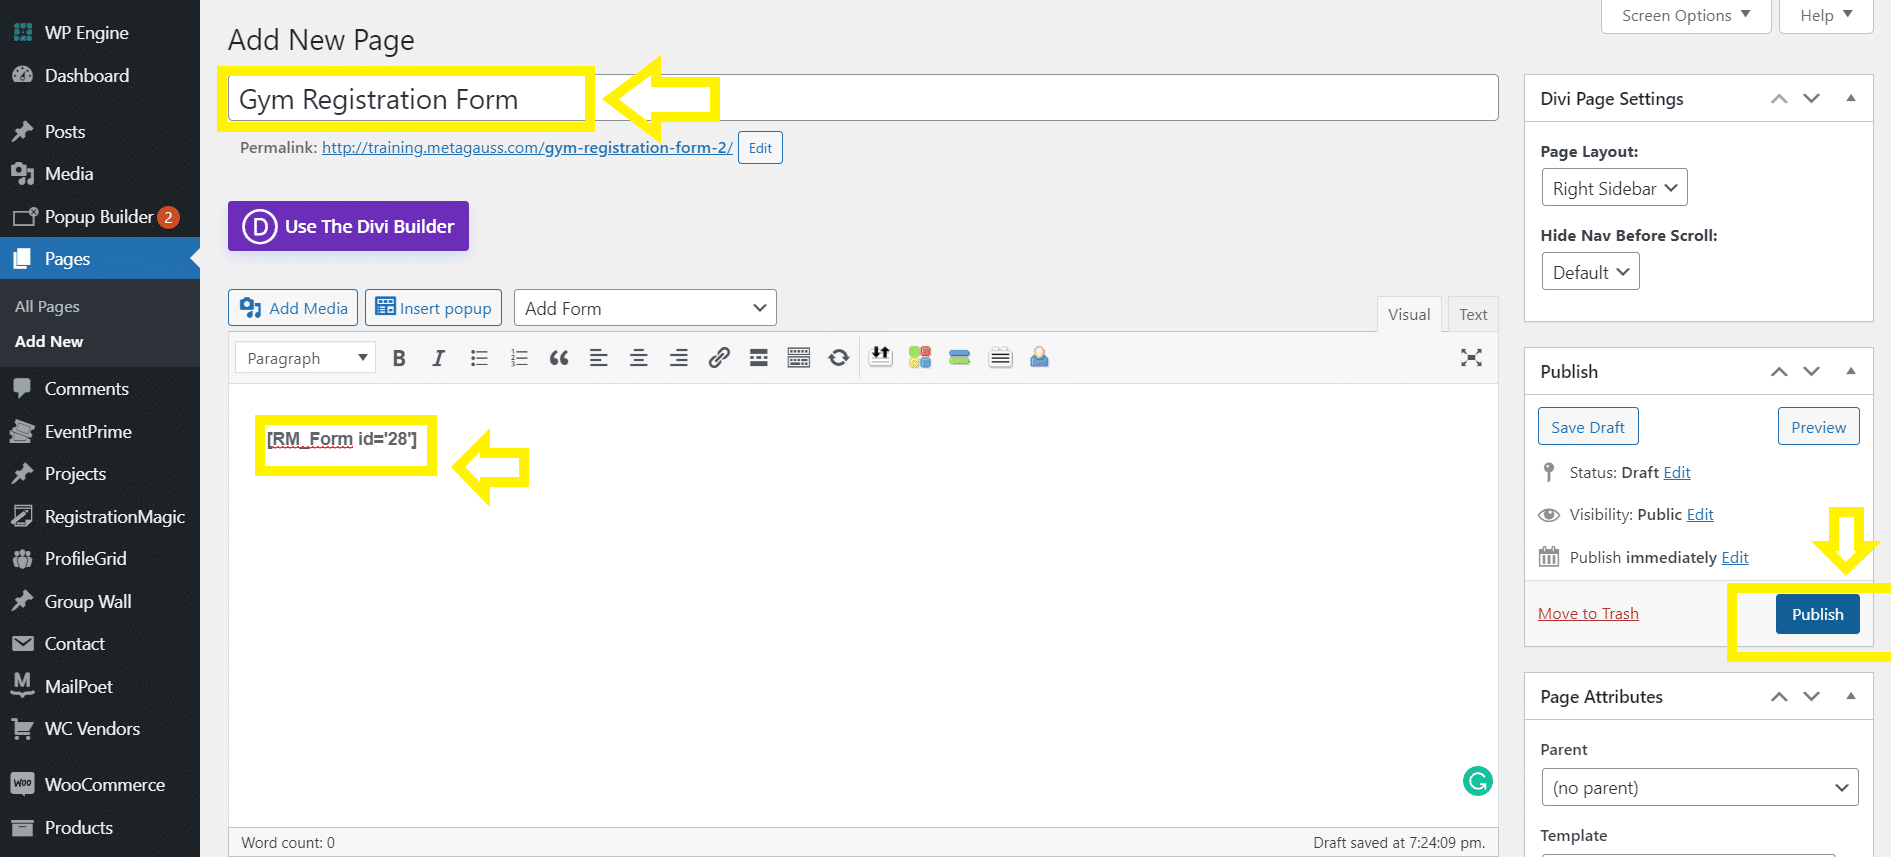
Step 5: Pasting the shortcode and publishing your form.
- Moving on to the next step, which is to copy the shortcode of the form.
- Copy the shortcode of the form.
- Click on “Pages” and then click on “Add New”.
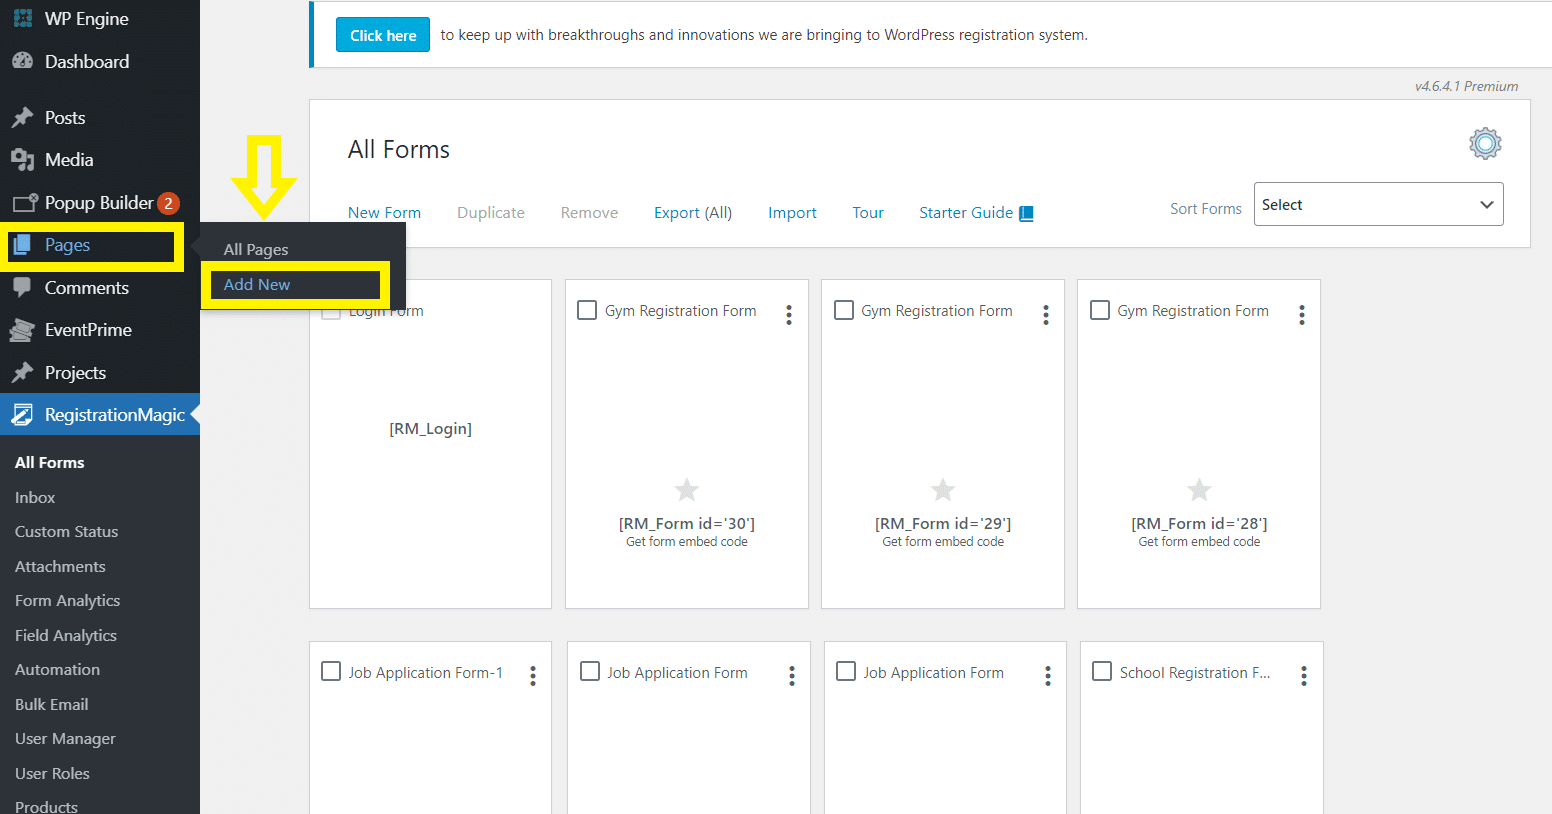
- As the new page appears, add the title on the top and copy the shortcode on the main body.
- Title your online gym registration form “Gym Registration Form”
- Towards the right of your screen, a button to “Publish” is present. Click that.
This is how you create a multipage form and publish it on your website. Not only this but you can customize the form according to you. From changing the design and color schemes to activating and deactivating user accounts, everything is in your control.
Gym Registration Form Sample
Primary details page
Health and insurance page
Documents submission page
Terms and conditions page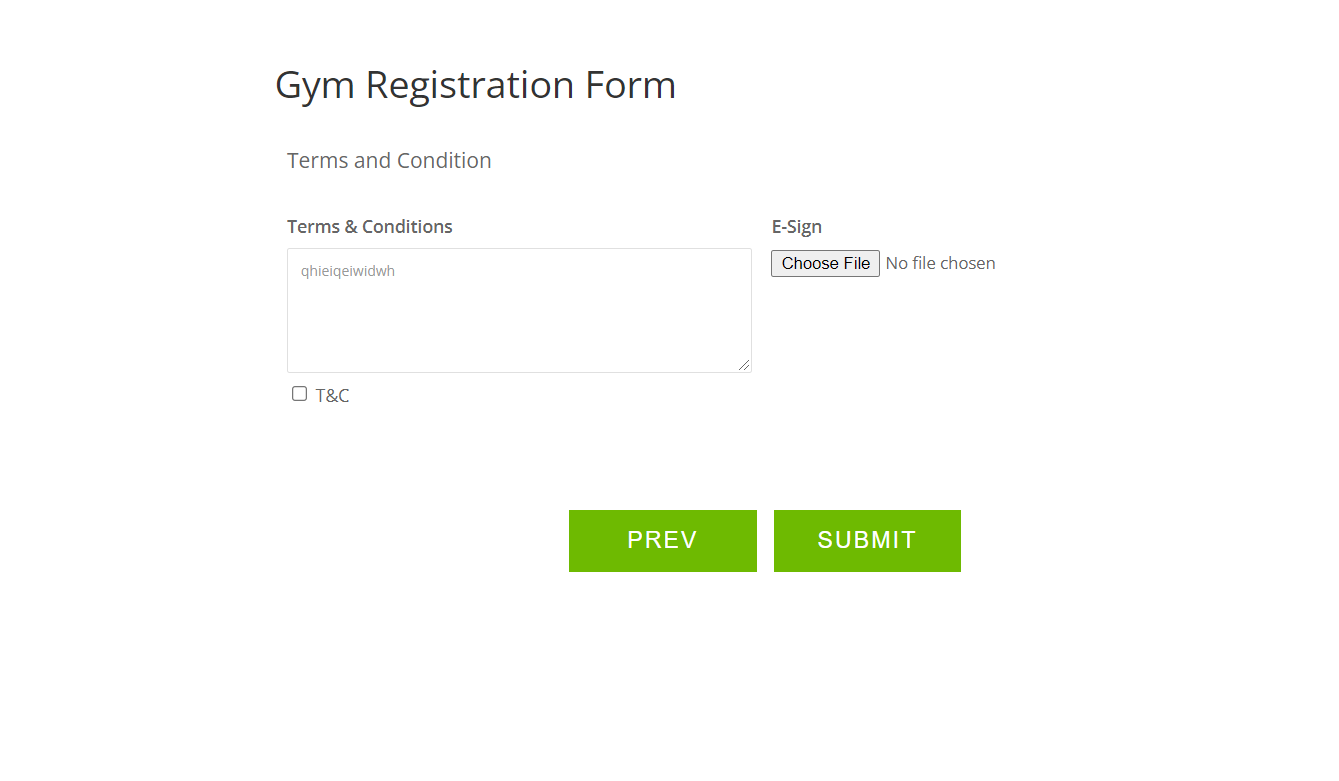
In the digital era, where efficiency and flexibility matter, RegistrationMagic stands out for creating a seamless online gym registration form. With its SEO-friendly features and user compatibility, it ensures smart engagement. As the world transitions to digital platforms, RegistrationMagic offers trust and simplicity. From managing user profiles to handling memberships, it seamlessly integrates with your website theme. Embrace the efficiency of online forms, a testament to the plugin’s versatility in a dynamic digital landscape.
- How to Manage User Registration Status in WordPress - August 8, 2023
- Send Emails to Registered Users in WordPress with Ease - August 6, 2023
- How to Create a User Registration Form on WordPress - September 22, 2022
- Registration Based WordPress Contact Form Plugins - September 15, 2022
- Create a Job Application Form on WordPress Website- In Depth Guide - September 14, 2022
- How to create an efficient Marriage Registration Form in WordPress - November 26, 2021
- How to make a flexible vendor registration form for your business - November 24, 2021
- Creating a Smart Membership Form for Your WordPress Website - November 22, 2021
- How to create a digital Preschool Registration Form - November 18, 2021
- How to make a creative Dance Registration Form with RegistrationMagic - November 16, 2021