Winning makes you feel good and boosts your confidence. This article unveils the art of crafting seamless contest entry forms using the RegistrationMagic Plugin, a gateway to engaging competitions that resonate with the fundamental aspects of human psychology.
What is a contest entry?
Entering the domain of winners and losers, teams or individuals step into the competitive arena through a contest entry—a crucial stage often facilitated by a contest entry form. This form becomes the distinguishing lens from the moment of submission, offering insights into participants and their affiliations. Whether it’s a sports event or any competition, the contest entry form plays a pivotal role, guiding participants on betting choices and providing organizers with authentic insights into the origins of competing teams or individuals. This ensures a fair and transparent competition.
How to create a contest entry form for your WordPress website?
Before going ahead make sure to ‘Install’ and ‘Activate’ RegistrationMagic plugin on your website using this link.
RegistrationMagic transforms contest entry form creation into a seamless endeavor. Empowering users to design countless forms with unrestricted fields, the versatile plugin effortlessly adapts to website needs. Whether it’s dynamic event registrations or personalized admission forms, the possibilities are expansive. The freedom to customize and modify fields ensures precise alignment with your requirements. Harness RegistrationMagic’s transformative capabilities to effortlessly create and manage online contest entry forms. This not only simplifies the process but also enhances user engagement on your website, making it a vital tool for effective form creation.
Try RegistrationMagic for Free.
Detailed steps and demonstration to create a contest form
Step 1: Adding a new form using RegistrationMagic.
- First, click on the RegistrationMagic plugin and click on “All Forms“.
- Next, click on “New Form” to create a new contest entry form.


Step 2: Adding a new name for the form.
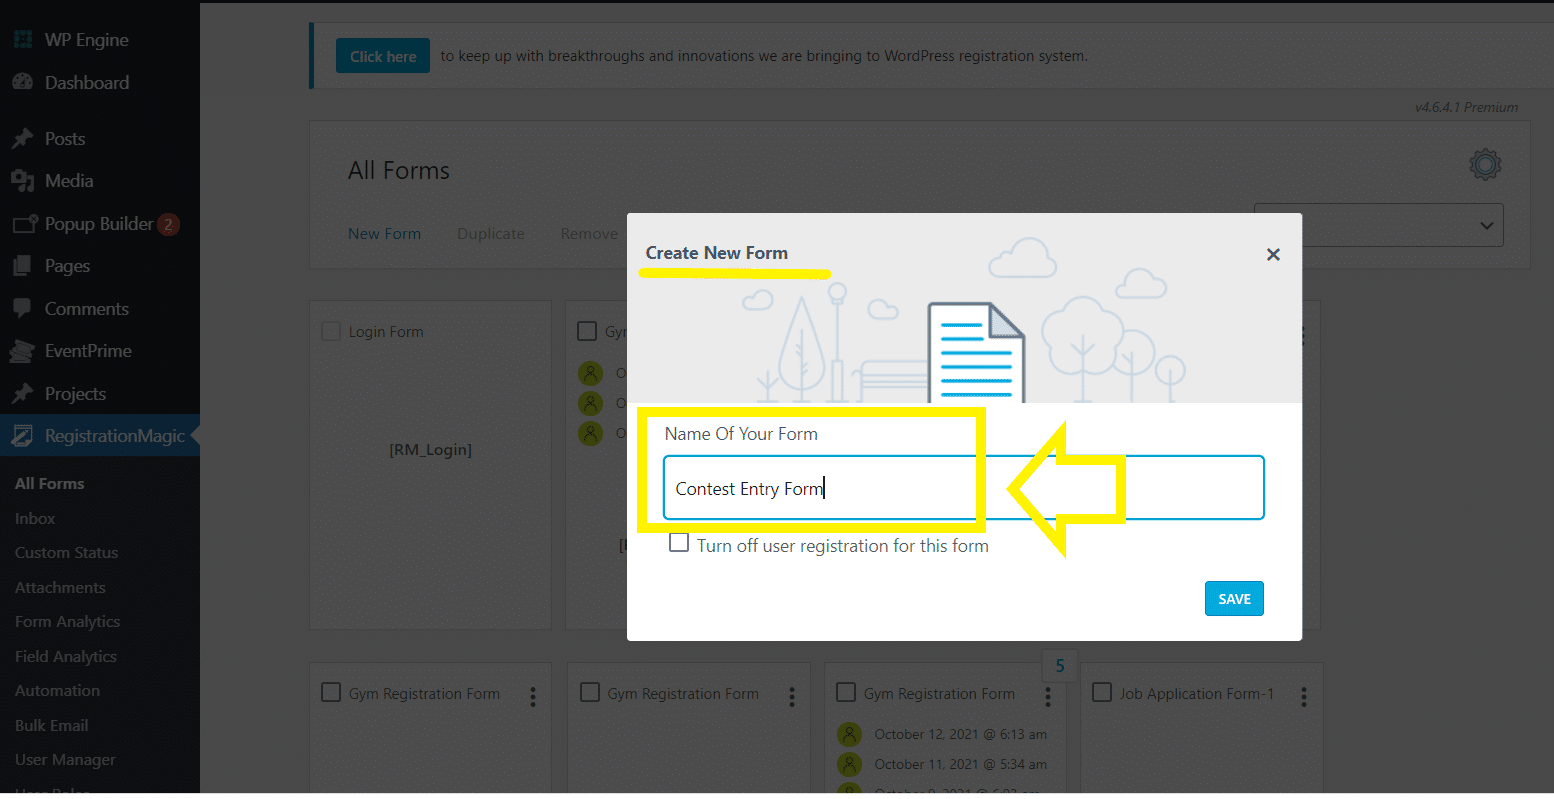
- In the window that says “Create New Form“, add a title for your form.
- Since we’re creating a contest entry form, that’s what we’ll name it. For reference, we’ll take the example of a contest organized by an art club. This contest aims at finding a new art teacher for the club.
- We’re fashioning a very basic form here with no videos or images attached. This doesn’t mean you can’t do that. We’ll tell you how to do that in the coming steps.
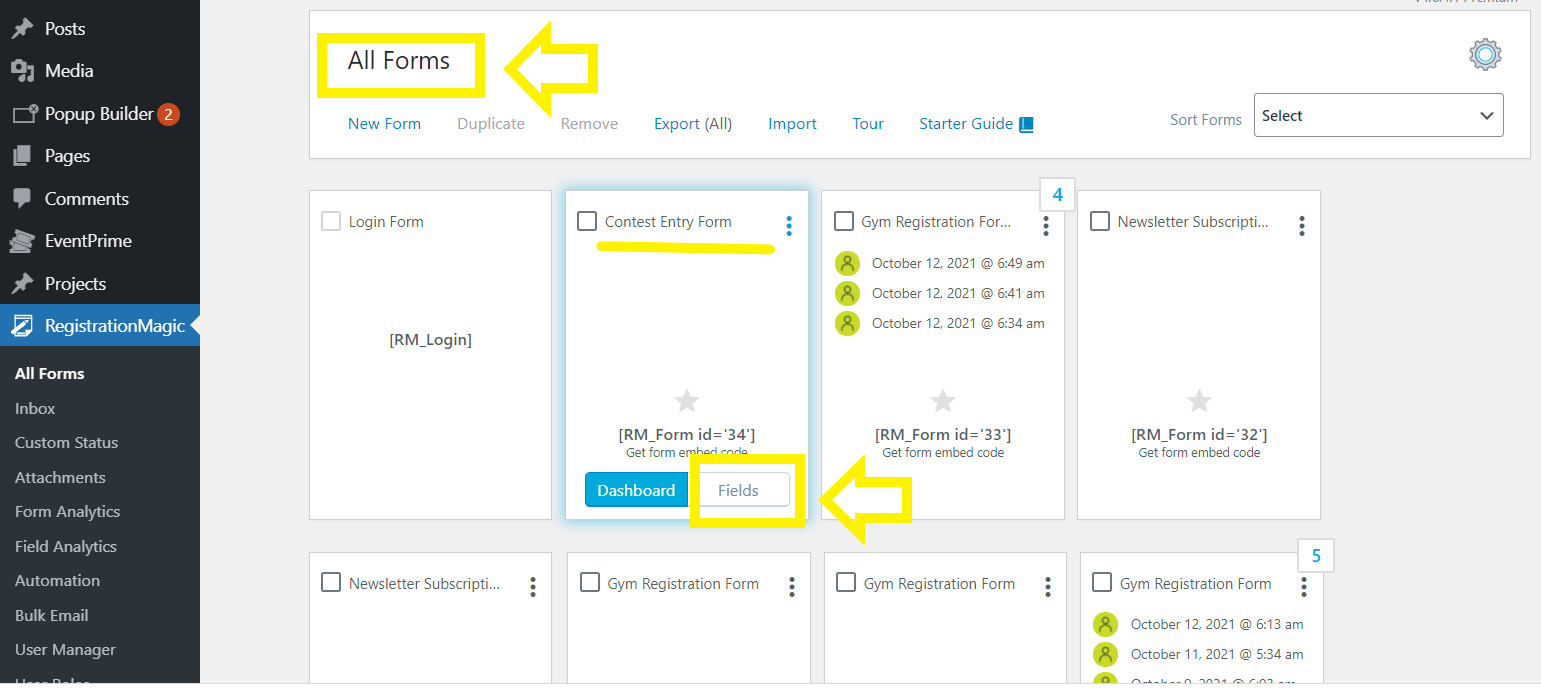
- After that, from the ‘All forms page’, click on your new form’s ‘Fields’ section to proceed to add fields
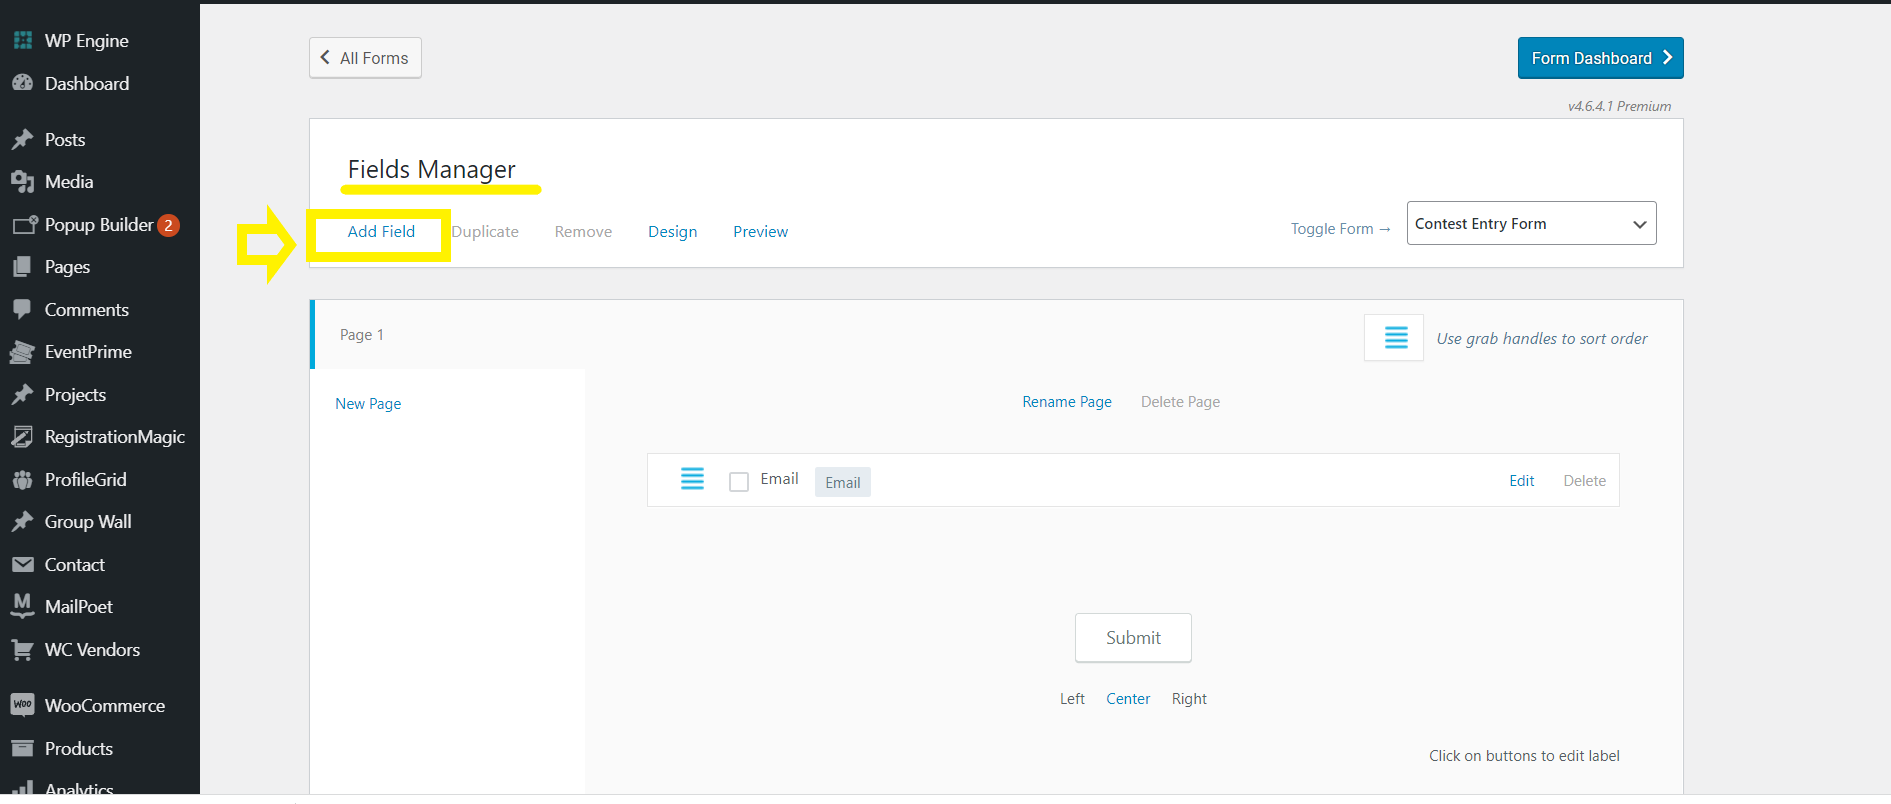
You’ll land on this page. This is the page from where you need to add all fields. This page is called the ‘Fields Manager’ page.
Steps for adding form fields
- From the above image, you can refer to the ‘Fields Manager’ page for adding all form fields.
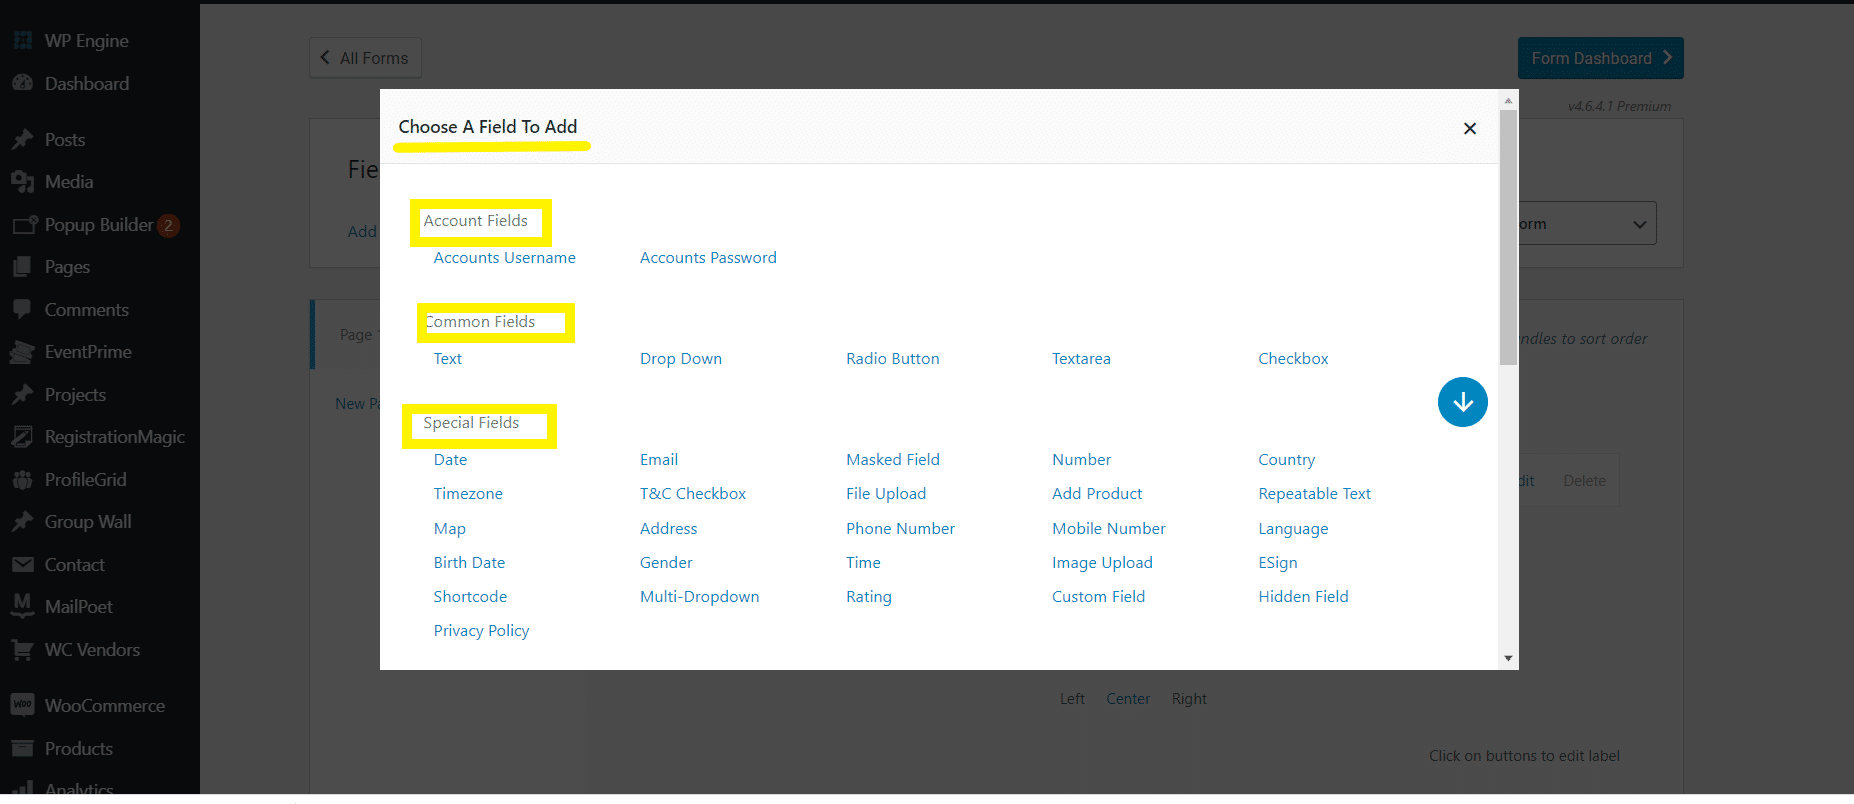
- All the fields are to be added to the form from the ‘All fields’ section. You’ll find every single field you’ll require here.
- Text, radio buttons, checkboxes, video links, images, etc. they’re all here under this category.
- Just to gander at the good, here’s a glimpse of the vast range of categories under the ‘Fields’ section that you can use. Obviously, we can’t use all of them in our form but you can always play around.
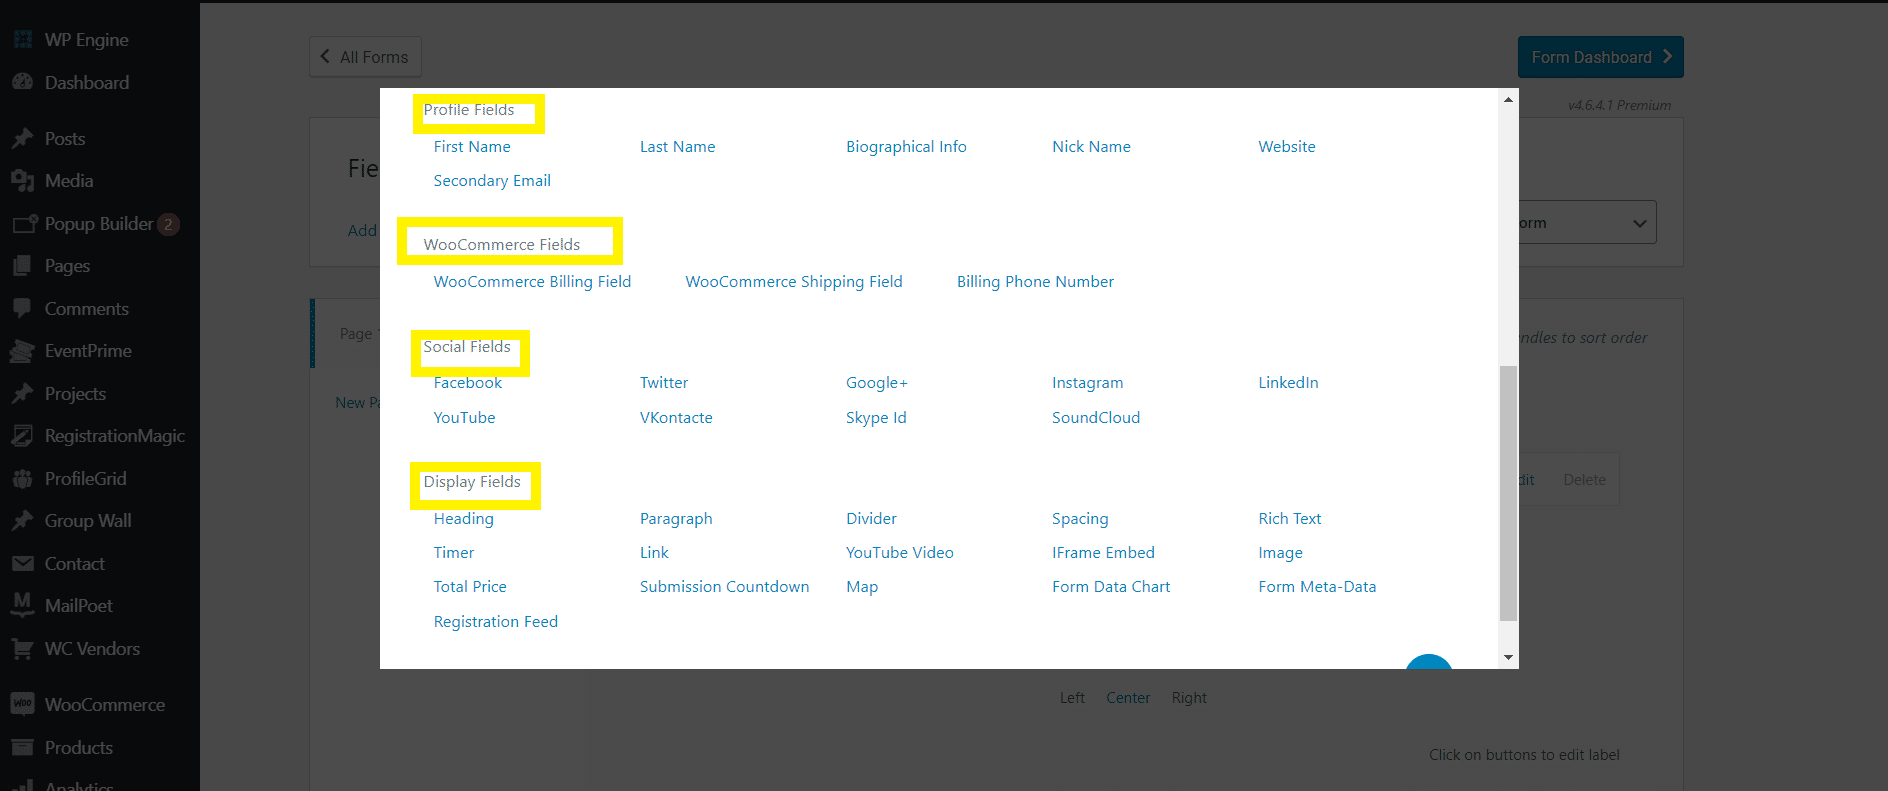
Step3: Adding fields to the form
Since the form we have in mind is a very basic and open one, we won’t make it extra refined. Therefore, we’ll add only a single sheet to the form. If need be, you can always create multipage forms easily through RegistrationMagic.
Let’s start adding fields to our form:
Just go to the ‘All Fields’ section and start clicking on the fields you’d like to add to your form. We’ll first add all basic fields and label them before moving on to the others.
Once a field is labeled, scroll down and click on the ‘Add to form’ option to add it to the form
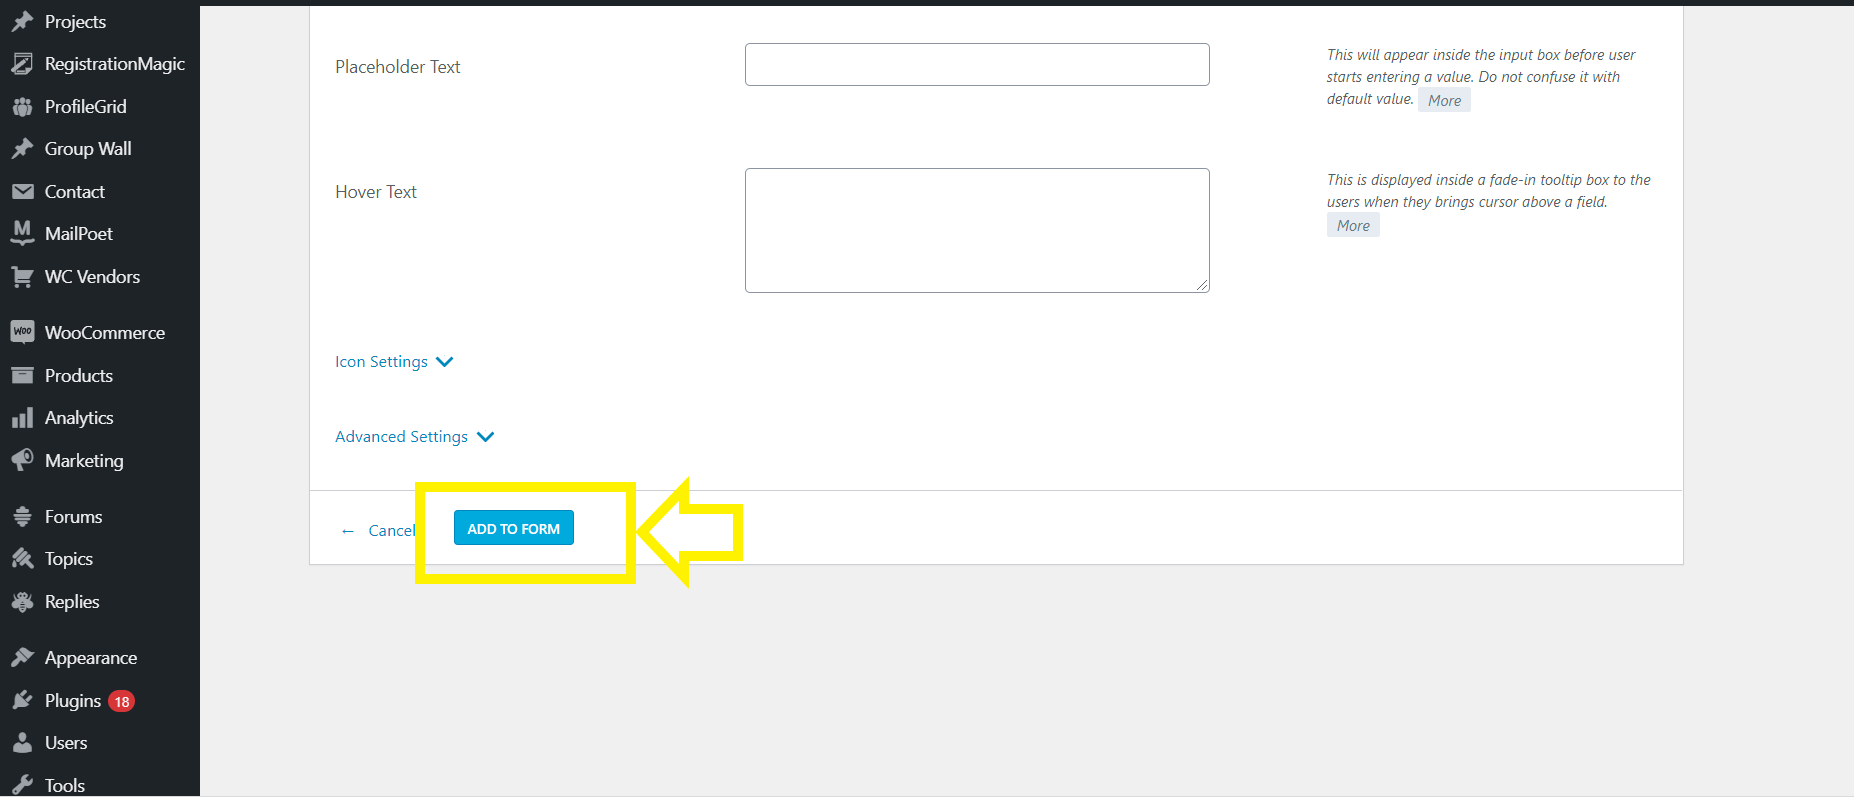
Basic Fields
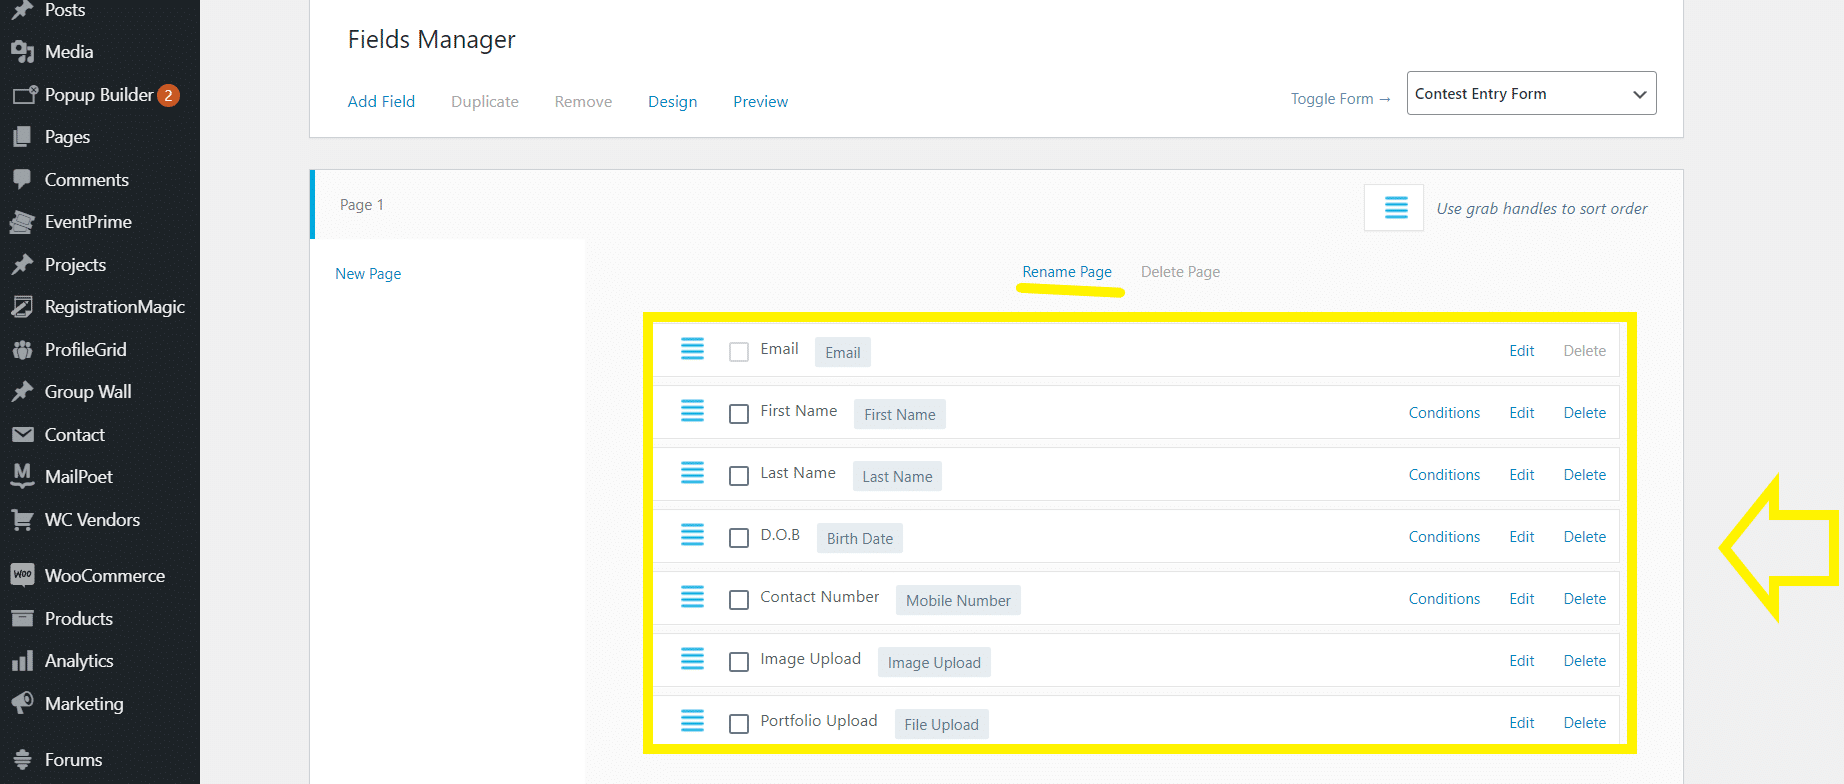
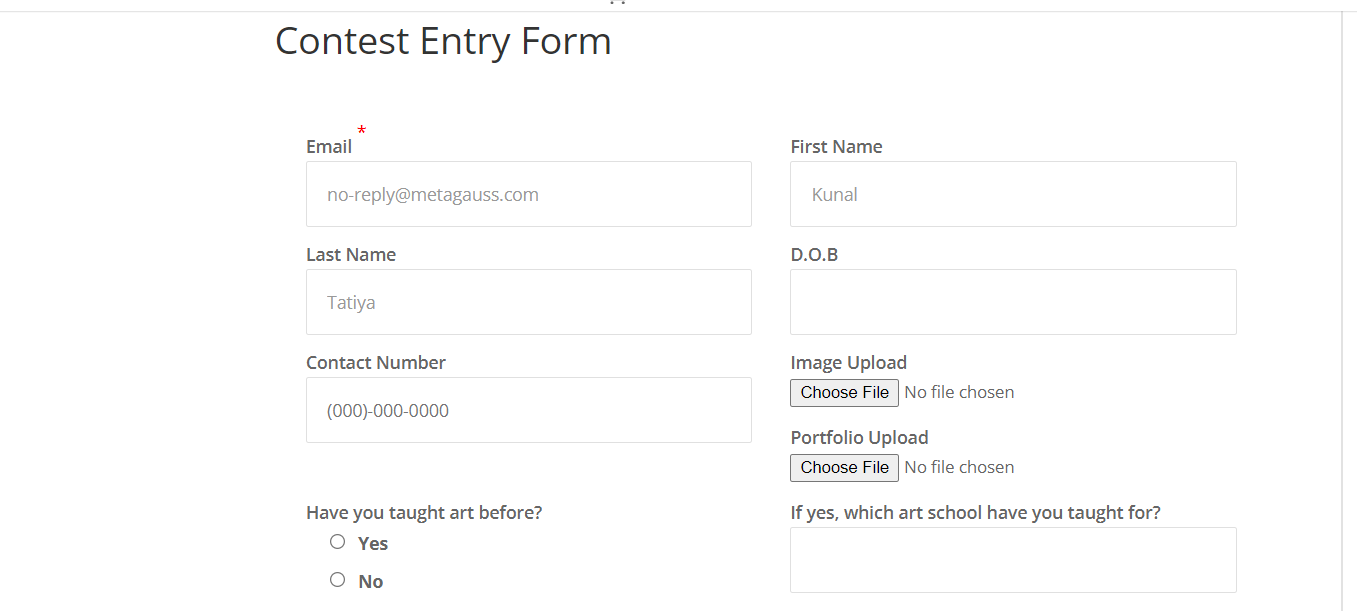
As you see from the image above, we’ve added all basic fields for the participant. We’ve also labeled them clearly. Next to each field label, you can see the field category used to create it. Mentioned below are the field category details:
- The email field is a default field in all RegistrationMagic forms. It is a mandatory field. This passively helps in better email marketing data.
- The first and last name fields are two different fields added to the form for the obvious reason of getting the full name of the participant.
- The birth date field is added to the form to get the D.O.B. of the participant. Fill the field in the DD/MM/YYYY format.
- The mobile number category has been used to get the contact number of the person. This can be customized according to your reach specifications. This means you can add this field for international or local purposes.
- The image upload field has been used to get the image of the participant. Upload the images in JPEG, PNG, or other formats.
- The file upload field gets a portfolio file of the participant. This will help me know further about the participant.
- You can rename the page when it’s a multipage form.
Advanced Fields
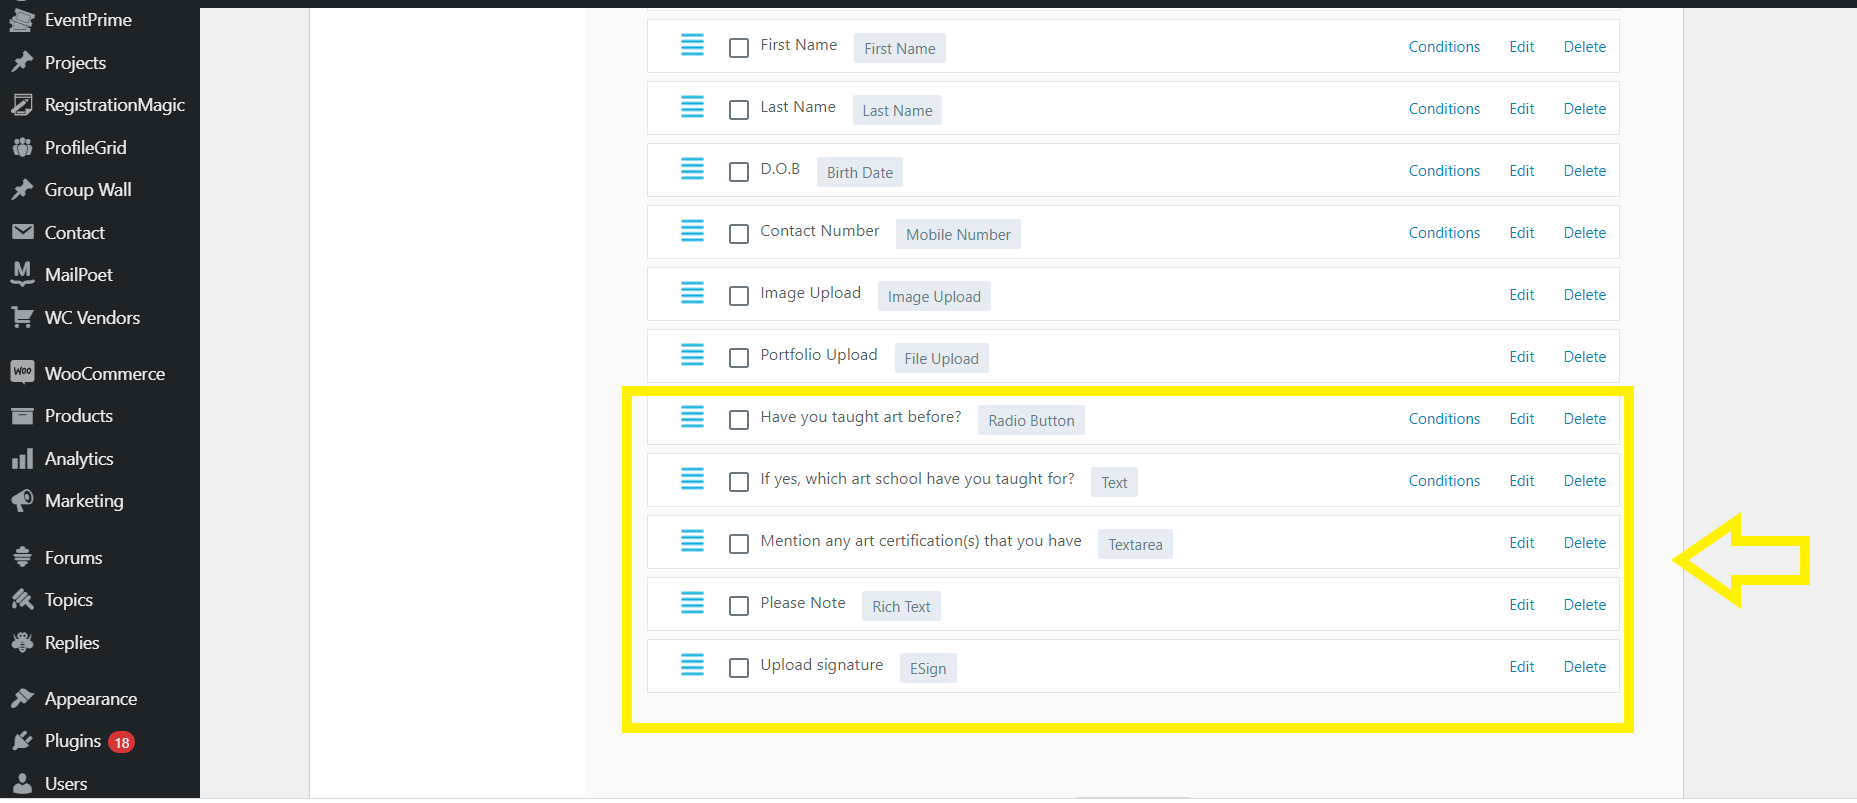 The fields used for advanced categories are:
- The radio button field asks a short question. This aims at asking the person whether or not they have taught art before. This field is usually used to ask gender, yes/no questions, etc.
- The text field asks the person a brief text question stating which art school have they taught in before.
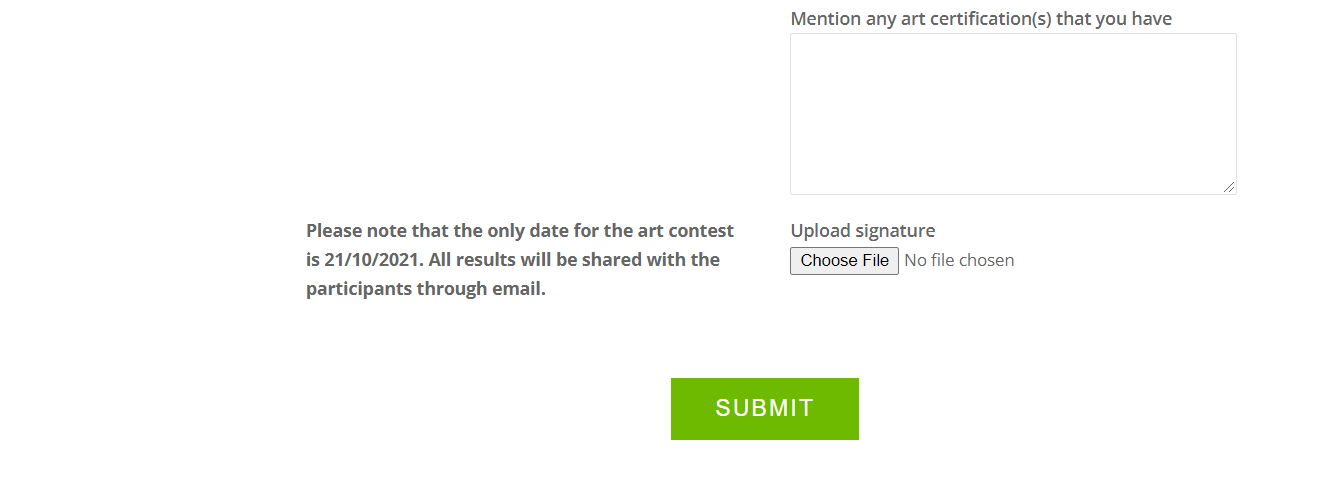
- The text area field asks a slightly elaborate question. This question intends to collect details on their certificates, one or many.
- The rich text area highlights a message that you want to convey to the participant. This is not a question field but a communication field. You just have to add your display message in the text box as shown below and add it to the form
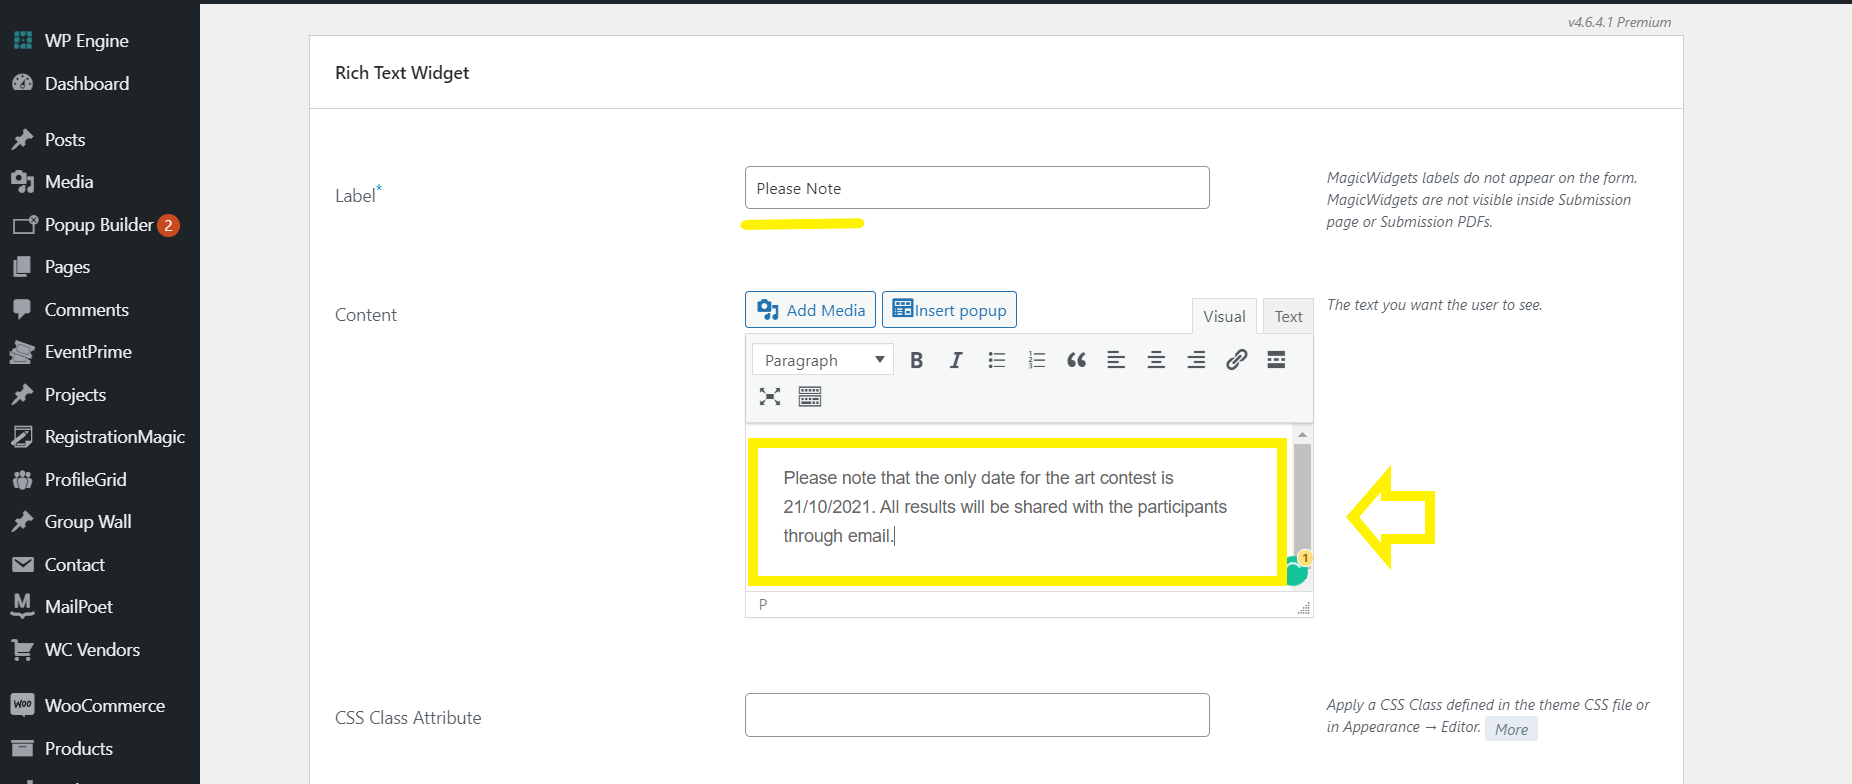
- The ESign field allows the person to upload their digital signature to the form directly.
With that, we’ve added all the necessary fields to our form. You can mark which fields are compulsory and which aren’t from the field settings themselves.
Additionally, you can also change the visuals and aesthetics of your form as much as you want through RegistrationMagic.
Step4: Publishing the form
Copy the shortcode to a new page
Go back to the ‘All forms’ section. Copy the shortcode of the form.
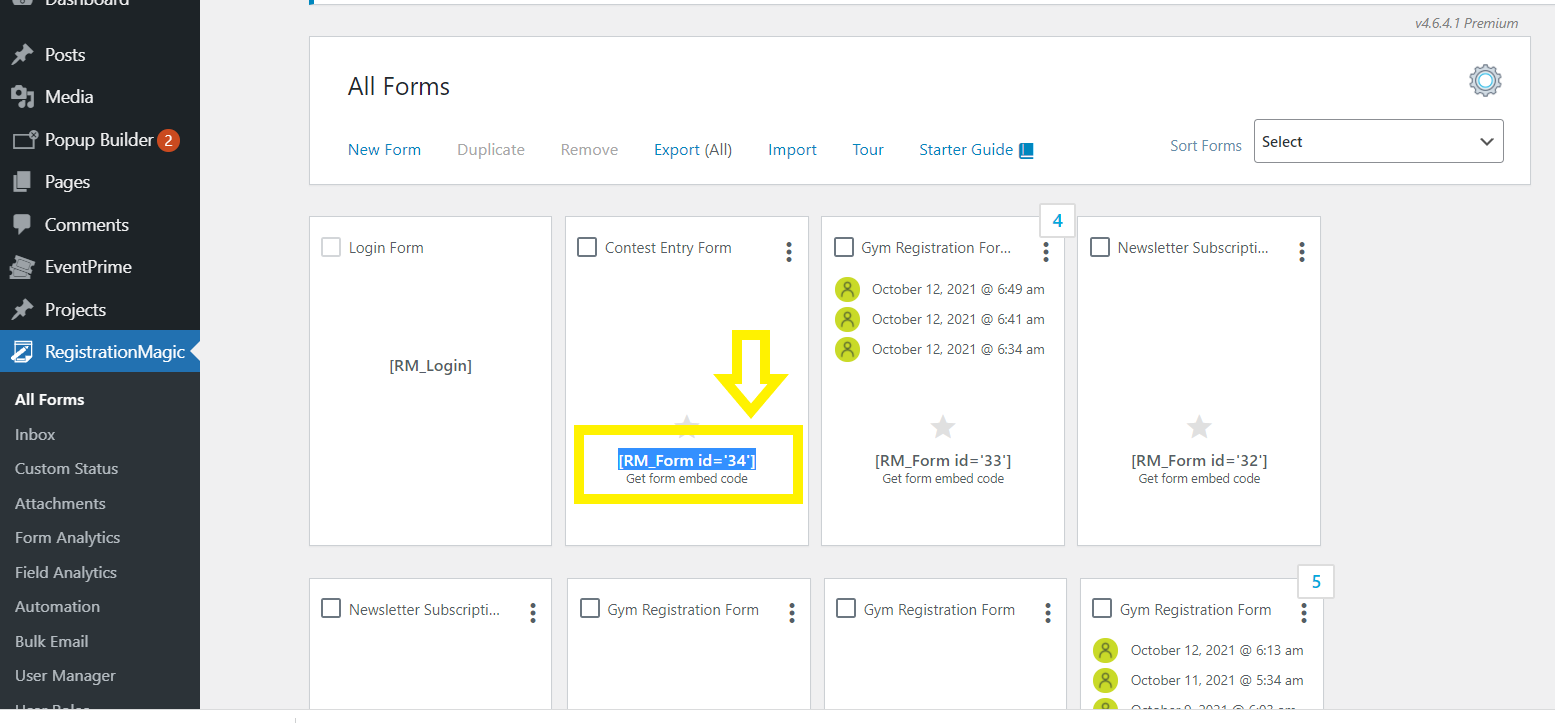
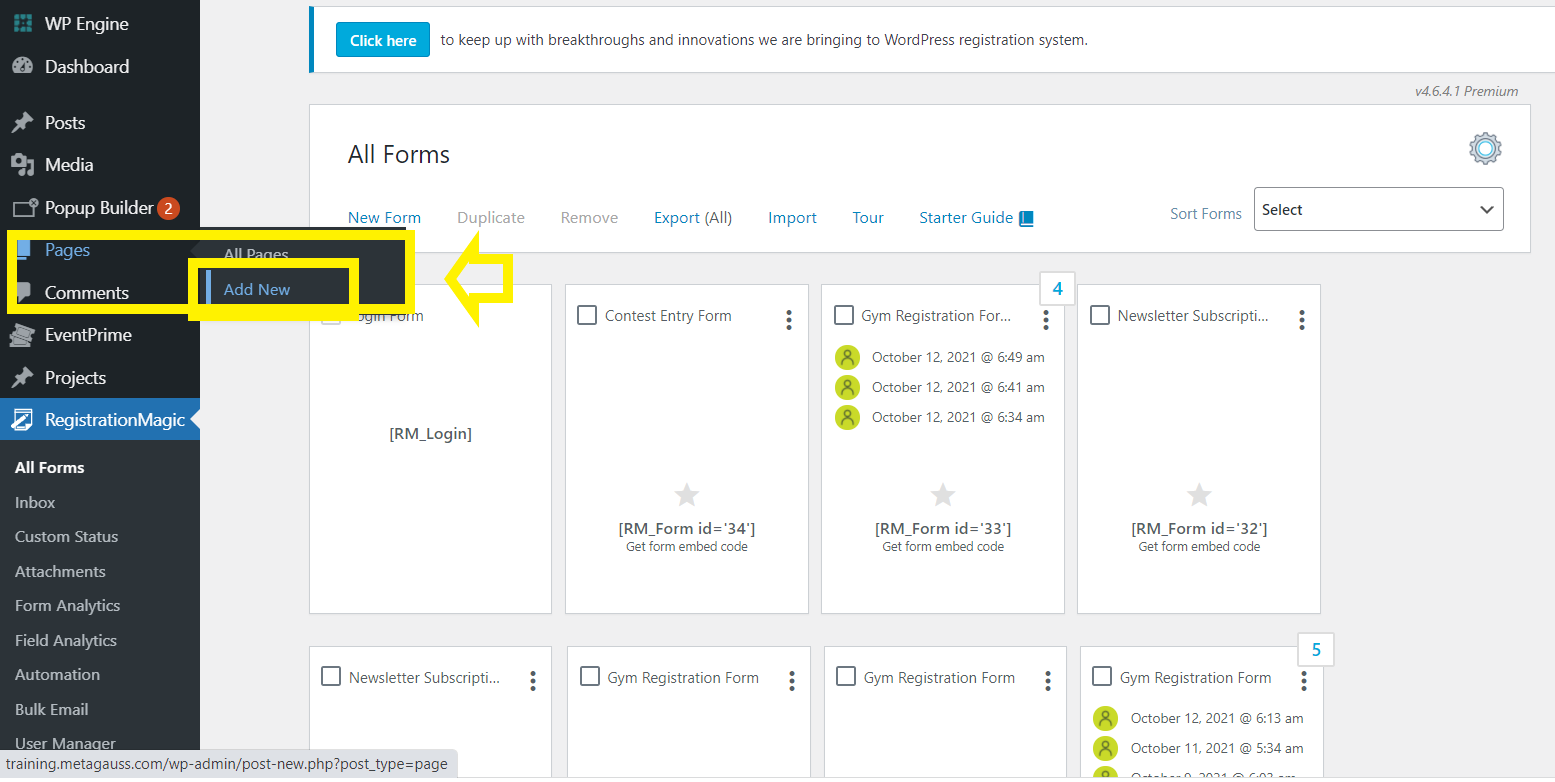
Now go to the ‘Pages’ section of the website backend. Click on ‘New page’
Add the actual title of your form in the ‘Title’ section and paste the shortcode in the ‘Main body’ of the page and click on ‘Publish’
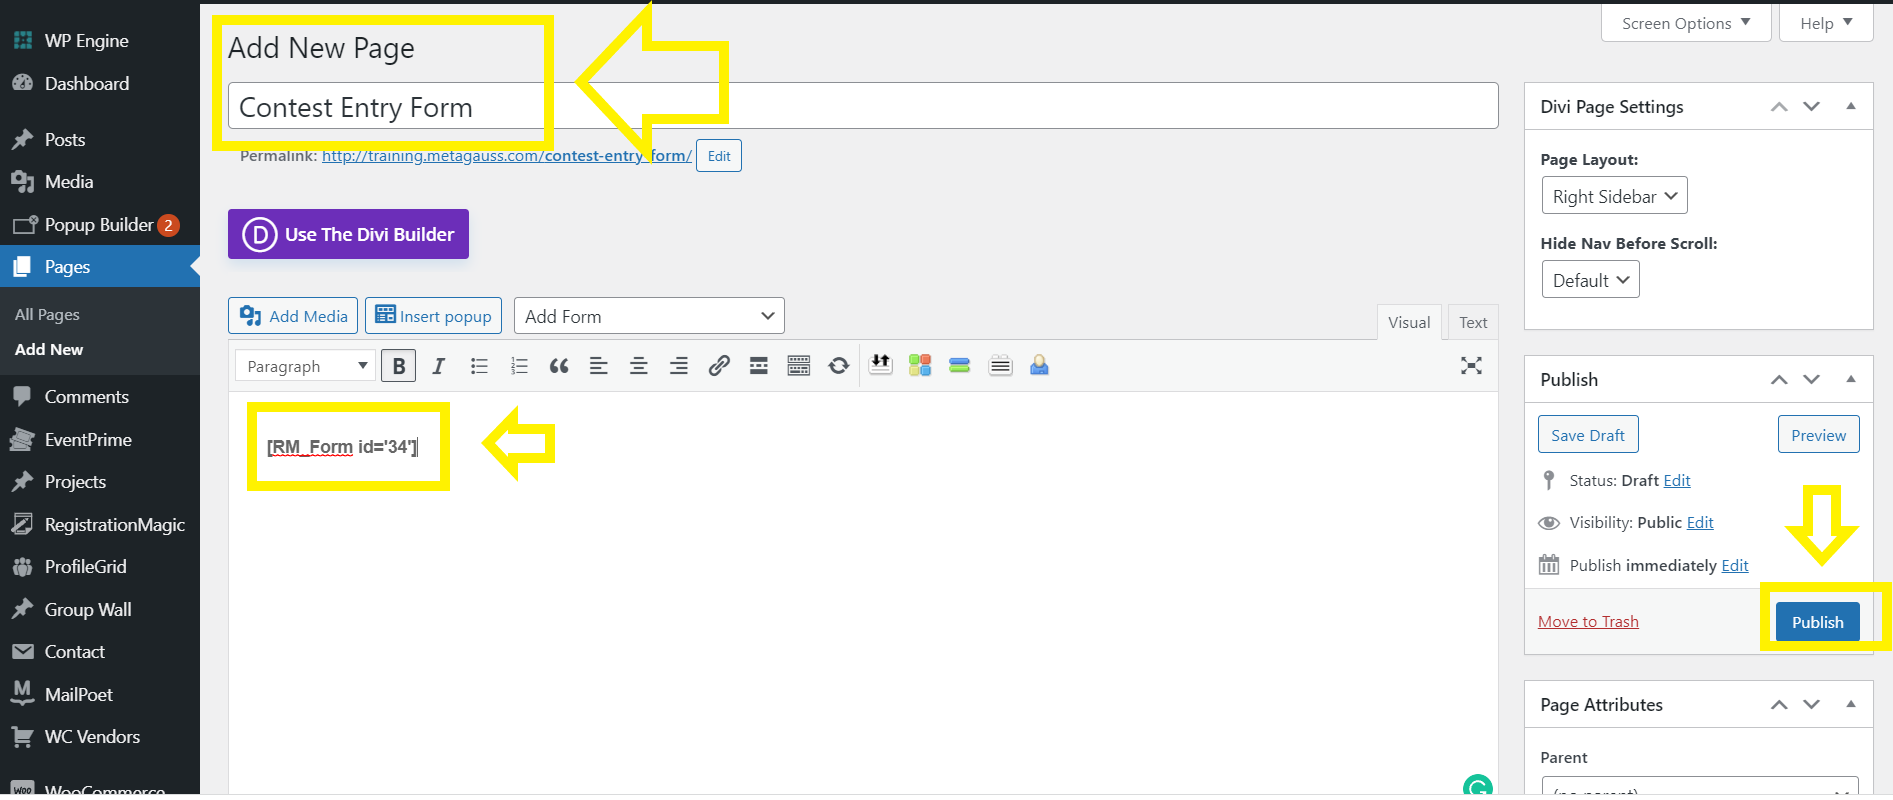
With that, the entire form publishing process is complete. However, if you wish to add this to the main menu of your website, you can go to the ‘Appearance’ option on the website backend options and add this form to the menu and save it. Quite an easy process right?
Frontend view of contest entry form sample
This is how your form will appear to the participants on your website front end.
Therefore, the powerful RegistrationMagic Plugin transforms the creation of an effortless contest entry form in WordPress into a reality. It doesn’t just serve as a submission sheet; instead, it emerges as a strategic tool that ignites human competitiveness and engagement. Offering boundless possibilities, from dynamic event registrations to personalized contests, the plugin takes center stage. Moreover, its user-friendly customization guarantees a seamless experience for both organizers and participants. Consequently, elevate your contests, engage your audience, and effortlessly navigate the realm of competitions with RegistrationMagic—an indispensable ally in WordPress form creation.
- How to Manage User Registration Status in WordPress - August 8, 2023
- Send Emails to Registered Users in WordPress with Ease - August 6, 2023
- How to Create a User Registration Form on WordPress - September 22, 2022
- Registration Based WordPress Contact Form Plugins - September 15, 2022
- Create a Job Application Form on WordPress Website- In Depth Guide - September 14, 2022
- How to create an efficient Marriage Registration Form in WordPress - November 26, 2021
- How to make a flexible vendor registration form for your business - November 24, 2021
- Creating a Smart Membership Form for Your WordPress Website - November 22, 2021
- How to create a digital Preschool Registration Form - November 18, 2021
- How to make a creative Dance Registration Form with RegistrationMagic - November 16, 2021
