- /
- /
- /
Fields Manager
Fields manager is the heart and soul of RegistrationMagic. It allows for creation and management of the fields and pages of the forms. Fields manager can be accessed by clicking on “Fields” on the form card on Form Manager page.
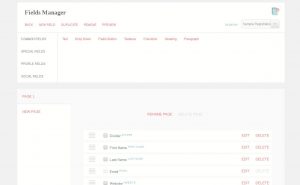
The Fields manager page is divided into three sections.
Operation bar
Operation bar has following actions:
- Back:To navigate back.
- New Field: Adds new field to the form.
- Duplicate: Create duplicates for the selected fields to the bottom.
- Remove: Delete selected fields.
- Preview: Generate form preview before publishing. The preview is shown in a popup, so you do not need to leave the page- handy!
As usual, form selector dropdown is on the right side. It provides a route to quickly switch to another form.
Field selectors
-
This is a tabbed view of all the available fields in RegistrationMagic. Fields are divided into four broad categories.
- Common Fields: Most common fields such as Textbox, Select, Radio etc.
- Special Fields: Advanced fields such as Pricing, Birthday, Address etc.
- Profile Fields: Profile fields are those that are directly bound to WordPress user profile- First Name, Last Name, Secondary Email, Bio, Nickname and Website. Submitting these fields will update the value in WordPress profile. Also, if user is logged in while visiting the form, in that case these fields are pre-populated with the data from user profile.
- Social Fields: Fields for accepting links to social media profiles such Facebook page, Instagram etc.
Fields
This section displays available fields in the form, rendered in different rows. You can make changes to the field by clicking on Edit on right side of the row. Similarly field can be truncated by clicking on Delete.
On the right hand side there is an icon (represented by three horizontal lines). This is the sorting handle; Click and grab it to reorder the fields. Also, there are corresponding check boxes that can be selected for batch operations such as duplicate and remove.
On the left form pages are visible. Clicking on New Page will add a new one in the form. This is a tabbed view and page’s name can be clicked on to switch to management of its related fields.
On the top of the fields there are two options:
Rename Page: Rename the current page. The page name is displayed on the top of the form on front-end as section title.
Delete Page: Delete current page along with the fields contained within. Be cautious, this action can not be reversed.
Primary Email Field
When you visit this page first time, you should see only an ‘Email’ field here. It is primary email field that can not be removed. The value submitted in this field is used to create user account, to send auto-responder email, for OTP login, batch email feature, and many other features.