Display WordPress Form Using HTML code
We already have the idea that a WordPress registration form page is published using a shortcode. Then why use HTML code to do the same thing? When you display WordPress form using HTML code rather than a shortcode, it enhances your options. With HTML codes, you can add or remove elements according to your necessity.
WordPress allows us to display WordPress form using HTML code. One can do this by taking a few steps on the WordPress dashboard itself. On the other hand, you can also download form creation plugins to help you add custom HTML codes to your WordPress form.
In this blog, we will discuss why and how should we display WordPress form using HTML code with the WordPress registration form plugin, RegistrationMagic.
With custom HTML codes, your form is guaranteed to attract more attention. Since it will have custom user data fields compared to the content of default WordPress forms. For example, by using HTML codes you can embed images to your form to make it more attractive. To sum up, your form will now draw more visitors who will be willing to fill up the form. Thus, you will earn more users to your site.
So, let’s start our tutorial, where we will learn to display WordPress form using HTML code.
Fetching the predefined HTML code
So, we will start by first installing the RegistrationMagic plugin. This plugin makes form creation really easy. It offers inbuilt custom form fields and shortcodes to publish forms on the frontend.
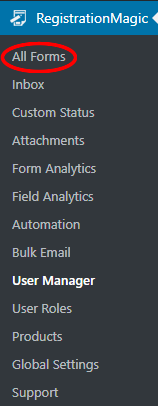
If you haven’t created a form already, then do it from the All Forms page from the plugin menu. In this example, we will work on an existing form that we created with RegistrationMagic.
The “All Forms” page consists of all the forms that you create through this plugin. Each form has its own dashboard to manage and create WordPress form design. To demonstrate, the form we select here is a General Purpose Registration Form. This form is located right next to the Login Form.
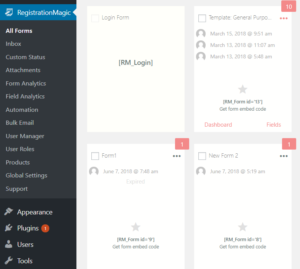
Hover your cursor across the form cover to find the “Dashboard” link. Click it to visit the dashboard of your form. This is the section where you can view the graph related to each form submission. It also displays “Field Manager” and allows modification of certain Specifications present in the form.
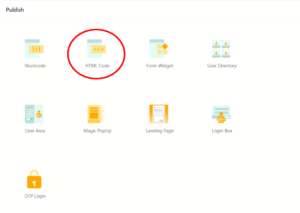
As a whole, you can use the Form Dashboard page to edit, configure, integrate and publish form content. Now, since we aim to display form page with HTML code, scroll down directly to the “Publish” section. Underlying is a sub-heading tagged “HTML Code”. Click on it to configure your WordPress form with an HTML code.
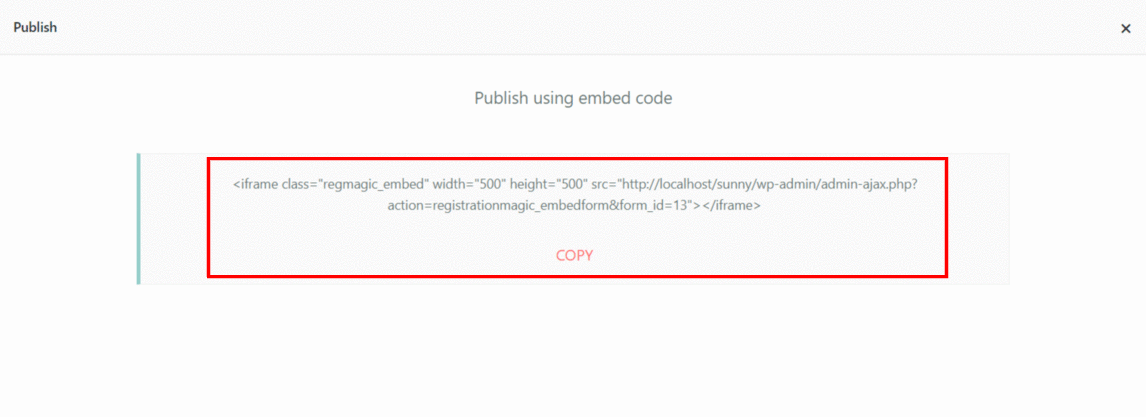
A pop-up appears with “Publish” as the heading. This pop-up will prompt you to publish your WordPress form page using the HTML code placed below. This code defines class attributes as well as particulars like the width and height of the form.
Click the “COPY” link underlying this code. This copies the complete HTML code used to generate the form.
Publish WordPress form using HTML code
Each HTML code found on a form dashboard is unique to that form. Now, navigate all the way back to Pages on your list of WordPress pages and click on Add New. This is the section from where you publish your form using the HTML code. Clicking on “Add New” creates a new page with the heading “Add New Page”.
Give a desired name to the page. In this example, we name the page as “Display Form”. From the body section of the page, click on “Text” placed to the right side beside “Visual”.

Paste the complete HTML code in this page. The Text part accepts HTML codes while the Visual part doesn’t. From the Visual section of the page, you can display WordPress form using shortcodes. HTML tags are generated only if they embed themselves under the “Text” section.
Now, click on “Publish” to display the form on your site. Your viewers can now access this form from the frontend of your site.
To see how this form appears, you can click on the “View Page” link to relish a view of your page. A roundabout way to this is clicking the permalink below your page name. Both the options are approved ones.
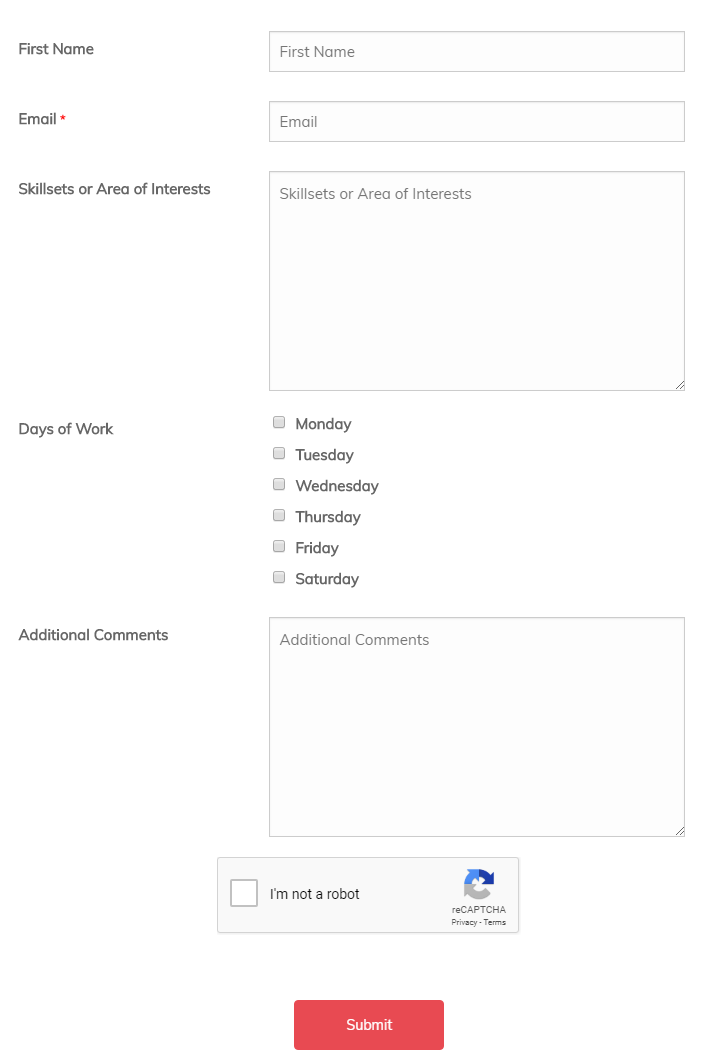
To sum up, this is how you display WordPress form using HTML code. Shared below is a screenshot of the form that I just published as “Display Page”.
Creating Efficient Forms
In the above form, you can see there are multiple fields and security measures to restrict spam users. RegistrationMagic allows users to add captcha to WordPress registration forms. Admins can also password protect their forms and assign user roles during form submission. This plugin offers the liberty to create dynamic registration forms to work for professional membership sites.
There is a wide range of form data fields to choose. One can even determine the appearance and content distribution through these fields. Since there are options to add spacing, paragraphs, dividers, etc. in the plugin form fields. Also, there is a unique feature to add conditions to fields in WordPress forms. So that, users can fill up form fields based on their inputs on previous fields. For example, suppose a user answers yes to a question “if he/she has a driving license?“. Then only, he/she is entitled to fill up the next field asking for the license number.
So, in all ways, RegistrationMagic helps users to build registration forms that offer more features than a default WordPress form. So, enable your site to conduct online business by offering premium content and paid memberships from it.
- Complete Automation Guide for WordPress Forms - July 20, 2024
- WordPress User Management Plugin Guide - July 18, 2024
- Add CAPTCHA in WordPress Login and Registration Form? - July 16, 2024
- How to Send Automated Welcome Emails in WordPress - July 15, 2024
- WordPress User Roles, Permissions & Role Editor [Complete Guide] - July 14, 2024
- How to Display Custom Success Message in WordPress Forms - July 12, 2024
- Publish Registration Forms and Display Registered Users - July 11, 2024
- How to Approve WordPress User Accounts Without Logging Into Dashboard - January 25, 2021
- How to Set up Two Factor Authentication in WordPress - April 4, 2019
- How to Edit or Replace Default WordPress Registration Form - April 2, 2019
Hi,
Will I be able to place conditional logic to the submit button of the form and do redirects based on the form data?
Hello,
Feature to redirect the user on the basis of field value is not available as of now. However, fixed redirection for a form submission can be configured by following the steps:
1. Go to Form Dashboard
2. Click on Post Submissions
3. Configure Page or URL in “Redirection”
4. Save when done.
Please let us know if you have any other questions.