A payment processing system enables you to accept payments from various payment processing platforms. You can set up a payment processing system on your WordPress website to accept and process payments.
Some of the vastly used WordPress payment processing platforms are Stripe, PayPal, WePay, and more. Another popular way of accepting payments on the website is through Offline Payments.
Offline Payments are transactions that can be processed without any data connection. Further, these transactions can also be recorded offline and can be processed later.
RegistrationMagic is a registration form builder that comes with various WordPress online payment integrations. These integrations include some of the best payment gateways for WordPress such as WordPress PayPal integration, Stripe integration, Authorize.Net integration, and more. It also allows you to accept and process payments through Offline Payments.
Using the RegistrationMagic Offline Payments, you can set up a WordPress payment processing system that allows you to accept offline payments on your registration forms, membership forms, WordPress payment forms, or any other type of forms.
Features of Offline Payments Extension
The Offline Payment Extension is vastly used by eCommerce websites, membership websites, subscription-based websites, marketplace websites, events websites, and more.
For example, if you have a membership website, you can set up a membership form with a payment processing system that will allow you to accept the payment offline when a user purchases the membership.
Further, your user can purchase the membership using the offline WordPress payment methods and the transaction will be processed later. Here are a few other features of this extension:
- RegistrationMagic Offline Payments extension allows you to collect payments offline.
- Users can complete the purchase process but pay later.
- Setting up this payment processing system is quick and easy.
- You can send an email including the offline payment details to the user who opts for Offline Payments.
- You can also include offline payment steps in your autoresponder message.
- The offline payment processing system simplifies the registration process for the users.
How to include an offline payment/payment processing system on your WordPress website?
To include the offline WordPress payment gateway system on your WordPress website you need to download and install RegistrationMagic Premium or Premium+. The Core version of RegistrationMagic does not have this extension.
You can download the plugin from this link or by simply clicking the button below:
Try RegistrationMagic Premium!
Once you have downloaded the plugin and installed it on your WordPress website, follow the below-given steps to know how to add an offline payment gateway to a website in WordPress:
Configuring WordPress Offline Payment
Step1: Go to your WordPress Dashboard and find RegistrationMagic on the left menu bar.
Step2: Hover your cursor on RegistrationMagic and click on ‘Global Settings’.

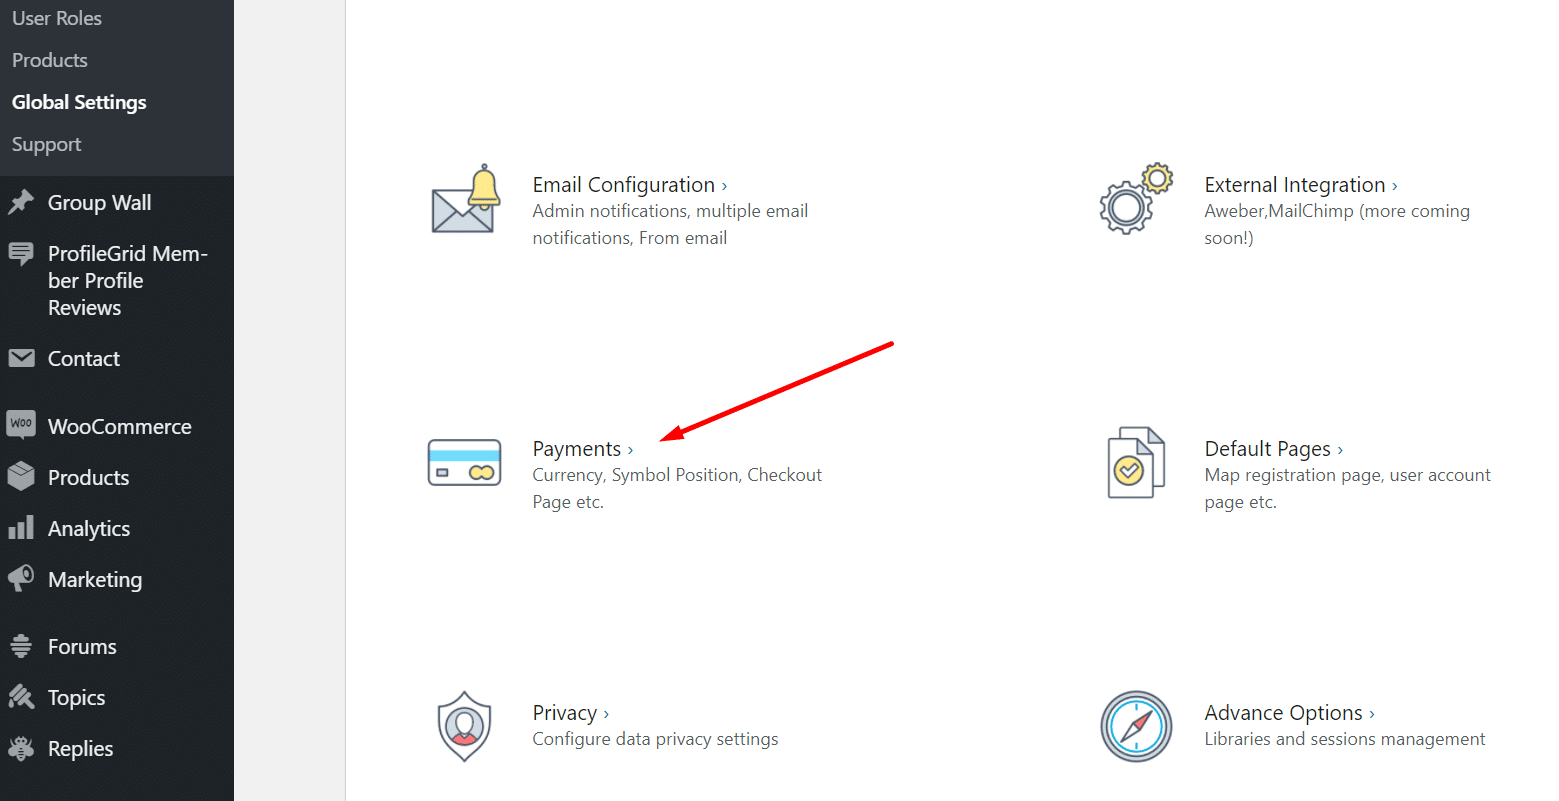
Step3: On the Global Settings page, scroll down and click on ‘Payments.’
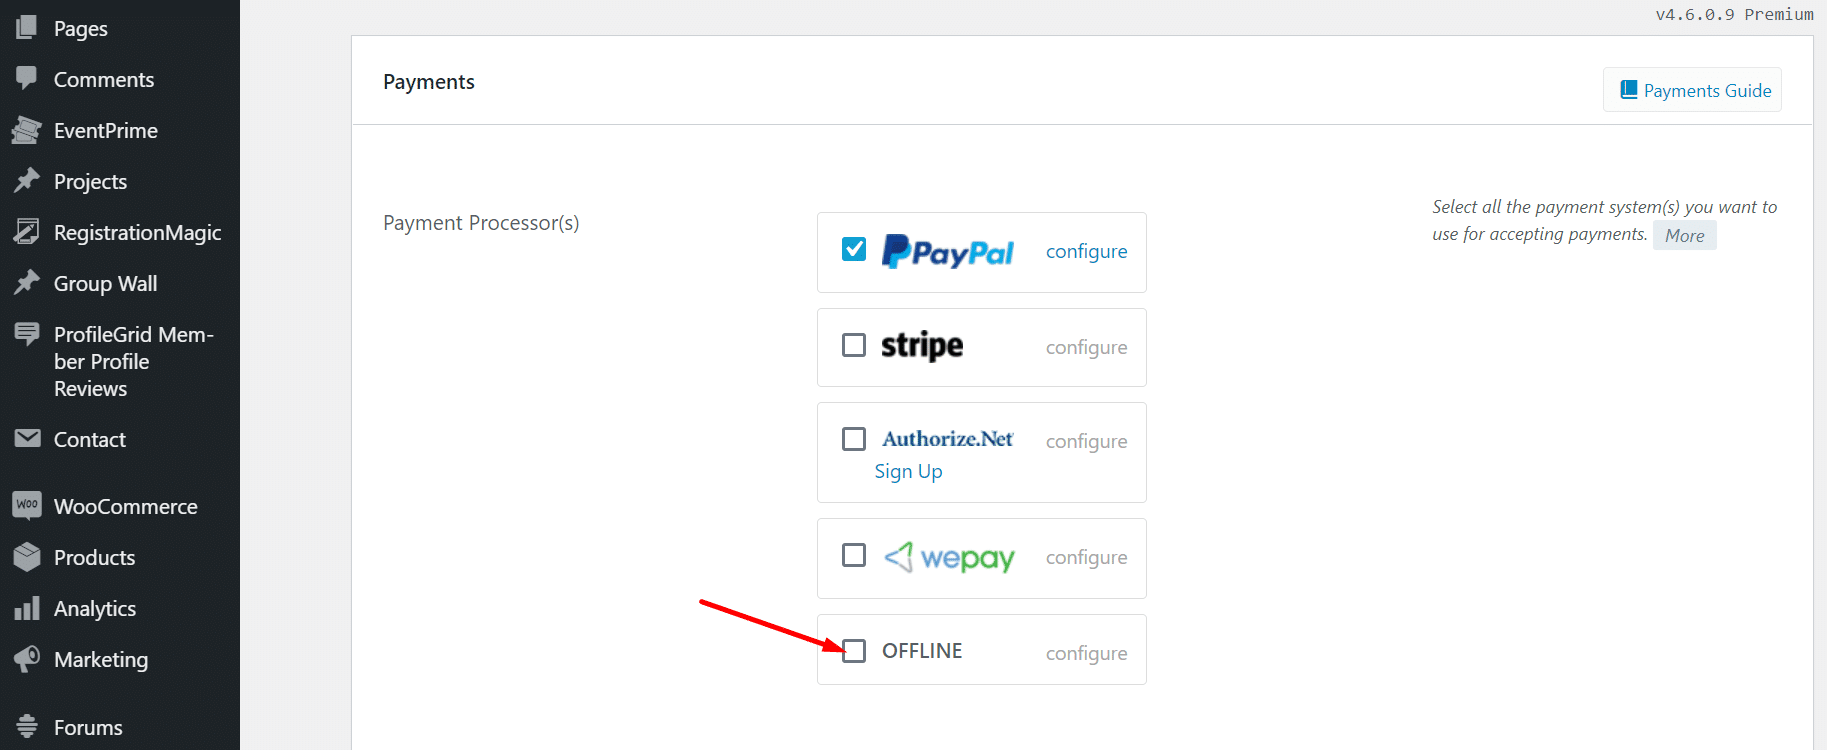
Step4: Here you will get multiple payment options, find and select Offline Payments.
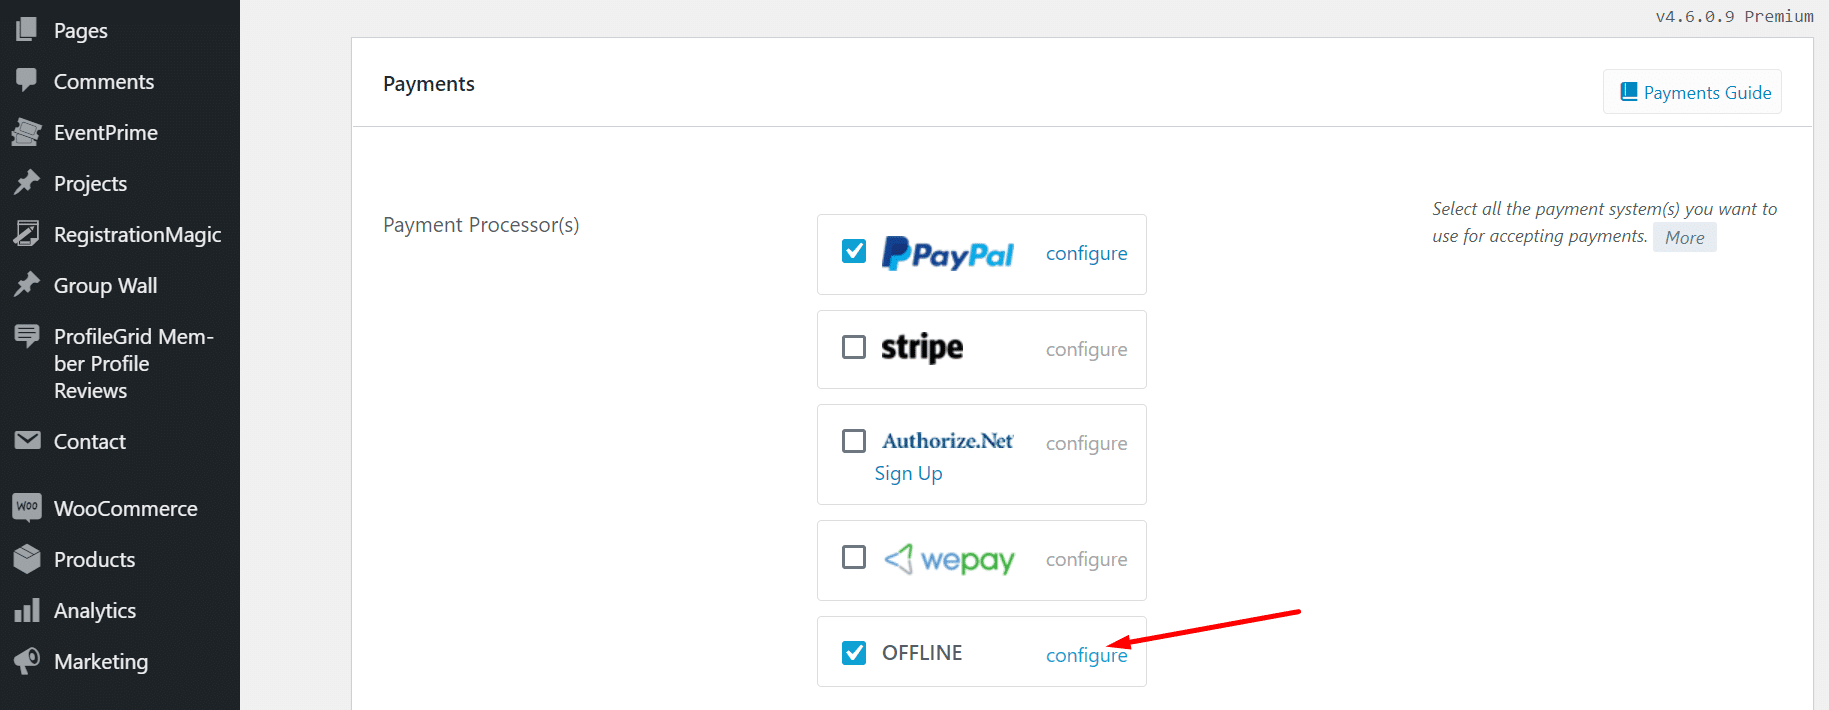
Step5: After you select ‘Offline’ the ‘configure’ option will be available. Click ‘configure.’
Step6: Here you can choose to send an email to the user who opts for Offline payments.
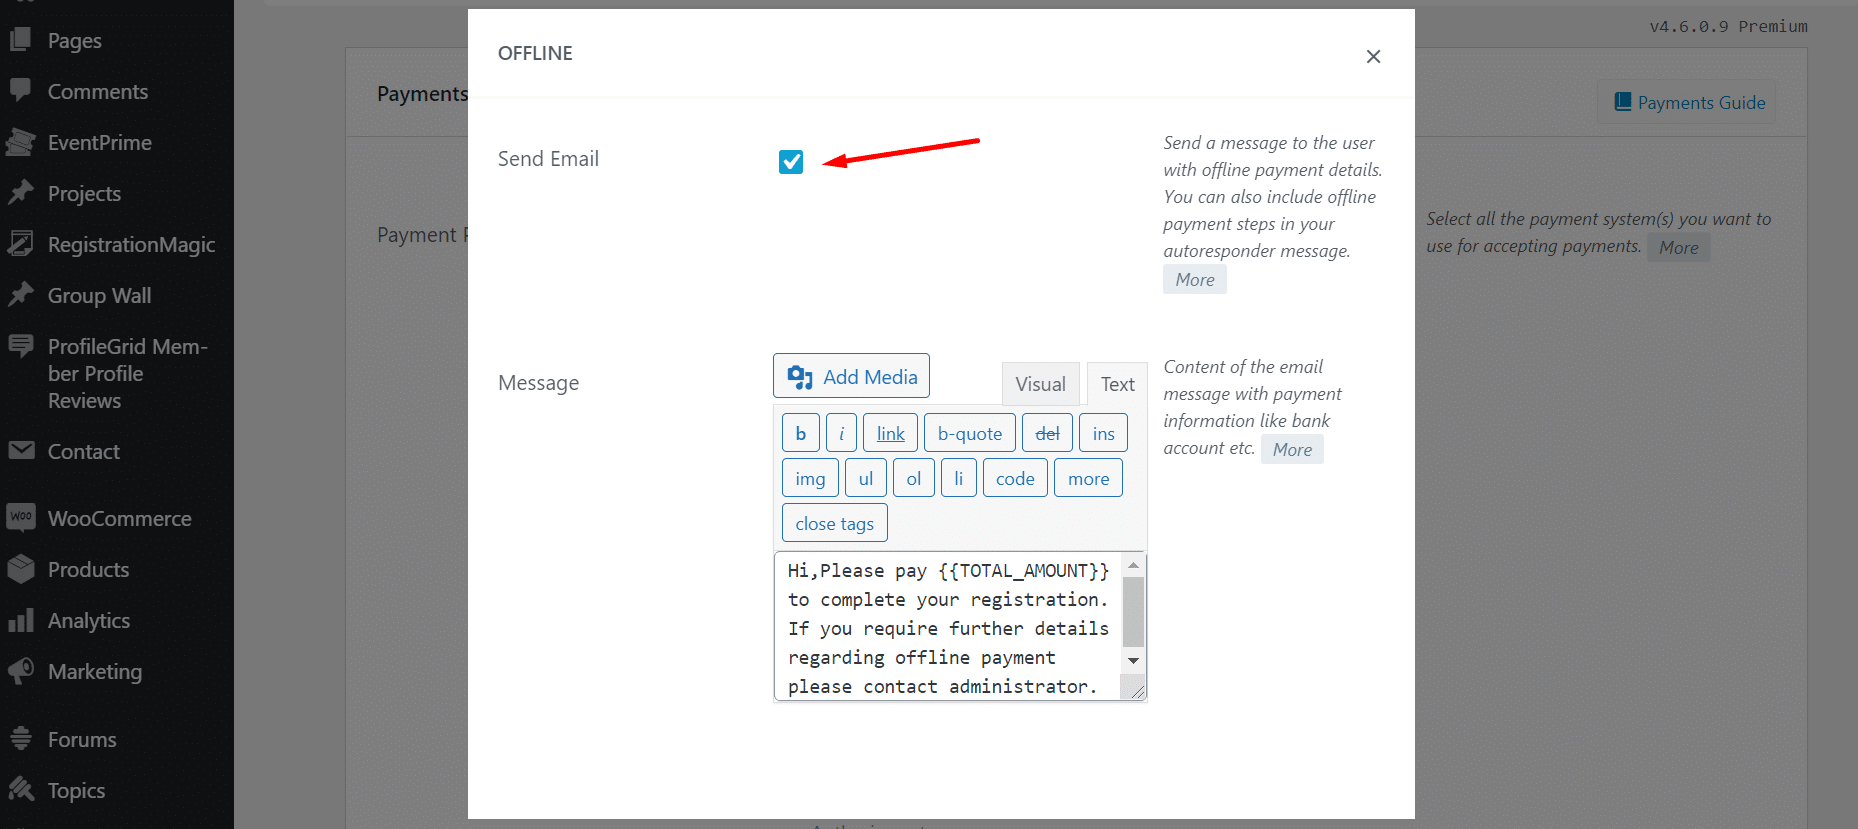
Step7: Next set the email template that you want to send to the user. The plugin comes with a default template that you can edit according to your requirements.
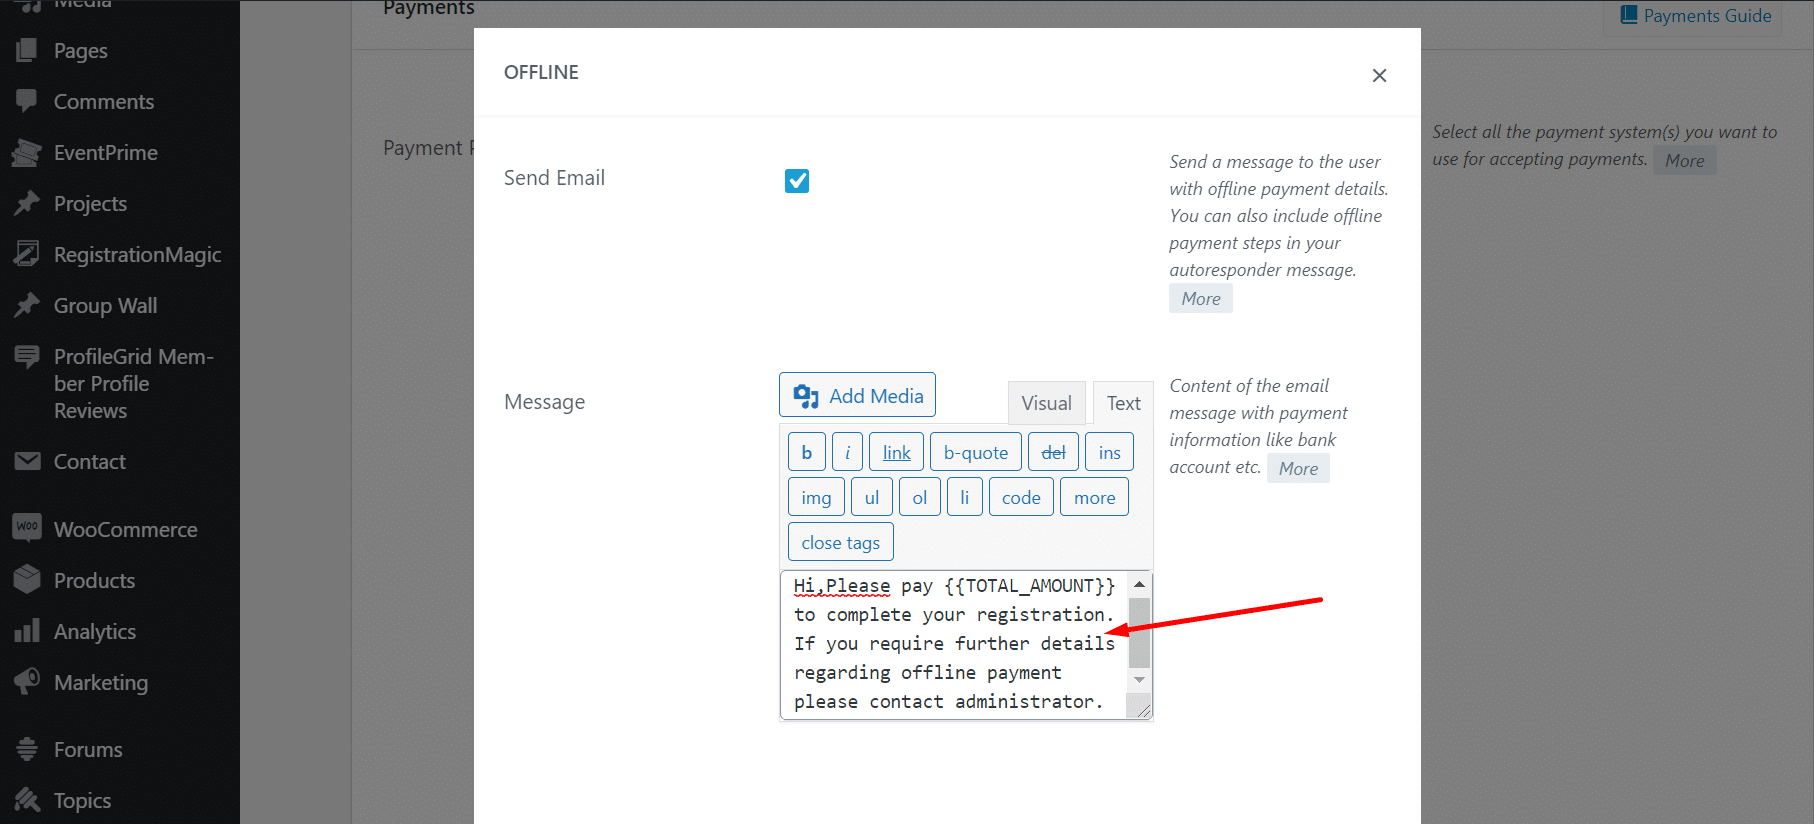
Step8: Once done, close the pop-up and save the setting.
Creating a Product
Step9: After you have successfully configured the offline WordPress payment options, next you need to create Products.
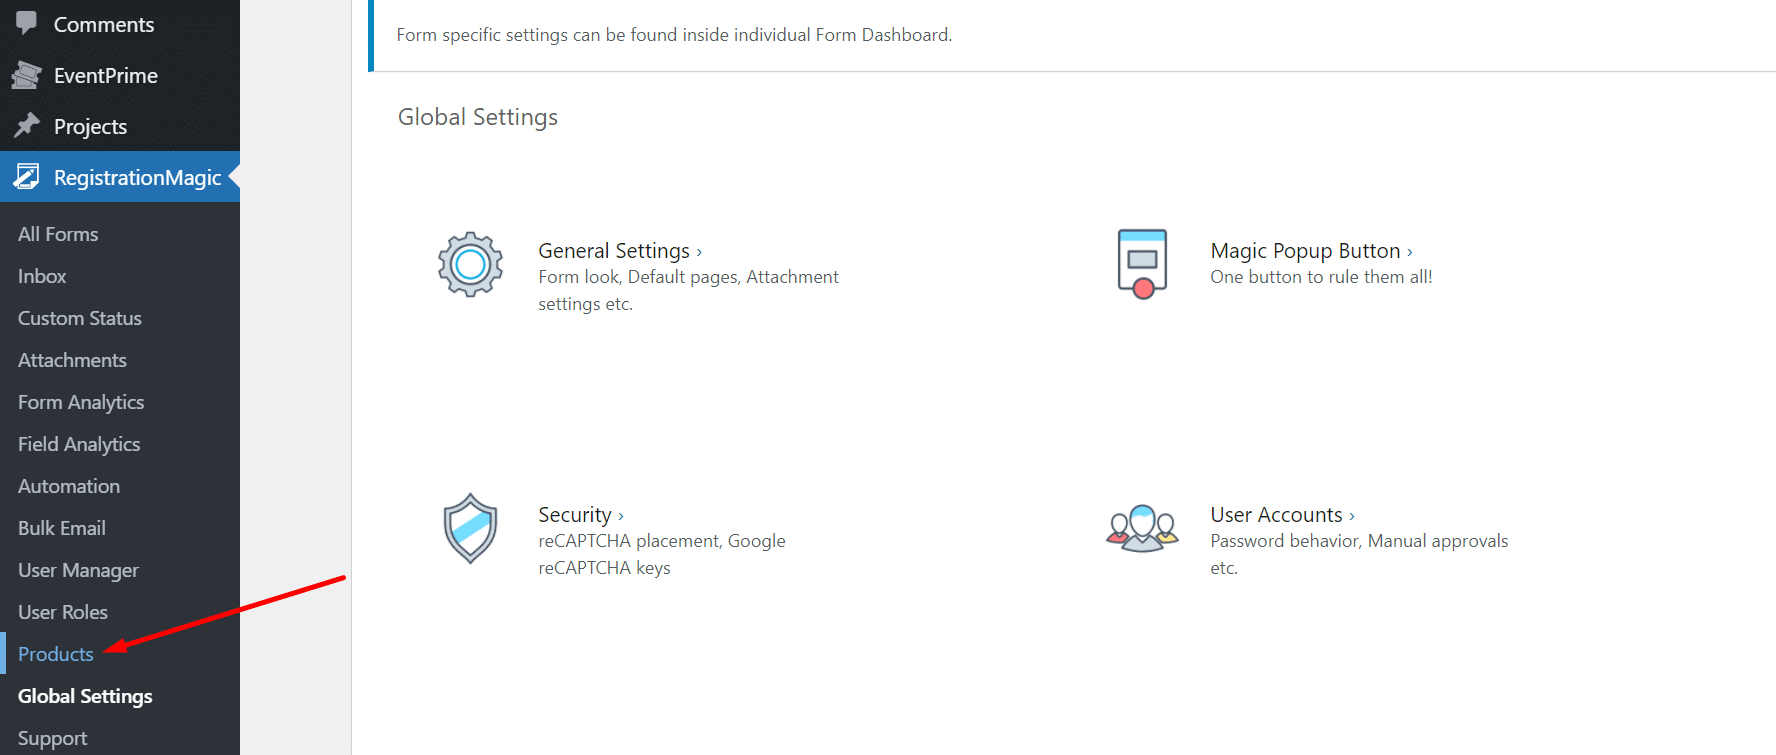
Step10: To create a product go to the RegistrationMagic Menu bar and click on ‘Products.’
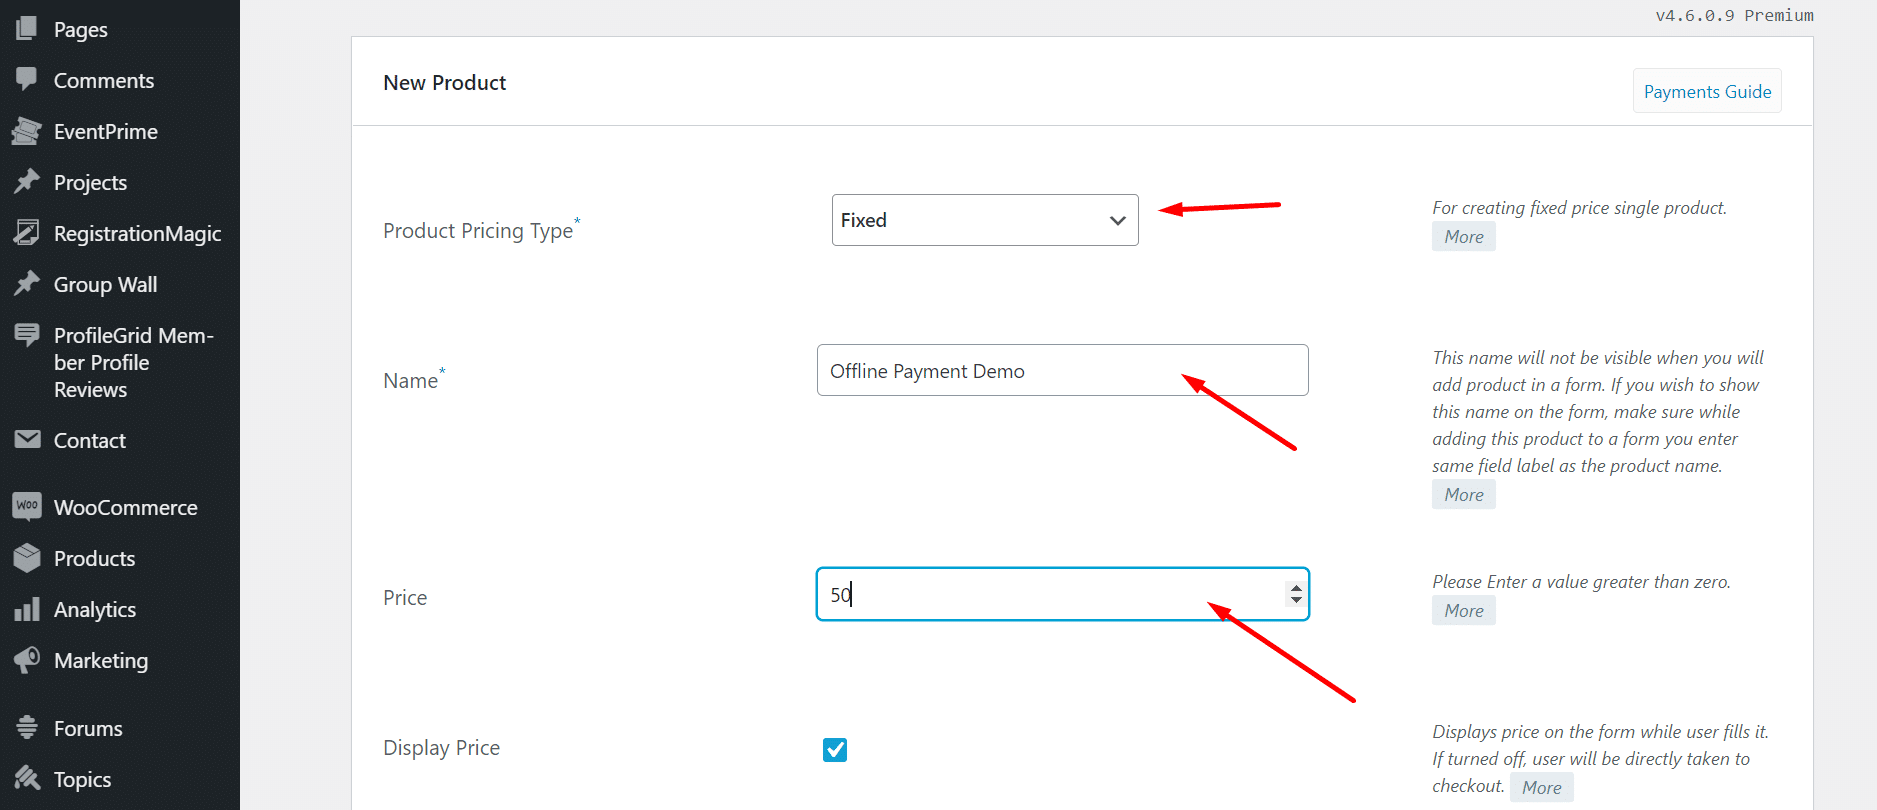
Step11: Further, click on ‘New Product’.

Step12: Now set the product pricing type, name, and price.
Step13: Next you can choose to display the price and ‘Allow Users to Specify Quantity.’ However, only select this option if you want to allow the user to make more than one purchase.
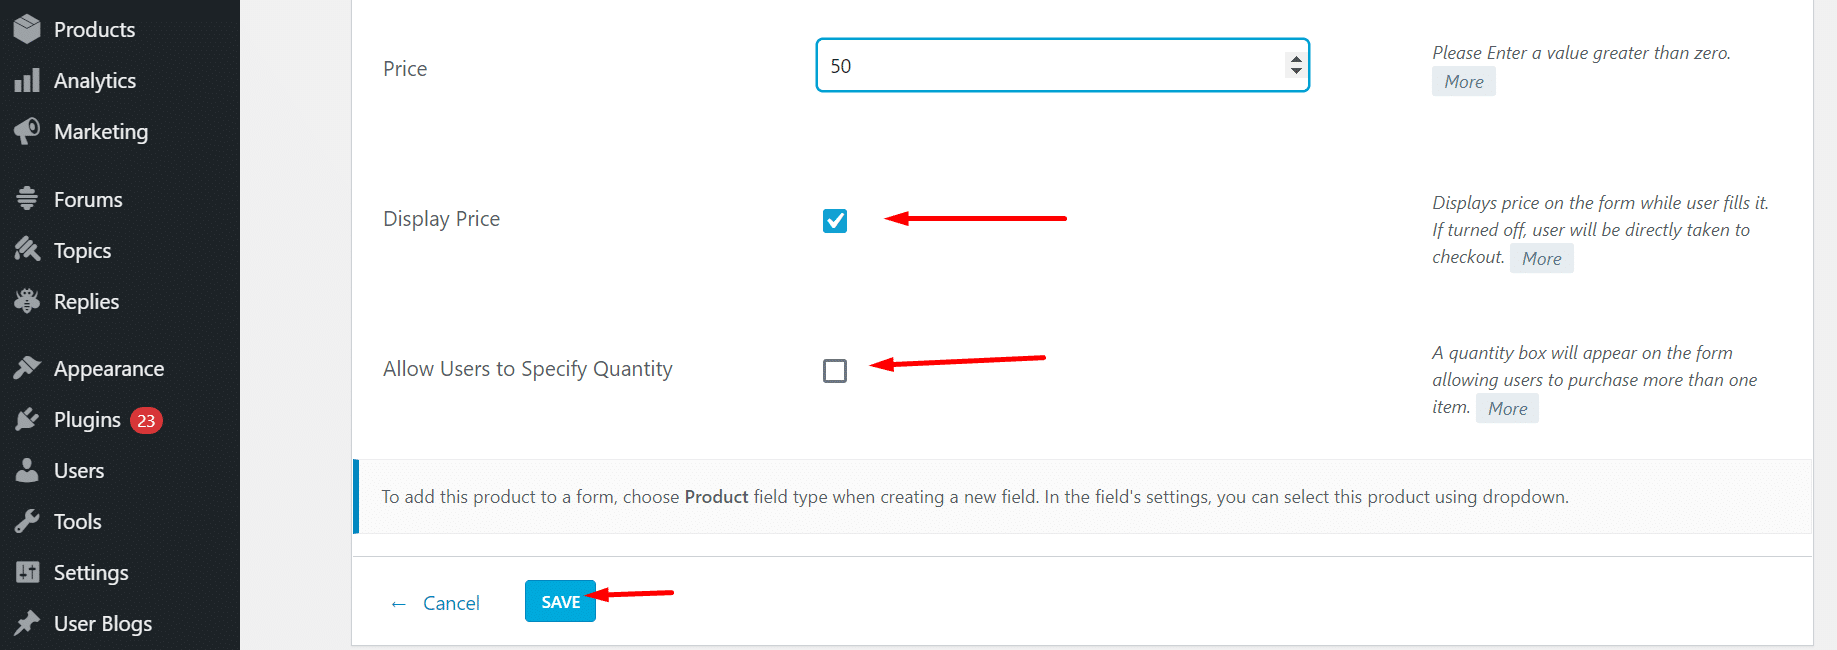
Step14: Save the setting and your product will be added to the product page.

Adding Offline Payment in WordPress Forms
Step15: Afterward, go to ‘All Forms’ to add the offline payment mode to a form.
Step16: Hover your cursor over the form to which you want to add offline payments.
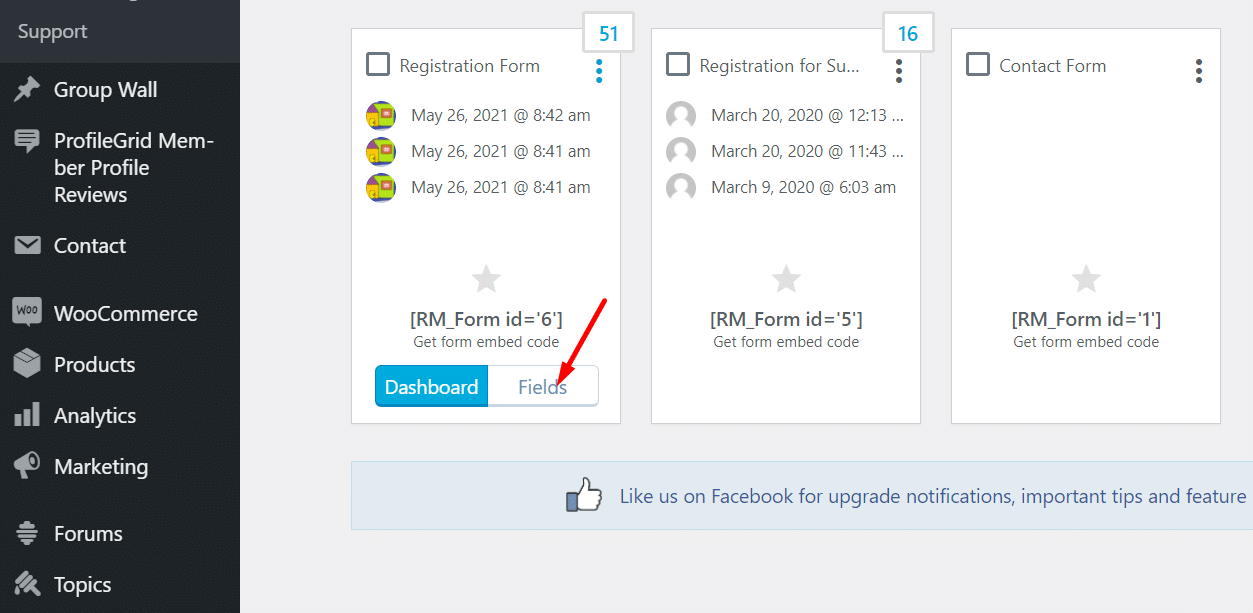
Step17: Click on ‘Fields’ and further it will take you to the ‘Fields Manager’ page.
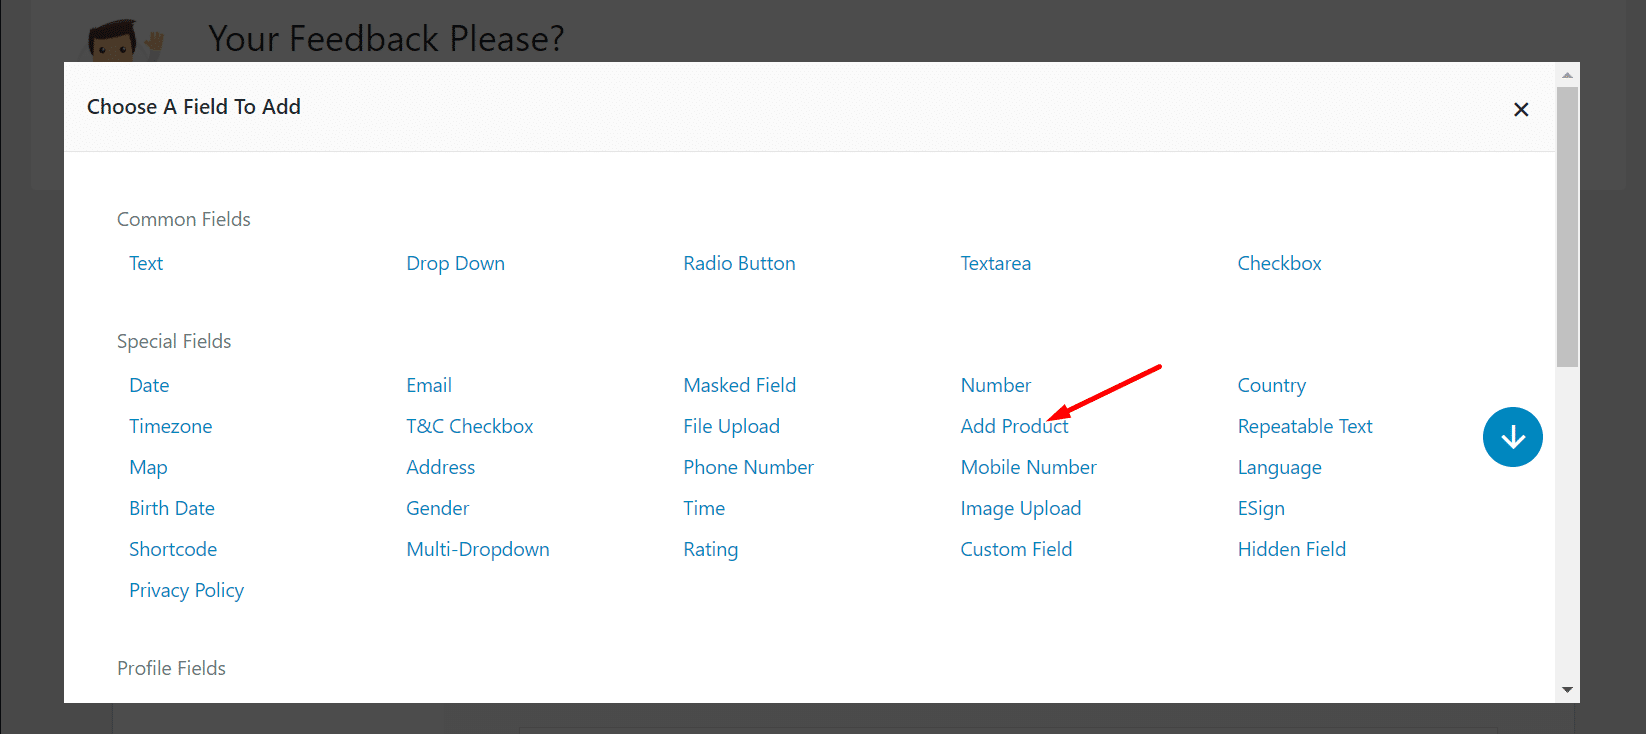
Step18: On the Fields Manager page click on ‘Add Field’ and select Products.
Step19: Now fill the ‘Label’ and ‘Hover Text’.

Step20: Next select the product from the ‘Select Product’ option.

Step21: Save the setting after configuring everything according to your requirement.

Step22: After adding the field to the form you can check the offline payment option on the frontend.
Frontend example of offline payment option for the users
Registration Form where we added an offline payment option:

The user needs to fill in the details and click next.
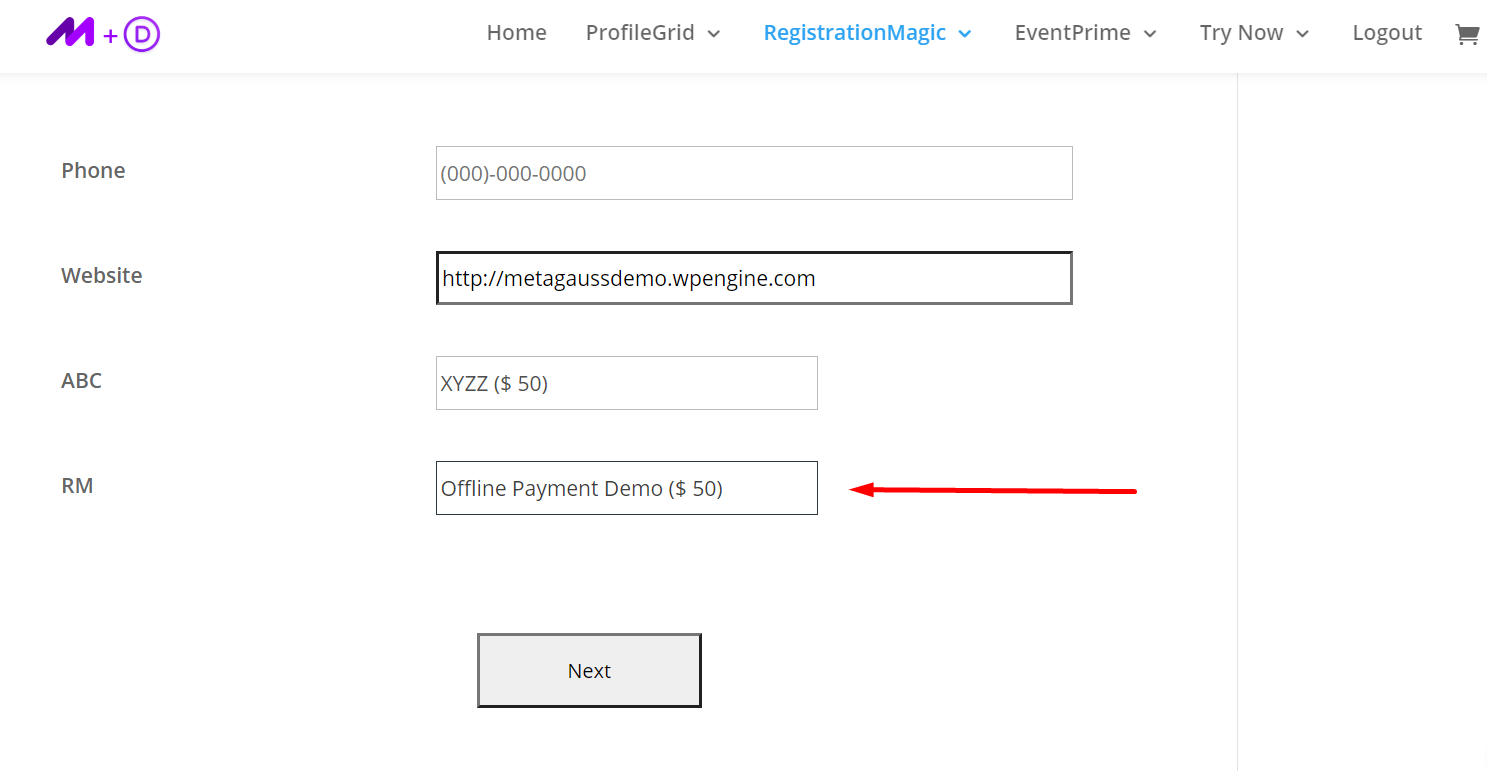
On the next page, the user can select the ‘Pay Offline’ option and complete the process.
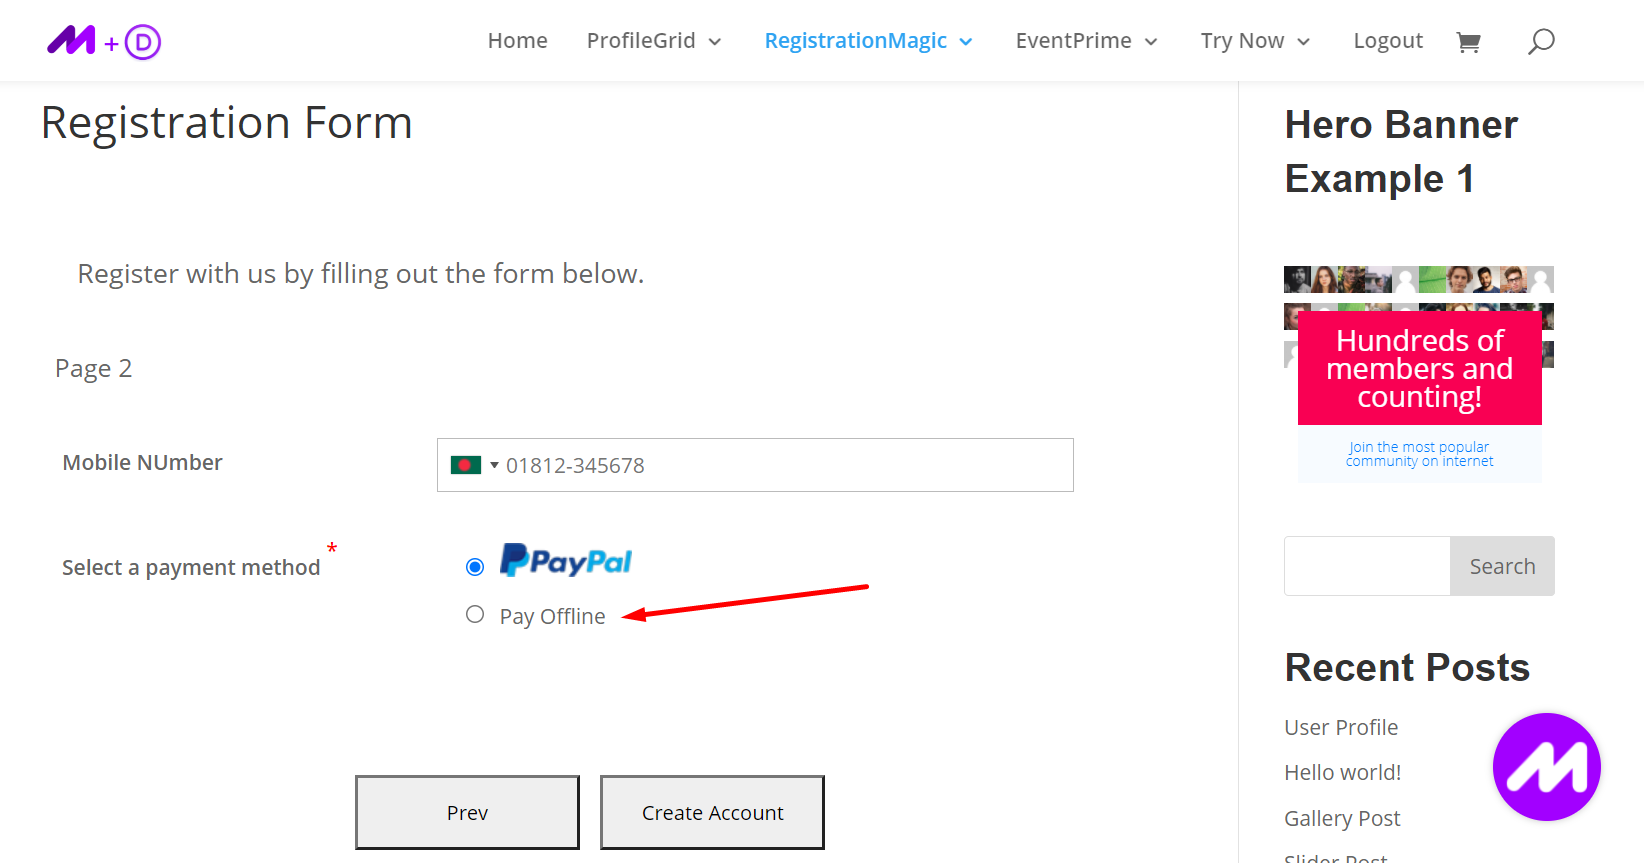
Once the user clicks on ‘Create Account’ an email is sent to the user including the offline payment details.
Ending Note
The RegistrationMagic Offline Payment Extension can be extremely useful especially for membership, community, and subscription-based websites.
Offline Payments are not an ideal WordPress payment gateway option but can be exceptionally helpful. It can help you increase the conversion rates. In addition to that, the extension is very easy to set up and use. Even WordPress beginners can use this feature of RegistrationMagic on their website. Moreover, it takes zero coding to use and set up RegistrationMagic.
Hopefully, this guide has assisted you to successfully set up the offline payment management system on your website. If you require any further assistance, feel free to reach out to us by commenting below.
- How to Manage User Registration Status in WordPress - August 8, 2023
- Send Emails to Registered Users in WordPress with Ease - August 6, 2023
- How to Create a User Registration Form on WordPress - September 22, 2022
- Registration Based WordPress Contact Form Plugins - September 15, 2022
- Create a Job Application Form on WordPress Website- In Depth Guide - September 14, 2022
- How to create an efficient Marriage Registration Form in WordPress - November 26, 2021
- How to make a flexible vendor registration form for your business - November 24, 2021
- Creating a Smart Membership Form for Your WordPress Website - November 22, 2021
- How to create a digital Preschool Registration Form - November 18, 2021
- How to make a creative Dance Registration Form with RegistrationMagic - November 16, 2021
