Adding date picker field of WordPress form
A date field picker is one of the many special fields allowing users to choose a date from the graphical calendar. Users also have the option to enter the date manually. With RegistrationMagic plugin, its easy to configure the date picker field of WordPress form. Let’s discuss the configuration process in tutorial below.
Step by Step Tutorial
From your WordPress dashboard go to the “All Forms” section in RegistrationMagic. Hover on any of the forms and click on the “Fields” hyperlink which is also termed as the “Field Manager”.
This will take you to a new page with pre-created fields. Click on “Add Field” from the operations box. The fields are classified as common, special, profile and social fields. Click on the first option labelled “Date” field under “Special Fields”.
You will navigate to a page where you can customize the date field picker of WordPress form. The Field Type option remains as Date which cannot be modified.
Customizing and Configuring the Date field picker
Assign “Label” as Date which will create a modifiable field stacked in the Field Manager queue. The next option is Placeholder text, which is also visible on the front-end. Clicking on the field will remove the text so that you can add your custom date. This value will appear inside the front-end input box before the user starts inserting the value.
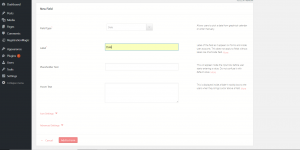
The next option is the “Hover Text” area. This is the text that pops up whenever user hovers the cursor across the field. Scroll down to Icon Settings; this setting will set up an Icon inside the front-end text area, on left side.
Icon Colour and Icon Container options setup the icon colour and background colour of the iron container respectively. Container capacity modifies the capacity of the icon’s container. Container shape defines the shape of the container. The container shape can be square, sticker or round according to your requirement.
Move along the page and click on advanced settings.
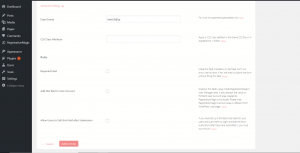
Advanced Settings
The first field will let you assign the format in which the date will be displayed on your form. The basic format is MM/DD/YY. In case you are looking for other formats click the “click here” hyperlink to the right side of the field. The next option is to apply a CSS class. Note that this CSS class must be defined in the coded HTML file.
By checking the box beside “Required Field”, you can setup the field as mandatory. Lastly, “Add this field to User Account” adds the data field to the field manager.
Displaying date picker field of WordPress form
Go back to RM form front-end. You will notice that the date field picker is now added to your WordPress form.
- Complete Automation Guide for WordPress Forms - July 20, 2024
- WordPress User Management Plugin Guide - July 18, 2024
- Add CAPTCHA in WordPress Login and Registration Form? - July 16, 2024
- How to Send Automated Welcome Emails in WordPress - July 15, 2024
- WordPress User Roles, Permissions & Role Editor [Complete Guide] - July 14, 2024
- How to Display Custom Success Message in WordPress Forms - July 12, 2024
- Publish Registration Forms and Display Registered Users - July 11, 2024
- How to Approve WordPress User Accounts Without Logging Into Dashboard - January 25, 2021
- How to Set up Two Factor Authentication in WordPress - April 4, 2019
- How to Edit or Replace Default WordPress Registration Form - April 2, 2019
The date picker is not properly displayed, there is just a blank input that cannot be written and not calendar at all
Kindly reach out to us through our support portal: https://metagauss.com/help-and-support/ and also share the screenshots of the same, in order to allow us provide you a speedy resolution.
OK< but how do you turn OF the datepicker and allow simple typing input instead?
To achieve this, go to fields section > select ‘custom field’ > in ‘validation’ drop down choose custom validation > enter your regex in the text box > add to form.